Beginning to bake #3: Scones for tea

Baked scones

Scones are easy to make at home, but so hard to buy. If you’ve never had a homemade scone, the chances are you’ve never had a good one.

Scones also keep very badly. Even the next day they become dry and crumbly. So the solution is to bake them the day you want to eat them, and if necessary, freeze any leftovers that day. They are the sort of thing the fifties domestic goddess would start to make because someone had dropped around unexpectedly – quick, and best eaten fresh from the oven.

Why are scones next on the ‘how to bake’ list? Like pancakes and muffins, the ingredients for scones are pretty simple, and rely principally on baking powder to make them rise. You just need flour, butter, milk, baking powder and maybe a little sugar to to put them together. Some add eggs to the recipe, but I’m sceptical – that seems to make a much cakier thing, and not a proper cream-and-jam scone.

The differences are that you use cold butter, and you rub the butter into the flour, creating crumbs. ‘Rubbing in’ the butter is something you also do with shortcrust pastry. It involves cutting the cold butter up into pieces about the size of peas. Then you use your fingertips to rub the lumps of butter into the flour. This distributes the butter through the flour, coating some of the flour with fat, and waterproofing it to restrict the development of the gluten when the milk is added. You want soft and tender scones – too much gluten would make them tough and chewy.

For the same reason, you want to play with the scone dough as little as possible – don’t knead it or smush it around. Use a spoon to mix the dough together, then your hands very briefly to make sure all the floury bits are incorporated. You need to make sure it forms a single lump of dough, but no more than that.

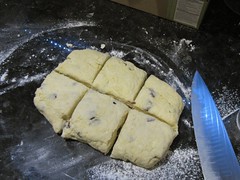
To make the scones, you can flatten the dough with a rolling pin or just use your hands. It just needs to be patted out to about 2cm high. The thicker the dough at this point, the taller your final scones will be.

You can use a cutter or a glass for round scones. For minimum waste, just cut the dough into wedges or squares with a sharp knife.

Glazing the scones is optional, but it will give you a beautiful shiny golden top. The ideal is a beaten egg, or a yolk beaten with a little egg or cream. Some milk or cream on it’s own will also do, but won’t be as golden. Try not to drip glaze down the sides – it can limit the rising in the oven.

Equipment:

  • Bowl
  • Spoon
  • Knife
  • Pastry brush
  • A solid baking sheet. That means thick sheets of metal, probably aluminium. Can be non-stick, anodised or plain. You need it thick and heavy so it won’t warp and twist in a hot oven.
  • A round cutter (optional: the end of a water glass will also work, or use a knife to cut squares.

Basic recipe:

Adapted from Nigella Lawson’s ‘How to be a domestic goddess’:

  • 250g plain flour
  • 1/2 tsp salt
  • 3 tsp baking powder
  • 70g cold butter
  • 2 tbsp / 30g caster sugar
  • 130ml milk (full fat if you can)
  • 50g sultanas or raisins for fruit scones
  • 1 egg plus 1 tbsp milk for the glaze

Method:

Put the flour, salt and baking powder in a bowl and mix togther with a whisk.Slice or cube the cold butter and put it into the flour.

Flour and butter

Use a butter knife to slice through the butter, reducing it to small pieces in the flour.

Once you’ve sliced it up as much as you can, use your fingers to rub the butter and flour together. The movement you want is something like the ‘money, money, money’ gesture – rubbing your thumb along the fingers of the same hand and back again. The trick is to get the bits of butter and flour in there so that as you rub your fingers together, the butter and flour get pushed together. Using your fingertips keeps everything from warming up too much – your fingertips are cooler than your palms.

Butter rubbed into crumbs

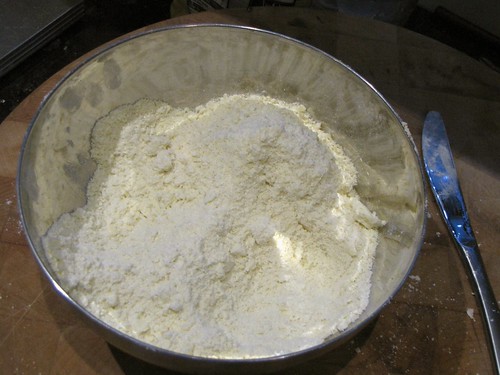
Once the butter has almost disappeared, and the mixture looks sandy without any big lumps, add the sugar, and raisins or sultanas if you want to use them.

Add the milk and stir everything with a spoon or a knife to make a dough.

Mixing into dough

Once it’s almost all mixed, use your hands to push and squash it until there are no more floury parts and the whole thing comes together in a single ball, leaving the bowl virtually clean.

Ball of dough

Take a small handful of flour and scatter it over a counter. Tip out the ball, and if there are any big fissure or cracks, push them together. Push the ball out to flatten it to a roughly rectangular piece about 2cm thick. Use a cutter to cut round scones, or a knife to cut into 6 square ones.

Cutting scones

Cut scones

Put the scones carefully on a baking sheet.

Scones on the tray

Beat the egg with a little milk (or just use milk on its own) and use a pastry brush to glaze just the top of the scones. This will make sure they get a golden colour in the oven.
Bake for 10-15 minutes at 200C until risen and brown on the top.
Cool on a rack and eat as soon as possible (or freeze).

Baked scones

Variations:

The Guardian: as part of a series, Felicity Cloake investigates the recipe for the perfect scone

Baker Paul Hollywood was featured on BBC2’s the Great British Bake-off. He says his scone recipe is perfect.

Delia has a step-by-step on how to make scones on her website.

Beginning to bake #2: Raspberry muffins

This is the second in my series of Lent posts on simple baking. After pancakes we move on to muffins, and the first item that is actually baked.

The word muffins is used for all sorts of things, including split and toasted English muffins, made with yeast, and those cakey things sold in plastic wrappers with a spookily long shelf life. We’re not talking about either of those here. What we’re aiming for is a not-too-sweet bun, with some pieces of nuts or fruit adding texture, that’s moist and quite good with breakfast or a cup of tea. The classic would be a blueberry muffin, the firm berries providing little pockets of purple juice, but in this case, I’m doing raspberries, because that’s what I had in the freezer. And I like raspberries better.

The logic for moving from pancakes to muffins is that the mixture is made in a similar way: you mix dry ingredients, including flour and baking powder, and add wet ingredients, including milk and egg, and mix together very briefly. This is a thicker mix, so it is baked in a muffin tin in the oven instead of being cooked in a pan.

My preferred recipe for muffins uses mashed bananas as part of the wet ingredients. I think this gives a great flavour, and it helps to use up the over ripe bananas that I always seem to have. However, I’m trying to make these recipes as straightforward as possible, and you don’t always have bananas just lying around. So this is a plain version. But if you find yourself with bananas on the turn, I urge you to try one of the recipes in the Variations section below.

This version can be used with other berries instead – blueberries would work very well (it’s originally adapted from Nigella Lawson’s blueberry muffin recipe). Frozen berries can be easier to work with, as they don’t smush when you stir them in. Or you can use other fruit, chopped nuts, citrus zest or chocolate chips as the flavouring instead. As these muffins are quite plain, it’s also nice to add something crunchy to the top – crunchy sugar, and chopped nuts or flaked almonds are good. But all these things are optional and flexible. Start with something straightforward and go from there.

Equipment:

In addition to scales and measuring cups:

  • Bowl
  • Wooden spoon / silicone spatula
  • Jug or small bowl for wet ingredients
  • Muffin tin (can be pretty cheap, doesn’t need to be non stick if you’re using cases)
  • Muffin paper cases
  • Spring-loaded ice cream scoop (entirely optional, but really good for dividing muffin batter into cases. If you get addicted to muffins, get one).

Basic recipe:

Wet ingredients:

  • 100ml/g milk (as before, milliliters and grams are the same thing for milk and water)
  • 100g yoghurt
  • 1 large egg
  • 75ml vegetable oil (near enough 75g)

Dry ingredients:

  • 200g plain flour
  • 1 teaspoon baking powder
  • 1/2 teaspoon bicarbonate of soda (baking soda)
  • pinch of salt
  • 75g caster sugar

Flavourings:

  • 200g raspberries – fresh or frozen

Topping (optional):

  • flaked almonds
  • demerara sugar – a couple of tablespoons of each

Method:

Preheat the oven to 200C / 180C if it’s a fan oven.

Measure the dry ingredients into a large bowl. Use a whisk to combine them, and make sure the baking powder and bicarbonate are distributed through the flour.

Measure the wet ingredients into a large jug or a small bowl. Use a whisk or a fork to break up the egg and combine it all together.

Pour the wet ingredients into the dry. Mix the two together gently. Once they are most of the way combined, but still with dry patches, add the raspberries. Frozen berries are easier to mix in, but fresh are good too.

Divide the mixture between the muffin cases. Sprinkle a few flaked almonds and half a teaspoon of sugar onto each muffin. Bake for 20 minutes at 180C.

Once they are golden brown on top, and they spring back if you press the top gently with your finger. Leave the muffins to cool for five minutes in the tin, then lift them out using the cases and set to cool on a wire rack (a grill pan will also work).

Muffins are best eaten on the same day, or the day after. If you want to keep them longer, the best thing to do is put them in a plastic box or a ziplock bag and freeze soon after baking.

Variations:

Banana muffin variations: Cherry and almondCoffee ginger walnut

Dan Lepard has a recipe for mocha fig muffins that are both dairy and egg free.

Marmalade makes a good muffin – it adds moisture from the pectin in the marmalade.

Beginning to bake #1: the pancake plan

As I explained in my previous post, the challenge I have set myself is to set out a series of steps to help someone to learn to bake. The idea is to build each step on a platform of existing knowledge.

Thinking through possible starting points, I’ve decided to assume only the skills needed to fry things. If you can make a basic stir fry, or cook up some bacon and eggs then you should be able to make pancakes.

Although cooked on top of the stove, and therefore not strictly baking, pancakes have many things in common with baked goods. They are made of flour, eggs and milk, and in the case of these puffy Scotch pancakes, leavened with baking powder.

Cooking them on a pan also allows you to easily tell when they are cooked, one of the harder things for novice bakers.

A word about equipment: I am going to try and keep equipment needs to a minimum, and to increase what is needed by only one or two pieces each time. However, there are a couple of things that I think are essential for baking of any sort. One is a set of digital scales – I really wouldn’t want to ever bake without them, although American cooks seem to have avoided them for decades. Because you can zero them out with a bowl on there, you can often measure everything into one bowl. You can also more or less get away without a measuring jug for liquids, because they can be weighed too (remember that 100ml of water weighs 100g, and that goes for milk too). So, get a good set of digital scales, with a flat top and a zero button – they should be about £20. You will also need measuring spoons – at least 1 tablespoon, 1 teaspoon and a half teaspoon. Don’t use cutlery – it’s very unlikely to give you the same measure.

Apart from those two baking essentials, for these pancakes, you will also need a frying pan, a bowl or large jug, a whisk and a large spoon or a ladle (to pour the batter into the pan).

Basic recipe:

  • 120 grams plain flour
  • 2 teaspoons (tsp) baking powder
  • Pinch of salt
  • 150 millileters / grams milk
  • 1 large egg
  • 1 teaspoon sugar

This is a fairly simple ingredients list, so you may find you have everything on hand anyway.

If your baking powder has been untouched for years, it’s probably worth getting a new pot. Baking powder is just a mixture of a powdered acid and a powdered alkali. When you add liquid, the two react, producing bubbles of carbon dioxide that make baked goods light and fluffy. Modern baking powders are often ‘double-acting’, releasing gas when the liquid is added, and then again when heat is applied in the oven.

If it’s old, it can lose it’s potency.

Method:

Measure the flour, baking powder and salt into a bowl.

Add the sugar. Use a whisk to combine them together, making sure the baking powder is evenly distributed in the flour. If you have a sieve, you can put that on top of the bowl before you zero the scales and sieve them all together, but the whisk does a pretty good job. Watch out for lumps in the baking powder – those are harder to remove with a whisk.

Add the milk and the egg to the centre of the bowl, and use the whisk to combine everything together.

You need to mix the liquid and flour completely, but you don’t need to beat it hard and remove all the lumps. Whenever you add water to flour, you will start to develop gluten, the stretchy protein thy gives bread it’s texture. If you beat this batter hard, you will develop the gluten more, and the pancakes may end up chewy.

Heat a frying pan over a medium heat.  Non-stick pans are very helpful, I used a cast iron pan, but use whatever you have. Add a little butter, allow it to melt, and then wipe the pan with a paper towel to coat the pan with fat, and remove the excess.

Use the spoon or ladle to add about a tablespoon of batter to the hot pan. Spread it a little to form a circle, then leave it to cook.

You’ll know it’s ready to turn over when you have little bubbles over the surface, and the top of the pancake has almost all set, with virtually no liquid left. Turn over with a spatula, and cook the other side for a few minutes. You’ll know you have the heat right if the pancake is a perfect shade of golden brown when the top is set. If it looks too pale or too dark, adjust the heat.

Continue cooking the pancake like this, on batches. Get as many as you can in the pan, without them flowing into each other. If they do touch, use the spatula once they are set to separate them, then continue.

Keep the cooked pancakes warm on a plate or baking tray in a low oven (about 120C), covered with a tea towel.

Serve hot with maple syrup and crispy bacon. Or make then for afternoon tea, and serve with jam.

You can also freeze the pancakes after they have cooled. Interleaved them with greaseproof paper or baking parchment if you want to remove them individually, and freeze in a sealed box or freezer bag. Reheat frozen pancakes a few at a time in the toaster, or wrap a larger stack in foil and warm in the oven.

Variations:

We Should Cocoa: Chocolate, ginger and cardamom tea loaf

As a fan of Katie’s chocolates at Matcha Chocolat, and especially her masala chai caramels, I knew I should enter this month’s We Should Cocoa, the monthly chocolate challenge co-ordinated by Choclette. This month’s challenge was tea with chocolate, a great combination. Unfortunately, I was on holiday for most of this month (I was in Mexico – so not *that* unfortunate), so I needed something I could do at short notice to get in before the deadline.

I would have loved to spend some time on different tea infusions for this, but with limited time, and the need to do this after work, I needed something more straightforward. This tea loaf is a recipe I had bookmarked some time back when going through Paul A Young’s stunning book ‘Adventures with Chocolate‘. It sounded like a potentially overwhelming set of flavours, but also one that really appealed. The recipe calls for a huge amount of crystallised ginger, no fat and lots of ground cardamom. The tea is there to moisten the loaf, and also provide a malted, caramel background to these other flavours.

[Update: Choclette also made this recipe as part of the challenge – read about hers here.]

The recipe is unusual for a cake, as it includes just the tea-soaked fruit, sugar, eggs and flour – no butter or oil is used. However, this is the traditional tea loaf recipe. Tea loaves are an old traditional recipe, and can be called Tea Brack in Ireland, and similar to the Welsh Bara Brith. Irish Tea Brack recipes date from the 1800s, and would seem to be somewhat similar to soda bread, with the leavening from baking powder.

I made very few changes to the original recipe, even though the amount of ginger – 250g – seemed potentially overwhelming. Given the strong flavours, I wanted to try the recipe on its own terms before making changes. I baked this in two small loaf tins rather than one large one, so I could freeze one. I also swapped wholemeal self-raising for white self-raising, as that’s what I had in the cupboard, and I thought it would fit well with the rustic idea of a tea loaf. As this calls for Assam tea, which is a major component of English Breakfast blends, you could probably substitute with your everyday teabag. I used loose leaf Assam to make sure I got the strong and malted flavours Paul described.

I used two different brands of crystallised ginger, because I already had a packet open, and needed to get more to make up the large amount. Both come in large chunks, and I decided to slice the chunks into fairly thin pieces, so that the final cake wouldn’t be overwhelming with chewy lumps of ginger. The softer of the two was Humdinger Traditional Stem Ginger, that came with large sugar crystals on. The Waitrose Cooks Ingredients ginger comes in a cute plastic jar, and is firmer and drier, and cut into more even cubes. That made it easier to slice into pieces, so might be worth bearing in mind if you need to chop ginger finely for another recipe.

The smell of the ginger and raisins soaking was incredibly aromatic, with both the orange and cardamom coming through clearly. Even when baking, you could smell this amazing perfume, along with the chocolate. I was right about the flavours – it’s a really intensely flavoured cake, which sets your mouth buzzing with the ginger. Having said that, I think it works really well – the chocolate comes through, the orange holds its own with the ginger, and the cardamom is just about there in the background. My teaspoons of cardamom were a bit scant, so I probably could have used the full measure. It reminds me a lot of Divine’s orange and ginger dark chocolate – that also has quite a bit of crystallised ginger embedded in the chocolate. So I’d definitely recommend making this, but it’s not for the faint-hearted!

Chocolate, ginger and cardamom tea loaf

barely adapted from Paul A Young’s ‘Adventures with Chocolate‘.

  • 250g crystallised stem ginger
  • 100g raisins
  • 75g light brown muscovado sugar
  • 2 tsp ground cardamom (about 1 tbsp green cardamom pods)
  • zest of 1 orange
  • 200ml strong assam tea
  • 1 large egg
  • 200ml wholemeal self-raising flour
  • 100g dark chocolate, chopped into chunks (I used Divine 70%)

Slice the ginger chunks into slices, and combine with the raisins and sugar in a heatproof bowl.

Warm the cardamom pods until fragrant in a dry pan, then cool. Pop the black and brown seeds out of the shells and grind into a powder in a pestle and mortar. (This step is optional – you can buy ready-ground cardamom, or grind the pods without toasting them, but this method will get you the most aromatic powder).

Brew 200ml strong assam tea (1tbsp of loose tea leaves, 200ml boiling water) for 4-5 minutes, and strain over the raisins and ginger. Cover and leave overnight or for about 8 hours. (I prepared the ingredients one evening, poured the tea over the following morning, then made the cake the second evening).

After soaking, the tea should almost all be absorbed, with some syrup where the sugar has dissolved. Don’t remove any liquid, but add 1 beaten egg directly to the fruit and mix in. Mix in the flour, then fold in the chocolate to combine. The texture is very similar to a traditional fruit cake at this stage, fairly stiff but still moist.

Put the mixture into two lined 1lb loaf tins (or one large loaf tin).

Bake for an hour at 160C. Check with a skewer that it is cooked through. Cool for 30 minutes in the tin, then remove and cool completely. Wrap in fresh paper and store in a tin for a day before cutting and eating, on its own or buttered slices.

There’s something about pastry

Edd Kimber, a.k.a. @theboywhobakes linked to this article on twitter not once, but twice – and I’m very glad he did. It’s a fascinating article from the New Yorker about the evolution of the modern dessert, a “quest to find out what desserts really [are] and where they [are] going”.

It’s a great read, although leaves you wanting more detail in a number of places. However, I found the distinction between dessert and not dessert somewhat false. As the article describes, the line between the two is quite blurred, because the techniques straddle dessert and main course cooking, and sweet and savoury flavours can appear in both. Ultimately, the only good definition of dessert is that it comes at the end of the meal.

But for me, the more interesting separation is not about dessert, but about pastry. I found the most interesting part of the article Ferran Adria’s description of the two major revolutions in French cooking coming from chefs originally trained in pastry – Carême codifying French cuisine and Michel Guérard and nouvelle cuisine. I’ve always found it interesting that Gordon Ramsay trained in pastry as well, and his Just Desserts book is, I think, one of his better ones. Pastry, in this context means a set of techniques in manipulating flour, sugar, butter and eggs to create a set of new materials – a set of skills which perhaps can equip you to imagine a new type of cuisine.

I definitely prefer pastry, mostly baking, to cooking – something that’s very obvious from the archives of this blog. It is something that I have thought of as a bit of defect, and have tried to correct (at least on the blog). I have thought of myself as  preferring pastry because I have a sweet tooth, and when I was at cooking school, because it was a calmer task than line cooking. These preferences are part of it, but this article also starts to get at something else which marks pastry apart from the rest of cooking. It is learning the techniques you need, and understanding the science behind the transformations in baking that really fascinates me, and draws me back to repeat, refine, adapt and develop.

The idea of constructing something new – creating new textures and materials out of raw ingredients – is fascinating. This is what Alice Medrich calls ‘a basic wardrobe for designing desserts’ and the part that appeals to ‘the engineer and architect’ in her. Armed with these techniques, and the ratios that make them work, you can create anything you care to dream up.  And because these are confections, they lend themselves to imagination and creativity. There’s no ‘meat and two veg’ target to hit, no nutritional points to count, no need for ‘food as fuel’. It is pure escape, like couture, the concept car or the Turner prize. (High end dining occupies a similar place, regardless of the courses.)

Something I’ve done before is to map out techniques or recipes, to see how learning one can lead you on to the next. This seems to work particularly well for pastry, where the same few ingredients can be combined in a huge number of different ways.

This diagram is an illustration of where these techniques can take you. A diagram of how to navigate the materials and techniques, and what you can access with each of them. This is a start – I would like to develop this further. If you can see anything that’s missing, or have any good ideas on how it could be used or developed, please let me know.

What about you – do you prefer pastry or cookery – and do you know why?

The Great Brownie Bake-off

Saturday was a momentous day for me. My first piece of competitive baking – and my first win! Yes, my brownies were voted the best of 25 entries on Saturday at The Great Brownie Bake-off. I was amazed when I found out. Firstly, I was convinced I had underbaked them, so when my back started to give out on the day, I headed home a mere 20 minutes before the results were announced. And secondly because the judging panel included the amazing Paul A Young, as well as a host of other professional cake and chocolate experts.

If you’ve been here before, you’ll know that brownies have appeared before. I make them pretty regularly because they can be mixed quickly in one bowl, but the results still feel special enough for a celebration. So when Louise Thomas, The Chocolate Consultant announced that she was organising a brownie bake-off, I thought I would give it a go.

I started with my old recipe, which is a hybrid of a couple of versions in Alice Medrich’s book ‘Bittersweet‘ (one of my favourites) and gave it a few different tweaks to try it out on my work colleagues.

Brownies

I baked more for the Macmillan Coffee morning a couple of weeks later. These were tougher and overbaked, so I knew I had to do something different for the final version.

I went back to the drawing board to make the result softer and less dense. I toasted hazelnuts to give a subtle flavour compared to the more aggressive Frangelico or alcohol. Leon’s brownies include ground almonds which make them very gooey, so I ground some of the nuts to create the same effect. Finally, I replaced the caster sugar with some soft brown sugar and golden syrup for extra stickiness, and I hoped a little extra caramel flavour.

The bake-off was a great day, with demonstrations going on throughout the day. It was pretty packed though, so hard to get to the samples, and I wish I had muscled in a bit more firmly and introduced myself to more people.

Thanks so much to Louise for organising the day, all the judges: Paul A Young, Abigail Phillips, James Hoffmann, Tom Kevill-DaviesLee McCoy and Jennifer Earle, Jane MansonKavita Favelle and Mathilde Delville and Fred Ponnavoy from Gu Chocolate Puds.

Also lots of thanks to the demonstrators: Fred Ponnavoy, Caroline Aherne from Sugargrain Bakery, Edd Kimber, winner of the Great British Bake-off (and doing his first live demo!) Sasha Jenner from Hobbs House Bakery, and Stacie Stuart from Masterchef.

The Winning Recipe:

Ingredients

  • 100g unsalted butter
  • 100g dark chocolate(Valrhona Manjari 64%)
  • 30g Green & Blacks cocoa
  • 30g/2 tbsp Hazelnut chocolate spread (Nutella)
  • 100g light muscovado sugar
  • 85g caster sugar
  • 15g golden syrup
  • 2 large eggs, cold
  • 70g plain flour
  • pinch of salt
  • 150g whole hazelnuts

Method

  • Preheat the oven to 180ºC / 160ºC fan.
  • Toast the hazelnuts, by putting into the oven for 8 minutes. Rub off the skins.
  • Line an 18cm square tin with foil or baking parchment.
  • Put 35g of the toasted hazelnuts into a food processor and grind to a powder. Use some of the flour to prevent the mixture becoming too oily. Combine with the rest of the flour and set aside.
  • Combine the butter, cocoa, chocolate and chocolate spread. Melt in a microwave or in a pan on the stove until the butter and chocolate are completely melted and the whole thing is combined.
  • Stir in the sugars and golden syrup, then beat in the cold eggs one at a time until the mixture is glossy.
  • Add the flour and nut mixture and salt, and beat the mixture 40 times with a wooden spoon, until the mixture thickens slightly. Fold in the remaining whole hazelnuts.
  • Pour into the pan and bake at 180C/160C fan for 20-25 minutes, until it is cracked very slightly at the edges, but still soft in the centre.
  • To cut cleanly, put the cooled pan into the fridge, covered in cling film until thoroughly chilled or overnight. Remove the cold pan, invert over a board and peel off the foil or baking parchment. Cut into squares with a sharp knife.

Bakewell muffins (cherry and almond)

Cherry almond muffins
Muffins are not exactly a new topic for this blog, and this basic recipe is one I wrote up not long ago … but then I read that EnglishMum was having a bake-off competition, with the prize of a hamper of Green & Blacks chocolate, and these came out looking so pretty that I had to write about them.

This is the based on the same banana muffin recipe I’ve been making for a while now, originally from Gordon Ramsay’s Healthy Appetite. It’s a good  moist recipe and the banana flavour isn’t too dominant so they lend themselves to flavour variations. As these are a pretty healthy variation of muffins, with oil instead of butter, bananas replacing some of the fat, and wholemeal flour, I feel just fine about consuming them everyday. I like to freeze them and take them into work as a mid-morning or mid-afternoon snack.

Muffins work well frozen, as they can be quickly reheated in a microwave, or left to defrost on their own. As with any cake or bread leavened mainly with baking powder or bicarbonate of soda (such as soda bread) they will go stale quite fast once out of the oven. Freezing is a good way to capture that fresh quality.

Having some ageing bananas in my kitchen last weekend, I cast around for a new set of flavours to add to the recipe. When I found a packet of dried cherries and a half packet of roasted marcona almonds in the cupboard, the decision was made.

Bakewell muffins

Cooling cherry almond muffins

As before, these can be adapted in many different ways. Just make sure to keep the liquid ingredients separate from the dry ones, mix them both separately, then combine gently, folding in any berries or other bits at the end.

Makes 12 muffins.

Ingredients:

Dry ingredients:

  • 300g wholemeal self-raising flour (or plain flour and 1 tsp baking powder)
  • 1 tsp bicarbonate of soda (baking soda)
  • pinch of salt

Wet ingredients

  • 100g light brown muscovado sugar
  • 2 large ripe bananas
  • 220ml buttermilk, or 180g plain yoghurt and 40ml milk
  • 1 large egg
  • 75ml vegetable oil
  • 1/2 tsp almond extract

Bits and pieces

  • 100g dried cherries
  • 100g toasted chopped almonds (marcona almonds are really good)

Toppings:

  • 6 glacé cherries, halved
  • flaked almonds

Preheat the oven to 180°C / 160°C fan / 350°F.

Put the flour and other dry ingredients into a large bowl and use a whisk to make sure they are thoroughly combined.

Mash the bananas into a medium bowl, and add the sugar and other wet ingredients. (The sugar goes in here, because it’s easier to get the sugar to mix in and remove all the lumps in the liquid).

Add all the liquid ingredients to the dry in one go, and mix gently together with a spatula or large spoon. Add the bits and stir just to distribute them. The more you stir the batter, the more you develop the gluten in the flour, and the tougher the muffins will be.

Divide the batter between 12 muffin cases and bake for 20 minutes or until the tops are just starting to brown and the top springs back when pressed.

Cool for 5 minutes in the tin, the take out a cool on a rack. If you’re going to freeze them, wait until completely cold, then put into a freezer bag within a few hours and freeze. Should be fine for several months.

Chocolate and Courgettes (Zucchini)

Chocolate courgette cupcake

Courgettes are innocent enough looking when they first arrive

IMG_1336 copy

– but soon they expand and take over your life like triffids. Beware the courgette.

Mini courgettes, waiting to strike

Mini courgettes, waiting to strike

Little did I know when I took delivery of my spiffing Rocket Garden of baby veg plants in April that it would be the courgettes that were the real trouble makers. They were so innocent, with just one or two oval leaves – looking no larger than any of the other plants, and much smaller than the strawberries, for instance. The directions recommended a distance of 45cm between plantings, which is more or less what they now have, but they now seem so large that they tower over the long since bolted lettuces and shriveled brown pea plants.

The full size courgette plant

The full size courgette plant, on Flickr

Courgette gluts are a gardening cliché, but with good reason – once they start producing, they don’t stop, and if you leave them for more than two days without checking, you will turn around to find a marrow has appeared.

So far the production has been a pleasant trickle – two or three courgettes every 4 or 5 days is very manageable, and can easily be converted into pasta – linguine, lemon juice, parmesan, oiive oil – or substitute for aubergine in a parmigiana.

However, we are now well into production on all four of my plants, so it’s more like 4 courgettes every other day. Serious help is clearly needed.

Courgettes

So when my mother-in-law asked me yesterday if I had any good courgette cake recipes, it occured to me that in fact I had the perfect one, but hadn’t tried it yet. I am referring, of course, to Chocolate and Zucchini cake from Clotilde’s Chocolate and Zucchini book (and from the blog of the same name).

Having once made a Jamie Oliver beetroot cake that was a disaster, I am wary of baked goods with vegetables in, but I have complete faith in Clotilde and I knew she would not lead me astray. And so it proved: as she notes in the book, if you didn’t tell anyone this had courgettes in, they would never tell. It’s just a really soft, moist chocolate cake, not too sweet. In fact, it could probably bear icing with something like buttercream and still be good. Even the olive oil I used in place of butter (as she suggests) is all but undetectable. So if you have courgette problems this summer, simply make endless batches of this and freeze where necessary.

Chocolate and Zucchini cake

Adapted, just barely, from Clotilde Dusoulier’s ‘Chocolate & Zucchini’

Ingredients

  • 240g plain flour
  • 60g cocoa
  • 1 teaspoon bicarbonate of soda (baking soda)
  • 1/2 teaspoon baking powder
  • 1/2 teaspoon sea salt
  • 180g light brown sugar
  • 120ml extra virgin olive oil
  • 3 large eggs
  • 1 tsp vanilla extract
  • 1 tsp instant coffee granules or instant espresso powder
  • 350g courgettes (zucchini), grated – about 2 medium courgettes
  • 150g chocolate chips or chunks

Method

Preheat oven to 180°C/160°C fan/350°F.

Put the flour, cocoa, baking powder, bicarbonate of soda and salt into a bowl and use a whisk to mix everything together thoroughly and distribute the baking powder and bicarbonate.

Flour and cocoa mixture

Put the olive oil and sugar into a mixer bowl or food processor and combine for 3 or 4 minutes until thoroughly mixed together. It won’t cream as butter and sugar would, and may form clumps – don’t worry. Add the eggs one at a time, and mix thoroughly after each one, until the mixture is smooth again.

Oil, sugar, eggs, vanilla mixed together

Add the vanilla and coffee granules or powder to the egg mixture.

Meanwhile grate the courgettes fairly finely – I used the grating disc on my food processor, but it wouldn’t take too long with a hand grater.

Grated courgette

Add just over half of the flour mixture to the eggs and very gently mix until the flour hasn’t quite disappeared.

Toss the remaining flour with the grated courgettes and chocolate chips to coat them.

Mixing in courgettes and chocolate chips

Add this on top of the rest of the batter, and fold together gently with a large spoon or spatula.

Pour into a greased or lined tin.

Chocolate and courgette cake, ready to bake

I used a 2lb (large) loaf tin and 6 muffin cases. Clotilde recommended a 25cm springform tin. You could also do them all as cupcakes, which I’m guessing would make around 18.

Bake at 180°C (160°C fan)/350°F for about 20 minutes for the cupcakes, and 45 minutes for the loaf cake.

Remove from the oven and leave to cool for 10 minutes before removing from the tin. If you use a springform tin, unclip the outside at 10 minutes, but leave in the tin to cool completely.

The cupcakes are especially good when they’re still a little warm.

Chocolate and courgette goodness

Frozen sourdough

As a follow up to my post on bread, I just wanted to point out Dan Lepard’s excellent video of reviving a lump of frozen sourdough into an active starter:

Awakening the frozen sourdough

Great to see it in action. For anyone wondering, sourdough is simply bread leavened with yeasts from the air and the flour, raised into a starter that you keep alive, instead of by adding dried or fresh yeast. Freezing this mixture is a great way to be able to make sourdough without having to do it every week to keep the starter active. I have some rye starter in my fridge right now, and I’m going to have a go at freezing some this week – will let you know how it goes.

Principles of bread – and a video

Whole books are written about making bread (I should know, I own quite a few of them). It is often seen as something quite daunting – a serious, difficult topic, with a major sense of accomplishment from producing a loaf. And while there is definitely a ‘staff of life’ thrill about producing your own loaf, bread is unusually accommodating, and will cope with a surprisingly wide amount of variation and approximation. So I thought I would try and distil the essentials down into a few principles, and see how few I could get away with. This list doesn’t talk about everything you need to know – that’s what all those books are for. And for more resources, see the end of the post. But hopefully these principles give some context for the stages in the recipe books, and more of a feel for what you’re aiming for.

  1. Any sort of baking with yeast means that you have to be flexible: you need to watch the dough and see what it does. This is why the instructions always give vague directions like ‘until the dough has doubled in size’ – that can take very different times depending on the amount of yeast you started with, the temperature, how much sugar the mixture has in, and many other factors. So you have to do what the dough says (at least up to a point – and see point 7)
  2. The basic process is: mix: to combine the ingredients; knead: to develop the gluten; rest: to allow the gluten to relax, and the yeast to develop air bubbles in it; shape: to redistribute the air bubbles and create the final loaf shape; proof: to let the final air bubbles reemerge; bake: to set the protein and give a nice brown crust.
  3. The ratio to use is 5 parts flour (by weight) to 3 parts of water. For example, 500g to 300g, with 1.5 tsp salt.
  4. Bread flour is useful but not essential. Plain flour is fine for many breads. Brown flours are harder to work with, and need more water.
  5. Adding fat to the dough makes the crumb softer – so if you want soft rolls, use milk instead of water, and add some butter; for a more rustic loaf, you don’t need to add any.
  6. You can use any amount of yeast – use a 1/4 tsp instant dried yeast, and let it rise over 18-24 hours, or 2 tsp for a very quick rise.
  7. If you want the process to happen slower, put it in the fridge; if you want it to work faster, put into a warm place. Use this along with the quantity of yeast to make the process happen at a speed to suit you.
  8. Kneading is optional – you can also leave the dough for a longer time – this will develop the gluten as well. However, kneading does repay the effort – you will almost always get something better out if you knead it a little more.
  9. You need to bake bread very hot – 200C/400F or more. About 45 minutes for a loaf made with 500g of flour, or 15-20 minutes for rolls.

Here is a video I made of me kneading bread. A couple of things to know: I started this dough off in the mixer, so it’s quite well developed here – when you start, it is much stickier and harder to handle.

Resources

Dan Lepard – bread baker extraordinaire, creator of loaves at Locanda Locatelli, Baker & Spice and many other locations. He has a lovely website with lots of useful resources, and writes every week in the Guardian – bread but also yummy cakes and biscuits. @dan_lepard on twitter.

Richard Bertinet – has a cooking school in Bath (which I keep meaning to go to) and has produced some great bread books, including Dough, which comes with a DVD of the kneading technique. @BertinetKitchen on twitter.

See also previous post on no-knead bread – really, no kneading required, but you do need to let it sit for at least 18 hours, so that the gluten can develop that way instead.