Behind the Sweets – part 1 – sugar and caramel

Chocolate caramels

I’ve been enjoying the new food TV series ‘Sweets made simple‘, catching up on the first two episodes on iPlayer.
They successfully rattle through four or five recipes an episode, and succeed in making the finished sweets look both tasty and, yes, simple.
In fact, I think they make both caramel making and chocolate tempering look a bit too simple – it’s quite possible to come across problems with both of these techniques, which they don’t really address.

As usual, my particular bugbear is their lack of explanation of the various rules and instructions (although I concede that exploring these would create a rather different programme). Here are some of the techniques and tips they mention, with a bit of further explanation about them. So here’s a bit of a breakdown of some of things they mention in passing, with a bit more on what’s behind the advice.

Part 1: Caramel making and sugar syrups
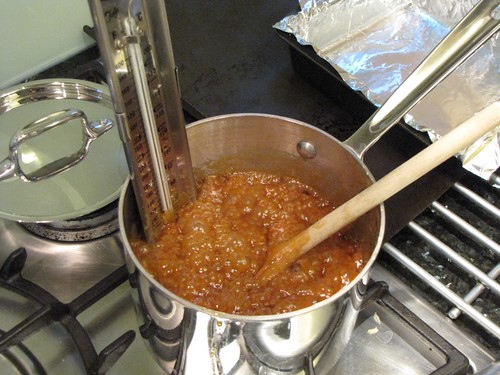
Heavy bottomed pan

They are sure to mention that you should use a heavy-bottomed pan when making a caramel. What’s so special about a heavy bottom? What they really mean is a pan that has a sandwich of metal on the base, typically a disc of aluminium, fused to a stainless steel pan. This type of pan will help distribute the heat evenly across the base, as aluminium is a good heat conductor, much better than steel. This will help to avoid hotspots, which can be a particular problem with sugar syrups and caramels, where you are trying to reach a specific temperature across the whole mixture, and where stirring could create crystals that cause the whole lot to become grainy.
In fact, an alternative to the recommended ‘heavy bottomed pan’ is a distinctly lightweight (though not cheap) unlined copper pan, as copper is an excellent heat conductor.

Temp goes fast and then slow

Kitty sensibly mentions that when making a sugar syrup, the temperature will rise fast to 100ºC and then go slowly. The temperature of the syrup is related to how concentrated it is. As it heats up, more and more water boils off, leaving a more and more concentrated sugar syrup behind. While the mixture is mostly water, the temperature will remain at, or very close to 100ºC. It’s only when the syrup is almost all sugar that the temperature can start to rise again. For instance, if you heat to 260F/ 127C you have reached ‘hard-ball’ stage, which is used to make marshmallow, for instance, and the syrup will be 92% sugar and 8% water (see here for more details on the link between temperature and sugar concentration).

This is why the specific temperatures are so critical with sugar work – they determine what the texture of the cooled sugar will be. To make a caramel, all the water has to be boiled away, until you have just molten sugar, which when heated further, will caramelise, firming new molecules and turning first golden, and then dark brown.

Caramel - 3

It will froth up

I’m thinking particularly of the marshmallow recipe, where soaked gelatin sheets are added to sugar syrup, but this applies to anything where you add something containing water, like cream, butter or soaked gelatin, to a syrup or caramel where most or all of the water has been boiled off. As the watery ingredient hits the hot syrup, the water instantly boils, producing a huge mass of bubbles that make the syrup froth and foam. This is why it’s usually a good idea to use a high-sided saucepan when doing sugar work.

Using liquid glucose

A couple of the recipes have suggested adding a small quantity of liquid glucose or golden syrup to the white sugar used for most of the recipe. The reason for these is the same as why Kitty often tells you not to stir as the mixture is heating. When you heat up sugar and water, and start to concentrate it by boiling off the water, it’s easy to trigger the sugar into crystallising again. This produces a grainy white mess in the pan. Putting in a spoon can give the sugar something to crystallise on, which is why sugar recipes often advise you only to swirl the pan. Adding a liquid sweetener like liquid glucose or golden syrup disrupts the crystallisation process, adding in sugar molecules that don’t fit, and making it difficult for the white sugar crystal to reform.

Back soon with more on chocolate and tempering.

Candied peel – why it works

Seville oranges

Whenever I make marmalade, the huge piles of wasted peel get me down. While I like the taste of orange peel, i dont like my marmalade to be jam packed with it, so I tend to include only some of the peel in the preserve. But those shiny, bright orange skins disappearing into the food waste bin is such a sad sight. Its only the exhaustion induced by the particularly time consuming method of marmalade production that leads me to discard these skins. Because instead, I could be making candied peel – and this is what I did this time.

But what is it that turns orange peel into candied peel successfully? All the recipes say different things, even though it’s a very simple recipe. The idea is to remove some of the bitterness that makes orange peel unpleasant to eat raw, soften it so you can bite through easily, and then steep in sugar syrup to sweeten and preserve it, without causing the sugar to recrystallise.

Candied orange peel

The problem is that hardly any of the recipes explain why they have the steps they do. Not understanding what’s going on really annoys me. If I don’t know the purpose of each step, then it’s much harder for me to work out when each stage is done, or to spot if something has gone wrong.

And this is a baking-type recipe – it should be precise – but when all the recipes disagree slightly, how do you know which one to follow?

In the case of the candied peel, the basic steps are:
1. Remove the peel, either by scoring the entire peel, or by peeling just the zest with a peeler (if you do that, there generally isn’t a requirement to blanch it).
2. Blanch the peel – in anything from 1–5 changes of water. (Sometimes, boil the peel until tender) as well.
3. Immerse in sugar and water, anything from 1:1 ratio to 2 parts sugar to 1 part water. This might also include some corn syrup, or some cream of tartar. Boil for anything from 30 minutes to 2 hours.
4. Put out on a rack to drain. Roll in sugar straight away or leave out to dry for a day or several days.

That’s a lot of variation for very few steps of instruction. Obviously, you’re dealing with two big uncertainties: a natural product, the orange, that can be sweet or bitter, thick-skinned or thin skinned; there’s also another uncertainty that is acknowledged in recipes much less often: your individual palate. Relatively few recipe writers encourage you to taste as you go and then adjust suit what you would prefer. Do you quite like the bitter tang of orange peel or do you have a sweeter tooth? Are you planning to use this peel in recipes where the sour contrast is going to be appreciated, or would you like to eat these with chocolate where you want things a bit sweeter?

The first part, the blanching is there primarily to remove the bitterness from the pith – or at least moderate it. Harold McGee explains:

“The outer epidermis contains the aromatic oil glands while the spongy, pectin-rich
albedo usually contains protective bitter phenolic substances. Both the oil with its
terpenes and the antioxidant phenolics are valuable phytochemicals. The bitters are
water-soluble, while the oils are not. Cooks can therefore leach the peel repeatedly
with hot (rapid) or cold (slow) water to remove the bitter compounds, then gently
cook the peel if still necessary to soften the albedo, and finally infuse it with a
concentrated sugar syrup. Through all the processing, the water-insoluble oils stay
largely in the rind.” – from ‘On Food and Cooking’

So blanching the orange peel makes it edible by removing the bitter compounds and softening the pectin. This means you should be able to taste it, and test the softness, to determine how many times you want to blanch the peel.

When you infuse it with sugar syrup to preserve it, you are trying to reach a certain concentration of sugar, and this is most easily measured with the boiling temperature of the syrup. As you boil a sugar syrup, the temperature increases as the amount of water decreases, and the sugar gets more concentrated – this is essentially what a sugar thermometer is measuring. At a boiling point of 230 degrees F / 110C you get to about 80% concentration of sugar. This is a good level for candied fruit. If you stop at a lower level, there is a risk of crystallisation, as well as a risk that the peels will remain too sticky and not keep well. This also means that it doesn’t matter too much what ratio of sugar to water you start out with – except that a weaker solution will take longer to reach the right concentration, meaning that the peel will be submerged for longer, and this can help make sure that the syrup penetrates all the way through properly, especially with thick pieces of peel.

Candied orange peel
Traditional candying processes for whole fruits – for cherries, tangerines, melon in places like France – require the fruit to be cooked in increasingly concentrated syrups over many days. This allows the sugar to penetrate into the thick fruit and ensures that the water is displaced.

Adding cream of tartar (an acid) along with the sugar helps to prevent crystallisation of the sugar in the final peels. The acid helps encourage the sucrose in the granulated sugar to break down into glucose and fructose, its two smaller units. These get in the way of the sucrose reforming nice neat sugar crystals. Adding corn syrup does a similar job – it already has glucose and fructose in it, so they also help interfere with crystallisation.

The peel should cook for a good long time in the syrup – 45 minutes to 2 hours is the general guidance. Slow is good, to make sure the peel is well infused. Then remove the peel from the syrup and spread onto a cooling rack to dry a little, and become tacky rather than sticky to the touch. Then you can roll in sugar, or dip in chocolate, as you prefer.

Links:

June Taylor and Martha Stewart making candied Meyer lemon peel – recipe and video

Smitten Kitchen making orangettes

Candied ginger, candied lemon peels, and science