Making late-night birthday cake

Or How to bake a cake between 9:30pm and 11pm

Cutting the cake

There is something quite sad about supermarket birthday cakes. Don’t get me wrong – I’ve certainly bought them before now – but it’s just not the same as a homemade cake. There’s a particular large supermarket that sells a rectangular sheet cake, decorated with sweet chocolate buttercream and stars that often makes an appearance at my workplace. It looks so promising, with swirls of icing along the edges, but it always seems disappointing. The sponge is damp and collapses easily. The icing is gruesomely sweet. Even the chocolate stars on the top are have that waxy quality, more cake covering than chocolate.

I am an unashamed snob about birthday cakes. They need to be homemade, or from a good bakery. It’s not a celebration if the cake is going to coat your mouth, give you a sugar crisis, and is made of palm oil and emulsifiers. And it’s not too hard to come up with something better than those options.

Rectangular tins are perfect for low-hassle birthday cake. No complicated turning out or layering, just leave it in the tin, cover with frosting and then pop the lid on to take it to the birthday destination. I have an old traybake tin from Lakeland that I tried for the first time the other day. Although the tin is a little thin, and the non-stick looks a little fragile, its killer feature is a plastic lid with a handle that clips onto the edges for transportation. But even without a bespoke lid, if the tin is deep enough to allow the cake and icing to sit below the rim, the whole thing can be wrapped in cling film (plastic wrap) for transport.

It’s even possible to make a birthday cake if you’ve been to the pub after work and don’t get home until a bit late (as long as you’re fairly sober). Here’s how to make a late-night birthday cake:

  • Get in the door at 9:20pm
  • Immediately switch on oven, and get butter out of the fridge. Cold butter and sponge cakes don’t work well together.
  • Find Smitten Kitchen’s cookbook because you remember she has a sheet cake recipe in there (basically this one, but scaled down).
  • Find the weight of butter needed, and weigh it onto a plate. Put this into a microwave for two minutes on the lowest, lowest setting so it can soften.
  • Go back to the book and check that you really do have all the ingredients called for before you go any further. Yes, it seems OK. The only tricky one is buttermilk, but that can be taken care of with the last of the yoghurt, combined with some milk.
  • Dig out your traybake tin and check it is roughly the right dimensions. 20 x 30 cm is a typical size for a traybake recipe, but after last week and the coconut cake, I want to make sure this is deep as well. Put a piece of parchment paper in the tin – not only to stop sticking but to protect the non-stick from scratching when the cake is cut!
  • (Remember you haven’t had dinner yet, and re-heat the leftover curry)
  • Prepare the rest of the ingredients: whisk flour with the baking powder and salt in a bowl. Get the eggs from the fridge and immerse in a little bowl of warm water from the tap – everything as close to room temperature as possible. Whisk the yoghurt and milk together in a jug to make them smooth.
  • Once the butter is soft, add it to the bowl and mix it a few times to make sure it’s creamy. Weigh the sugar straight into the bowl and set the mixer running for a good five minutes or so. The mixture needs to become pale and fluffy, not sandy, and as there’s a lot of sugar in proportion to the butter, this takes a while. Don’t rush this bit – everything else is easier if you get this right. Go and eat dinner.
  • Once you have this fluffy state, add the eggs one by one (drying them so they don’t drip into the bowl). If you’re sensible, you would crack them into a cup or ramekin first, to make sure you don’t get shell in the mix. (I go for speed and crack them straight over the mixing bowl.) Mix in one at a time, until you get back to that fluffy looking mixture. Add the vanilla.
  • Now the job is to get in all the flour and the yoghurt/milk without either a) overworking the mixture once the flour is in, b) leaving big patches unmixed, or c) having it all curdle. A good rule is to alternate the two – one third of the flour; mix; half the liquid; mix; one third more flour; mix; rest of the liquid; mix; rest of the flour. This makes sure that nothing overwhelms the mixture at any one time.

Fluffy cake mixture

  • Once it’s all in (and you’re sure that you got the edges of the bowl mixed in too), scrape it all into the tin, smooth to the corners and bake. By now it’s about 10pm.
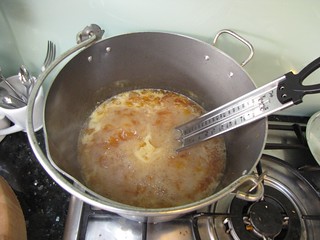
  • While the cake is baking, make some icing. The treacle chocolate fudge frosting on this page is a good option (I made it without the yolks and water, and with creme fraiche and 2 tablespoons extra icing sugar added). It uses a base of cornflour-thickened chocolate custard, with more chocolate mixed in while warm. Cover and leave until the morning. A simple buttercream of butter and icing sugar would also work.
  • When the cake is evenly golden on top, and a cocktail stick comes out clean, take it out and put onto a cooling rack. After about 10–15 minutes cooling in the tin, turned it out to cool, leaving the parchment still on the bottom. Leave to cool overnight and go to bed.

Frosting ready to spread

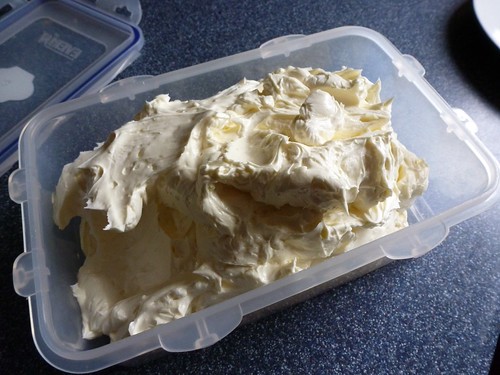
  • In the morning before work, put the cake back in the pan (the parchment will help). Beat the icing to make sure it’s smooth and spreadable. Scrape all of the frosting on top of the cake and spread it out with a spatula. Add sprinkles and other decorations if you want. It’s too early for piping.
  • The leftovers

Drømmekage – dream coconut cake

A slice of Drommekage

Drømmekage is a genoise sponge beneath a layer of coconut caramel – a plain cake made glamourous with a baked-on topping. This one is from a recipe by Signe Johansen, from her cookbook ‘Scandilicious’. It belongs to a class of Scandinavian baking that seems to be closely linked to German traditions of Kaffee and Kuchen – Swedish Toscakaka and German coffee-cakes with streusel toppings. There is a Danish word for the togetherness of coffee and cake, hearth and home: hygge. (It also appears on this excellent map of untranslatable non English words. These are cakes designed to be sliced and shared through an afternoon, not squirreled away in a tin for later. It was certainly devoured by my work colleagues last Friday, and generated not a little happiness.

A cake with a baked-on topping is a great thing. A plain cake, but with a little something extra. They strike a nice balance between the slight austerity of a very plain Madeira or pound cake, and the over-the-top elaborateness of a piled high cupcake or layer cake. Whether its flaked almonds on top of a bakewell tart, or a handful of granola on the top of a muffin, they provide not just decoration but a contrast in texture and flavour.

In this cake, the cake is too delicate to add the topping before it is baked, so the solution is to bake the cake, then add the topping and bake again to brown it and merge it with the cake beneath.

This makes it especially important to know when the cake is done – adding the topping too early will (as a Danish colleague warned me) sink the cake, collapsing the sponge into a dense layer. It’s also important to recognise when the caramel is thick enough to top the cake without sliding off.

I’ll give you the recipe, reproduced with very kind permission from Signe’s book, then discuss what’s happening behind the recipe – what are the critical steps?

Drommekage - Danish coconut cake

Drømmekage – Danish Coconut Dream Cake

from ‘Scandilicious – Secrets of Scandinavian Cooking’ by Signe Johansen, Saltyard Books
(and if you like this and live in London, you should definitely consider attending Signe’s Scandi brunch and supper club).

  • 4 medium eggs
  • 300g golden caster sugar
  • 1 teaspoon vanilla extract
  • 150g butter, melted
  • 150ml buttermilk (or a mixture of yoghurt and milk)
  • 300g plain flour
  • 3 teaspoons baking powder
  • 1/4 teaspoon salt

Topping
– 200g butter
– 200g light brown soft sugar
– 150g dessicated coconut
– 100ml whole milk
– 1 heaped teaspoon vanilla sea salt (I used a scant teaspoon sea salt plus half a teaspoon of vanilla bean paste)

Preheat the oven to 190C/170C fan/gas mark 5. Line a 20x30cm deep rectangular cake pan with parchment paper, leaving a 2 inch overhang to help remove the cake later. It helps to have the paper extend above the sides of the tin a little to contain the topping later.

Melt the butter and leave to cool a little. Combine the flour, baking powder and salt in a bowl, and mix with a whisk to distribute the baking powder.

Using an electric mixer beat the eggs, sugar and vanilla together until thick and pale, the batter should form a ribbon when the whisk is removed from the bowl. This will take several minutes on high speed. If you’re not sure whether it’s thick enough, give it another minute.

Pour in half the melted butter and buttermilk and sift half the flour onto the batter. Fold the batter together with a large metal spoon, trying to incorporate as much of the flour, butter and buttermilk without knocking out the air from the eggs.

Pour in the remaining butter and buttermilk and sift over the remaining flour. Fold the batter as above.

Pour the batter into the prepared cake pan and bake for 20 minutes or until the cake has doubled in size, looks light golden brown in colour and is firm to the touch. A toothpick inserted into the cake should also come out clean. You want to be sure it has baked thoroughly and will bear the weight of the topping to come.

Whilst the cake is baking make the topping by adding all the ingredients into a medium saucepan set over medium heat, stirring constantly to prevent the sugar from burning. Cook for 5 minutes until the mixture has thickened and some of the liquid has evaporated. It will reduce a little and also change colour to a slightly darker shade of brown. You want something thick enough that it will spread over the surface, and not run too much.

Once the cake is out of the oven turn the temperature up to 220C/200C fan/gas mark 7. Spread the topping evenly over the cake, return to the oven and bake on the upper-middle shelf for 5–10 minutes until the topping is a toasted deep golden colour (I found this step took more like 15–20 minutes in my oven). Cool in the tin before cutting into squares to serve. As the topping had set into a lovely chewy caramel in some places, I found it easiest to turn it over onto a board, topping side down, and slice with a serrated knife.

Behind the recipe

So what’s going on behind the recipe? Where are the critical steps? I think there are four steps that are particularly important:

Whisking the eggs well enough to support the rest of the cake

What makes this a genoise-type of sponge is that it is based on a first step of whisking the eggs and sugar together until thick, rather than the more usual process of creaming together butter and sugar. This thick mixture is known as ‘taking it to the ribbon stage’, as the mix should form a thick ribbon as it trails down from the whisk into the bowl. Once this is done, the other ingredients – in this case, flour, melted butter and buttermilk – are folded in.
Eggs and sugar whisked together – whether just egg whites or whole eggs – will form a pretty stable foam that can hold lots of air, even when deflating ingredients like butter and flour are folded in. It’s almost impossible to over whisk eggs once a substantial amount of sugar has gone in, so if you want to err on the safe side, just keep going with the whisk a bit longer. This is one of those times where you will give up your right arm for an electric mixer – the handheld ones work really well and are not expensive. I used my Kitchenaid with a whisk attachment.

Baking until firm enough to support the topping

In order to support the caramel topping, it’s important to bake the cake until all trace of liquid cake batter has disappeared, and the cake is fairly firm. The recipe gives the baking time as 20 minutes, but given all the variations in oven temperatures and baking tins, you should always check for doneness before the time is up, then at five minute intervals until it looks close. The first thing I check for with a sponge, whether genoise or creamed, is whether you can still see a wobbly lake of batter in the centre. If a gentle shake of the tin reveals there is still a puddle under the surface you can safely give it another five minutes. Once that has gone, you might want to check more frequently with either a skewer, cocktail stick or small paring knife to see that crumbs rather than liquid batter sticks. To test whether it is firm enough to support a topping, lightly pressing the surface with your finger, to see if it will resist and spring back, is another good test.

Cooking the caramel on the stove

The recipe asks for the caramel mixture to be cooked in a saucepan before adding it to the cake. Caramel is a really temperature sensitive thing, and the thing to know about caramel temperatures is that it won’t start to rise much above 100C until almost all the water is removed from the mixture. This is (I presume), why the mixture is first boiled on the stove – to remove most of the water, and create something that will readily form a set caramel in the oven. I found that the volume reduced quite a bit, and the colour changed from a pale gold to a darker shade.

Baking the caramel to caramelise it further

The aim of this final stage is to convert the sugar from a runny caramel to a chewy toffee-like topping. This means baking it in the oven long enough to caramelise it further and ensure it sets in place. I had difficulty with this stage, as my tin wasn’t deep enough, and as it baked, the topping overflowed the paper lining and spilled over into the oven. Having a very even surface to the cake will help make sure the topping browns evenly, and if you know your oven has some hot spots, keep checking and turn it around periodically, so that it evens out (I put my tin on a baking sheet at this stage to catch any overflowing topping, and also to make it easier to turn around).

Braising a blade roast of beef

Beef into the liquid

I like to braise a big piece of meat at the weekends. The smell of braising meat makes the kitchen a welcoming place to hang out, and it generates the sort of leftovers that can be very easily turned into quick after-work meals.

I love Jenny Rosenstrach’s Pork Shoulder Ragu, but this weekend I decided to do beef for a change. I asked the butcher for brisket, but they suggested it was probably too fatty for braising and proposed blade instead. And that was a great suggestion. (I bought my blade roast from the superb HG Walter in Barons Court – just the sort of place that will give you helpful advice about a good cut for braising.)

The blade roast – although I wasn’t sure when I bought it – is a cut from the shoulder. You will sometimes see beef braising meat as ‘chuck and blade’ – chuck being the other part of the shoulder. The really distinctive thing about the blade, also called the feather blade, is a central vein of connective tissue, from which radiates veins of fat, looking like a feather running through the centre of the meat. You can cut either side of this tough central vein to create flatiron steaks, or cut across for feather blade steaks. I didn’t take a picture of the meat before I started cooking, but you can see photos of what the blade steaks look like here.

Or you can do as I did, and as advised by the many, many website recipes I visited on the way home, and pot roast it until that central vein dissolves into unctuous jelly.

(I particularly liked the look of Molly Steven’s recipe for beef braised in Zinfandel).

The braising liquid could have been wine, or just stock, but I chose a dark ale – a Bath Ale stout – along with beef stock. I could also have added tomatoes to the sauce to create a more pasta-like ragu in the end, but wanted to keep the flavours cleaner, and didn’t think that the bitter of the stout plus the acid of the tomatoes would work well together.

For the stock, I used a puck of concentrated beef stock from the freezer, that I’d made when I bought beef bones last, and added to it the concentrated chicken stock that was leftover in the fridge.

Lastly, I made a couple of short videos of some the key steps – it’s a bit of an experiment.

http://cinemagr.am/show/122493631

Braised blade of beef

  • 1 blade roast of beef (or other beef shoulder joint), about 1.8kg
  • 2 medium onions, peeled and chopped
  • 1 leek, washed, halved lengthwise and chopped into thick slices
  • 2 medium carrots, peeled and chopped into chunks
  • (a stick of celery, chopped, if you have it)
  • 500ml dark ale or stout
  • 500ml beef stock
  • about 1 tsp each of thyme, rosemary and sage
  • 2 bay leaves

Tie up the beef – putting three strings around it to keep it neat and together, make it easier to turn while browning, and help it to fit into the pot. Then sprinkle with coarse salt to get a good bit of seasoning.

Heat a casserole dish big enough to take the beef – I used my 7 litre oval Le Creuset – and add a few teaspoons of olive oil. I didn’t add much more, as the beef already had a cap of fat on the top of the meat. Place the beef (fat side down) into the hot pot and let it sit and brown in the pot while you prepare the veg. You want to leave it for at least three or four minutes on a high heat for each side, to make sure you get a good brown crust. That will create lots of flavour in the final dish.

Browning the beef

Meanwhile prepare the vegetables, and gather the herbs, pausing to check the meat every now and then. These are all stock vegetables, there to flavour the braising liquid and to provide a trivet to keep the beef off the bottom of the pot. Once the cooking is done, most of the flavour will have come out and into the liquid, so the veg can be discarded. So don’t spend too long getting the pieces neat and pretty.

Chopped vegetables and stout

Once everything is browned nicely, the beef comes out onto a plate, and the veg go into the pot and start to soften.

Showing the blade

As the water comes out of the veg, it will, along with some judicious scraping, start to dissolve the sticky meaty juices on the bottom of the pot that are crucial to the flavour. After stirring veg around a little, put the lid on the pot for a few minutes to encourage more of the juices from the vegetables and to make sure that all of the sticky meat lifts from the base of the pot. (Giving the vegetables time to soften and cook a little in the fat has another benefit – it produces different flavours than you create by submerging the veg directly into the liquid. It allows sugars and other compounds to be generated in the high-heat possible by cooking in a little fat. As soon as we add the liquid, the maximum temperature will drop right down to 100C or thereabouts.)

Once you’ve developed lots of good flavours on the beef and the vegetables, it’s time to add the liquid and the rest of the flavours. First, add the stout or ale to the vegetables, stir to get up any last sticky parts, and then simmer until it’s reduced by about a third. This boils off a bit of the alcohol, and concentrates the flavours a bit.

Add the beef back to the pot, along with any juices from the plate, and finally add in the herbs and the stock, and a good bit of seasoning (if your stock wasn’t seasoned, you’ll probably need at least a couple of teaspoons of salt – taste to check).

Cover the pot with greaseproof paper (which helps to seal the pot and also makes it easier to clean up the lid afterwards!) and put into a 140C oven for 4 hours. After 30 minutes to an hour, check on the dish, and if it’s bubbling very rapidly, turn it down another 10 degrees. When done, the meat should pull apart with a fork.

After braising

Remove from the oven and leave to cool for an hour or so in the liquid. This allows the meat to rest and reabsorb some of the juices. Remove the meat into a dish to be carved. Strain the liquid to remove the vegetables and herbs, and skim off the fat (I like to use a fat-separating jug for this. Reheat the liquid and taste for seasoning. Serve thick slices of the braised meat with the strained braising liquid.

Shreds falling apart

Bonus leftovers tip: Reheat chunks of the cold meat with a couple of spoonfuls of the braising liquid (which will form a jelly in the fridge) and a splash of tomato sauce for an almost-instant beef ragu sauce for pasta.

Candied peel – why it works

Seville oranges

Whenever I make marmalade, the huge piles of wasted peel get me down. While I like the taste of orange peel, i dont like my marmalade to be jam packed with it, so I tend to include only some of the peel in the preserve. But those shiny, bright orange skins disappearing into the food waste bin is such a sad sight. Its only the exhaustion induced by the particularly time consuming method of marmalade production that leads me to discard these skins. Because instead, I could be making candied peel – and this is what I did this time.

But what is it that turns orange peel into candied peel successfully? All the recipes say different things, even though it’s a very simple recipe. The idea is to remove some of the bitterness that makes orange peel unpleasant to eat raw, soften it so you can bite through easily, and then steep in sugar syrup to sweeten and preserve it, without causing the sugar to recrystallise.

Candied orange peel

The problem is that hardly any of the recipes explain why they have the steps they do. Not understanding what’s going on really annoys me. If I don’t know the purpose of each step, then it’s much harder for me to work out when each stage is done, or to spot if something has gone wrong.

And this is a baking-type recipe – it should be precise – but when all the recipes disagree slightly, how do you know which one to follow?

In the case of the candied peel, the basic steps are:
1. Remove the peel, either by scoring the entire peel, or by peeling just the zest with a peeler (if you do that, there generally isn’t a requirement to blanch it).
2. Blanch the peel – in anything from 1–5 changes of water. (Sometimes, boil the peel until tender) as well.
3. Immerse in sugar and water, anything from 1:1 ratio to 2 parts sugar to 1 part water. This might also include some corn syrup, or some cream of tartar. Boil for anything from 30 minutes to 2 hours.
4. Put out on a rack to drain. Roll in sugar straight away or leave out to dry for a day or several days.

That’s a lot of variation for very few steps of instruction. Obviously, you’re dealing with two big uncertainties: a natural product, the orange, that can be sweet or bitter, thick-skinned or thin skinned; there’s also another uncertainty that is acknowledged in recipes much less often: your individual palate. Relatively few recipe writers encourage you to taste as you go and then adjust suit what you would prefer. Do you quite like the bitter tang of orange peel or do you have a sweeter tooth? Are you planning to use this peel in recipes where the sour contrast is going to be appreciated, or would you like to eat these with chocolate where you want things a bit sweeter?

The first part, the blanching is there primarily to remove the bitterness from the pith – or at least moderate it. Harold McGee explains:

“The outer epidermis contains the aromatic oil glands while the spongy, pectin-rich
albedo usually contains protective bitter phenolic substances. Both the oil with its
terpenes and the antioxidant phenolics are valuable phytochemicals. The bitters are
water-soluble, while the oils are not. Cooks can therefore leach the peel repeatedly
with hot (rapid) or cold (slow) water to remove the bitter compounds, then gently
cook the peel if still necessary to soften the albedo, and finally infuse it with a
concentrated sugar syrup. Through all the processing, the water-insoluble oils stay
largely in the rind.” – from ‘On Food and Cooking’

So blanching the orange peel makes it edible by removing the bitter compounds and softening the pectin. This means you should be able to taste it, and test the softness, to determine how many times you want to blanch the peel.

When you infuse it with sugar syrup to preserve it, you are trying to reach a certain concentration of sugar, and this is most easily measured with the boiling temperature of the syrup. As you boil a sugar syrup, the temperature increases as the amount of water decreases, and the sugar gets more concentrated – this is essentially what a sugar thermometer is measuring. At a boiling point of 230 degrees F / 110C you get to about 80% concentration of sugar. This is a good level for candied fruit. If you stop at a lower level, there is a risk of crystallisation, as well as a risk that the peels will remain too sticky and not keep well. This also means that it doesn’t matter too much what ratio of sugar to water you start out with – except that a weaker solution will take longer to reach the right concentration, meaning that the peel will be submerged for longer, and this can help make sure that the syrup penetrates all the way through properly, especially with thick pieces of peel.

Candied orange peel
Traditional candying processes for whole fruits – for cherries, tangerines, melon in places like France – require the fruit to be cooked in increasingly concentrated syrups over many days. This allows the sugar to penetrate into the thick fruit and ensures that the water is displaced.

Adding cream of tartar (an acid) along with the sugar helps to prevent crystallisation of the sugar in the final peels. The acid helps encourage the sucrose in the granulated sugar to break down into glucose and fructose, its two smaller units. These get in the way of the sucrose reforming nice neat sugar crystals. Adding corn syrup does a similar job – it already has glucose and fructose in it, so they also help interfere with crystallisation.

The peel should cook for a good long time in the syrup – 45 minutes to 2 hours is the general guidance. Slow is good, to make sure the peel is well infused. Then remove the peel from the syrup and spread onto a cooling rack to dry a little, and become tacky rather than sticky to the touch. Then you can roll in sugar, or dip in chocolate, as you prefer.

Links:

June Taylor and Martha Stewart making candied Meyer lemon peel – recipe and video

Smitten Kitchen making orangettes

Candied ginger, candied lemon peels, and science

Seville orange marmalade

Untitled

I have made marmalade a number of times, with some notable successes as well as notable failures. I have had everything from a dark brown orange syrup to a set so thick you could bounce things off it. No one seems to have the same recipe, and several of them flat-out contradict each other. Nigel Slater, in the Kitchen Diaries II, at least acknowledges that every marmalade maker has their own peculiarities and that none of them can agree.

Marmalade making requires getting three things right: enough pectin in the mixture to create a gel; a balance of sugar, acid and pectin that will enable the gel to set at room temperature; and cooking the peel through enough to make it edible and not too chewy. There are a huge number of routes that you can take to get to this end result, and most regular marmalade-makers will have a preferred route, as well as desired result. Some are aiming for a tawny, caramel-tinged, dark marmalade with hearty chunks; others a light, clear jelly with threads of peel through it.

My real conversion to marmalade making was discovering June Taylor’s approach. Although recipes from her are frustratingly hard to track down, her handmade approach and attention to detail have produced stellar results when I have tried them – a softly set bright orange jelly with an amazing fresh flavour. This comes (I think) from a much lower-than-normal amount of sugar in her recipes, as well as a time consuming process which involves segmenting the fruit, and removing the membranes into a bag with the pips, so they can contribute pectin, but not cloud the jelly.

With marmalade, you have to balance the simplicity of making it with your satisfaction with the end result. How far are you willing to go? If you’re ready to make your own marmalade, we can safely assume you’re willing to go quite a long way, but segmenting each orange is a very different amount of active effort needed, compared to boiling the fruit whole and then chopping it all up. But for me, it comes down to how happy I will be with the end result. I am almost incapable of throwing away food that I have spent large chunks or time or money preparing, so if I end up with 5 jars of not-very-good marmalade, I know from experience that they will sit in the cupboard for a long, long time while I reluctantly work my way through them. If they are not great, I won’t want to give them away either, making their stay in the cupboard even longer.

I would rather spend an extra half hour on preparation to end up with a sparkling result that I’m incredibly proud of and can’t wait to share with other people. That, to me, is a much better reward for my time than a few jars of dark and muddy orange-flavoured jam.

Having tried a tangerine and grapefruit recipe before, with good results, I decided to try and work out what a June Taylor-style Seville orange marmalade recipe might look like. This was a tricky task, as she doesn’t make Seville orange marmalade at all – it’s one of very few citrus fruits that you never see in California. So I read through quite a few alternative approaches, as well as some blog entries that had also attempted to replicate her approach, to see if I could come up with something appropriate.

I started with her recipe for Thick cut orange marmalade, published in the San Francisco Chronicle. However, as this was a recipe for the thinner-skinned, juicier sweet oranges, I felt that I would need to modify it somewhat. One of the things I particularly liked about the tangerine and grapefruit recipe is that you get to slice across the segments, creating juicy chunks of citrus flesh with peel attached, which survive into the finished jam. However, doing this for all the oranges seemed like it would both take too long and leave me with way too much peel in the final result. I have tried making marmalade with whole oranges before (the method where you boil them whole, and then chop them) and have found that with the thick peels, you get far too much peel for my liking.

So I took a hybrid approach, slicing one lemon and one blood orange in segments with the skin on, and removing the peel before segmenting for the Seville oranges. As I did this, I removed the (copious) pips and, on Dan Lepard’s advice, popped them straight into a small dish of water. By the time I had finished the fruit preparation, this little bowl had gelled solid, demonstrating just how much pectin there is in those pips.

The final fiddly thing I did was to take the pieces of orange peel, and blanch them. I’m sure this stage is not essential, but I thought it worth doing for two reasons: one, when making candied peels, you are almost always asked to blanch the peel, sometimes repeatedly, to ‘remove bitterness’. I thought the same thing might apply here. It would also give them a headstart on softening, making it easy to slice them, and ensuring that I could cook the rest of the mixture for a fairly short period – something that’s important if you want to preserve a fresh, citrus flavour rather than aiming for a caramel one. So these were blanched, drained, about half of them sliced finely and added to the fruit. I kept the rest back to make candied peel with.

Candied orange peel

Recipe: Seville orange marmalade

This does make a rather acidic marmalade – something to really wake you up. If you are partial to chewing pieces of candied orange peel, it should be right up your street. If you prefer a sweeter marmalade, you may want to increase the sugar.

  • 1.5 kg Seville oranges (I ordered mine from Riverford organics)
  • 1 lemon
  • 1 blood orange (not essential – I happened to have one leftover)
  • 1.7kg of fruit in all
  • 600ml water
  • 750g granulated sugar

Segment the blood orange and the lemon, with the skin on and slice thinly.
Top and tail the seville oranges. Slice off the peel taking as little pith with it as possible. Then slice off the pith, exposing the flesh. Collect the strips of pith in the muslin. Segment the Seville oranges, removing the pips into a small bowl of water as you go. Squeeze any juice from the membranes that are left into the same bowl as the segments and the sliced segments, and then add the membranes to the muslin with the pith.

First boil

Take the strips of peel and cover with cold water in a medium saucepan. Bring to a boil for 2 minutes, and then drain and cool.
Slice about half of them into thin strips and add to the juice and segments.
Leave overnight.

The next day, wash your jam jars thoroughly (or put them in the dishwasher) and then place into a 110C degree oven to keep warm. Wash the lids at the same time, but leave them out of the oven.

Add the pips to the muslin, and their soaking water to the fruit in a preserving pan. Tie the muslin up with string and suspend it in the pan. Bring everything to a boil for about half an hour, to make sure the peel is really tender. It should be possible to mash it between finger and thumb. Take off the heat and remove the muslin bag. When it is cool enough to handle (after about 30 minutes), squeeze it out to release the pectin and add into the pan of fruit. You need to squeeze and massage this for a good few minutes to extract as much pectin as possible. This takes some time, but is strangely satisfying.

Pectin from pips

When you have squeezed out all the pectin you can, add a candy thermometer to the pot, add the sugar and bring back to a boil. Stir occasionally until the sugar has dissolved (it will stop making a scratchy noise on the pan as you stir) and then let it bubble quite fast until it reaches 105C on the thermometer, then test for a set.

Boiling with sugar

Pour the whole lot immediately into a Pyrex jug, and then into the hot jars. Using a tea towel, screw on the lids and inverted each jar for five minutes before returning them to the right way up to finish cooling. This helps to ensure the lids and surface are sterilised and prevents anything growing on the surface.

100 years young – making Swiss buttercream

Buying a 100th birthday present is a difficult task. Any birthday present purchase can present problems, at least for me. I want to make sure I get it right. Something that will be valued, something that will be loved. Something that will last.
A present for someone completing a century on the planet is a little different. Concepts like ‘lasting a lifetime’ take on a completely different hue. It’s almost impossible to get something useful that they don’t already have. Beautiful things seem trivial, ephemeral.

When my gran, my closest and only surviving grandparent, turned 100 a few weeks ago, I wanted a gift to express love, but just buying an expensive thing doesn’t cut it with grandparents.

photo-10100

Born in 1912, the year of Titanic, she went to Jersey to celebrate her 21st birthday in 1933, hanging out with chaps in blazers and lasses in swimming costumes. Her older brothers fought in the First World War, and her husband in the Second. She was a smart and funny white-haired lady when I was born, her first grandchild, and she still is. She’s an incredible woman, as sharp and funny as ever, and coming up with a suitable gift was daunting.

We gathered as a family for a weekend of celebrating – dinners, lunches and finally an afternoon tea with cards and presents. I bought her a painted silk scarf so there was something to unwrap. But I think my main contribution to the weekend was helping with the birthday cake.

This was a real joint effort between my mum, my sister and me. Although it needed to be celebratory, and bear decoration, she didn’t want either chocolate cake or fruit cake. As she doesn’t have much of a sweet tooth, we went for lemon sponge, but that posed the question of how best to decorate it.

Having done a bit of research on smitten kitchen and sweetapolita, I decided what we really needed was Swiss buttercream. The reason for using this is that it is very stable, and can be made ahead; it is not too sweet and sickly, unlike quick buttercream or fondant; and it can be made into a smooth surface to support piped icing decorations.

Swiss buttercream is made of a mixture of meringue and softened butter. The meringue is made using the Swiss method, dissolving the sugar into warmed egg whites before beating (as opposed to the French method:whisking sugar directly into whipped egg whites; or the Italian: pouring a hot sugar syrup into whipped egg whites).

You begin by measuring the sugar and egg whites into a large heatproof bowl. I used egg whites from a carton – I know there are virtually no problems now from British eggs, and you are heating them in this recipe, but I didnt want to take any chances with a 100 year old consumer. In any case, the carton whites (available as Two Chicks in a number of supermarkets in the UK) are very convenient for weighing out a precise amount.

This mixture is then heated over a barely simmering pan of water, stirring constantly, until it reaches 60c and the sugar has all dissolved into the whites. You can check this by rubbing the mixture between your fingertips to check that all the gritty sugar crystals are gone.

Then the warmed egg white syrup is whisked into stiff meringue peaks. We made two batches of the buttercream, fearing that my mum’s handheld electric mixer might not handle a full batch. Neither batch reached stiff peaks at this stage – both were still flowing a little, one more than the other, although the mixture was quite thick and opaque.

Ribbon

We pressed on anyway, despite the lack of stiff peaks, and it turned out fine. I don’t think there was any difference in texture between the two final batches. The process of adding the butter tends to deflate the mixture at first anyway. As long as the mixture is very thick and holds a ribbon, it should still be fine, even without peaks.

Once the meringue is thick, and has cooled to not far above room temperature, you can start to whisk in the butter. The butter should be cubed and a room temperature, so you can easily create an impression in it with your finger, but not so soft it starts to get shiny and greasy.

Whisk in one cube at a time. The mixture will deflate, and become thinner, perhaps quite soupy. It might also split and curdle. Keep whisking and adding butter. Once the butter is almost all incorporated, the texture suddenly changes, and it snaps to a thick mixture, that holds its shape very cleanly.

Untitled

This can be kept in the fridge for several days, or frozen. When chilled, the texture is much like that of butter – quite firm and almost waxy. For this reason, you should make sure cakes frosted with Swiss buttercream are served at room temperature. To bring the the buttercream back to a working consistency, bring it slowly to room temperature, or give a couple of very low power bursts in the microwave, just as you would do when softening butter from the fridge. To help the process along, return the batch to a bowl and use an electric whisk or stand mixer to whip the buttercream until it is soft and spreadable again.

Buttercream in a box

For the final cake, we layered my mum’s 8 inch square sponge layers, flavoured with lemon zest, with most of a jar of bought lemon curd.

Untitled

I trimmed the edges square, and covered the cake with a crumb coat of buttercream. After chilling for about an hour, the cake surface was firm, like a block of cold butter, and we could layer on the rest of the buttercream.

Untitled

Starting at the sides, this task looks a lot like plastering – apply a decent sized blob, and smooth it to an even layer. The great thing about Swiss buttercream is that it can be spread and smoothed out many times, and it will hold its texture. After covering it with a more or less even layer of frosting all over, I used a long palette knife to drag along the sides and over the top to make the surface as smooth and flat as possible. Then the cake went into the fridge overnight.

Untitled

The next morning, we mixed up some fairly thick royal icing with yellow colour paste, and my sister, practiced from many school holidays working in a Thorntons shop, piped 100 on the top of the cake, and scrolls in the corners.

The final touch was to add my mum’s crystallised primroses, made with flowers from her garden, brushed with egg white and dusted with sugar.

Cake

DSC_0268

The final cake went down well – it was moist in the centre, not too sweet. And a fitting cake to bear candles for a 100 year old to blow out.

Untitled

Stock that’s clear

IMG_3790

It’s very seldom that you achieve the platonic ideal of stock. There is an idea of a clear, golden liquid that conveys many layered savoury depths, and brings a touch of magic wherever you use it,

Reams of cookery writers have written hymns to the power of stock. Anyone trained in the traditions of French cooking, from Joel Robuchon to Michael Ruhlman, will have learnt all about stock as the absolute foundation of French cuisine, the essential component of all meat cookery at least. But even home cooks like Nigella Lawson are converts to this idea.

I fall somewhere in between. I hate food waste, so the idea of extracting every last drop of flavour and nourishment from a chicken carcass really appeals to me. I follow Nigella’s suggestion of freezing chicken bones, and when I have two or three chickens worth, I put them all in a large pot of cold water, bring it to the boil, simmer for about an hour and a half, then add chopped onions, carrots, a stick or two of celery, a few peppercorns and bits of thyme and parsley if I have them around, and simmer for a further hour.

What this produces is fairly flavourful and good for soups and risottos. But it’s not what you think of as beautiful stock – the clear, golden liquid you might see in a consomme or tortellini in brodo.

I know that you should keep stock bubbling very slowly, but the importance of how slow this should be didn’t really sink in until I made ham stock for Heston’s pea and ham soup, using the recipe in Heston Blumenthal at Home. The recipe suggests that you cover the ham with water, add onions, carrots and leeks, bring to a simmer, then place in an 85C oven for 5 hours. This very slow, long cooking produces a liquid that stays well below boiling for the entire duration but still extracts deep flavours.

IMG_3783

When I took the ham out of the oven after this 5 hour stint, the liquid was so clear I could see all the way to the bottom of the pot. It helped that, to ensure the gammon wasn’t too salty, I had brought it to the boil, poured the water away, and then cover it with fresh water to make the stock. This helped remove the scum and bits of floating protein that will always accumulate when you boil raw meat.

A few days later, I rescued the bones from two especially fat pheasants we ate pot-roasted for New Year’s Eve from the freezer, and made stock from them. After the ham experience, I took the lid off, and after bringing it to the boil, kept the heat as low as possible. You can see the cooking in the (rather noisy) video below. It was barely possible to see a single bubble over the course of a minute. The reward for this was a beautiful, clear golden stock. I think this calls for a risotto.

Using stock

To really show off your stock, make risotto – this really captures the flavour you’ve painstakingly brought in. It also makes great soups (although water will almost always do, especially for vegetable soups), provides liquid for curries, gravy, bolognese sauces. If you’re going to make stock regularly (and if you eat roast chicken, it’s not difficult), don’t be precious about it. Use it whenever you see the opportunity. It’s silly to wait for a perfect risotto to use your stock, when you could use it to improve things, even just a little, throughout the week.

Making good stock

  • You don’t need the very best ingredients, but neither should you use only compost materials. Make sure the vegetables are clean, and that most of the skin and fat have been removed from the bones.
  • Stock is all about long and slow. Doing this in the oven is easier, but requires you to have an ovenproof pot with a lid big enough to make this work. Chicken bones want at least two hours, preferably three.
  • Either keep the vegetables in large pieces, and add them at the start, or chop them into chunks and add to the pot with an hour to go.
  • Strain through a fine sieve, or layer of damp cheesecloth to remove any particles. This also means you can add herbs and peppercorns straight to the pot without tieing them into a bundle.
  • Don’t season your stock. You might want to reduce it, so only add salt when you use the stock, not when you make it.
  • Reducing the stock will concentrate the flavour and make it easier to store. After you have strained it, pour back into a clean pot and boil fast to drive off water.
  • Stock freezes really well – it’s the best way to store it. Use either strong freezer bags, or rigid takeaway soup containers. With freezer bags, you can easily get small holes once the bag is frozen, so be sure to defrost it in a container, in case the bag leaks.

Using miso

Shiro miso

Miso is a fermented paste that is an essential part of Japanese cooking, but has also started to show up in recipes for everything from roast pork to soup to butterscotch sauce. I started reading about miso, and then picked up the bag of shiro (white) miso in the picture from The Japan Centre.  If you’ve had miso soup from somewhere like Wagamama, or even Pret, you have an idea of the sort of savoury flavour that comes from miso.

Making miso

While reading up about soy sauce, I came across this interesting idea:

“soy sauce and miso paste were originally the same
preparation, but the liquid became soy sauce, and the solids
left behind became miso”

Miso and soy sauce are both produced by fermentation. Miso can be produced by many different grains, but the most popular types are produced by soybeans with rice and/or barley, and some rice colonised by an Aspergillus fungus, called Koji.

Miso is has both savoury and sweet aspects. Both of these elements come about because the fermentation creates enzymes that break down both the starches and proteins in the soy and rice grains. Breaking down starch produces sugars, (starch is just the name for a long chain of sugar molecules joined together). Breaking down proteins produces amino acids for the same reason. Glutamate is the amino acid which creates the taste of umami.

Cooking with miso

Shiro miso paste

As I read more and more about miso, it became clear that there are a huge number of different types of miso, all with different characteristics. Still, the ones you are most likely to find easily in the UK are shiro miso, or white miso – a pale, fairly sweet miso; and aka miso or red miso, a more savoury and stronger paste. Both of these can be used to make miso soup, by combining them with dashi, a savoury stock made from dried kelp and dried bonito (tuna) flakes.

However, the sweet-savoury nature of miso makes it much more versatile. The current issue of Lucky Peach, an American food quarterly, includes a recipe for burnt miso butterscotch sauce and for miso mayonnaise. (You have to love a magazine that entitles an article on different types of miso paste ‘Miso Horny’. And if you don’t love that, then Lucky Peach is probably not the publication for you.)

You can use it to enhance the flavour of soup, to glaze steak or pork, to marinade salmon, or in salad dressing. It’s a flavour enhancer, which makes it very versatile. I’ll be trying to use more of it this year.

The recipe I started with was Smitten Kitchen’s Carrot and Miso soup. You can head over to her site for the details, but a summary of what I did is below. This is a great way to introduce yourself to miso. The carrot soup is fine without the miso, but with it you get a rounder flavour that brings together the sweet and vegetal tastes of the carrots.

Carrot and miso soup

Carrot and miso soup

  • Chop two small onions, a couple of garlic cloves and about 10 medium carrots.
  • Cook gently in olive oil until the onion is translucent.
  • Add a thumb-sized piece of ginger, chopped finely. Submerge everything in about a litre of Marigold vegetable bouillon (made weak so it’s not too salty). Simmer until the carrots are soft.
  • Blend in the pan with an immersion blender.
  • Take a ladleful of the pureed soup out into a small bowl, and mix in a couple of tablespoons of white miso. As soon as you mix the miso with the hot soup, you get a burst of that miso soup smell. Mix the soup back in and taste. If it needs more miso, repeat this procedure.
  • Serve with a few dots of toasted sesame oil on top.

Eating the soup

Pistachio gelato

Pistachio gelato

I tend not to buy completely unknown ingredients – my cupboards are too full for that. But if something rings little bells of recipes I have seen before, then I’ll pick it up, and work out what to do with it later.

I like discovering new ingredients in this way. They present a new frontier of challenges, a new coastline to be explored. They give me a starting point to wander through my cookbooks and discover new things. (And have I mentioned how brilliant Eat Your Books is for this? This indexing service does what I have never had time to do: provides a list of all the recipes in cookbooks and magazines, along with a listing of the ingredients in them, so you can search through all your book indexes at once).

So when I was browsing for Christmas presents in Gelupo, a gelateria in Soho that is the sister location to Italian restaurant Bocca di Lupo, and spotted pistachio paste, I bought it without knowing how I would use it.

Pistachio paste

I’ve come across recipes asking for pistachio paste in the past. It’s like a pistachio version of smooth peanut butter, and has that nutty flavour and sticks to your palate in the same way. It is often used in professional recipes because it is so smooth, and because it provides a concentrated pistachio flavour.

Although the Gelupo staff seemed convinced that the pistachio paste wouldnt go off, I know that nut oils can go rancid quite fast, so I opted to store it in the fridge. And there it sat over Christmas while I wondered what to do with it. I thought about pistachio cakes and biscuits, where that bright green colour could really be shown off.

In the meantime, I got the Bocca cookbook for Christmas. And, of course, the answer I was looking for was pistachio gelato.

Pistachio has been my favourite ice cream flavour for ages. When on holiday in France as a child, I would usually order a double cone with one scoop of chocolate and one of pistachio (either that or coffee and chocolate). I even tried to make pistachio ice cream at home when I was 12 or 13. The results, using nuts whirled in a not particularly powerful food processor, were predictably grainy. There was still a whisper of the right flavour there though.

Gelato is something that you mainly see in Italy and the US. Whereas ice cream is properly made with cream and thickened into a custard with egg yolks, gelato is made with milk, and instead of being thickened with eggs, it uses either gelatin, or cornflour or both to thicken the mixture. Gelato fans say that the lower fat content and no eggs allows the flavour of the gelato to be less obscured than that of ice cream. Explaining its appeal in the Bocca cookbook, Jacob Kenedy says: “a flawless representation, like that of Dorian Grey, the picture is so perfect it steals its subject’s soul”.

What’s missing from the recipe

Following the theme of my last post, I wanted to look in more detail at this recipe, and why it works the way it does. The recipe asks you to make a ‘base bianca’ first, with milk, cream, sugar, honey or glucose, and milk powder. This is then heated and gelatin stirred in to dissolve before chilling it. Finally, more sugar and the nut paste are whisked in before churning it in an ice-cream maker.

It took me a while to understand the reason for some of the instructions in the recipe. It instructs you to remove it from the heat “when the mixture approaches a simmer”. Apart from being a very unhelpful instruction (how do you know it’s approaching a simmer until after it’s simmering?), was there a reason for needing to heat to a specific (unnamed) temperature, rather than just enough to dissolve the sugar and milk powder?

I remembered that I had read about the need to scald milk for bread making, to destroy proteins, and wondered if the purpose was similar. In Shirley Corriher’s food science book ‘Cookwise’, she explains in the Ice Cream section that:

“one step is essential for optimum smoothness if using any milk or half-and-half in the recipe. The milk or half-and-half should be heated to 175F (79C), just below scalding. I do not know the exact nature of the changes that this heating causes – perhaps denaturing or partial coagulation of some of the proteins. Whatever it is, the effect is a noticeably smoother texture in the ice-cream.”

Further clues are given by Harold McGee when explaining commercial ice-cream making:

“If carried out at a high enough temperature (above 170F/76C), cooking can improve the body and smoothness of the ice cream by denaturing the whey proteins, which helps minimize the size of the ice crystals.”

This recipe in fact contains three magic elements to make it smooth and creamy:

  1. the heated milk denatures the whey proteins, adding proteins to interfere with ice crystals
  2. the gelatin acts as a stabiliser, adding yet more protein, both thickening the final result, and interfering with ice crystals forming
  3. the honey or liquid glucose, which lowers the freezing point, and produces a softer texture at a given temperature. All sugars lower the freezing point of water below 0C. This site explains that the smaller the sugar molecule, the better it is at lowering the freezing point. Little glucose is much better than sucrose (table sugar) because it is half the size, sucrose being made of one glucose and one fructose molecule stuck together. Azelia has written much more about using liquid glucose in ice-cream.

The whole mixture is much more liquid than a normal ice cream base when chilled, with barely a hint of thickening from the gelatin.  But the final result is silky smooth, and much more scoopable than a traditional custard ice-cream.

Recipe: Pistachio Gelato

(adapted from Bocca by Jacob Kenedy)

I have tweaked this a little to suit the ingredients I had on hand, using semi-skimmed milk and double cream in place of whole milk with whipping cream. Gelatin can usually be found in the baking aisles – I used a Supercook brand, which comes in packets of 12 small sheets. I have also seen agar agar in some supermarkets – this is the one to choose if you are vegetarian.

Base:

  • 480ml semi-skimmed milk
  • 160g double cream
  • 40g glucose syrup or light honey (I used orange blossom)
  • 130g caster sugar
  • 40g skimmed milk powder
  • 3g leaf gelatine (2 small sheets) or 4 teaspoons agar-agar

Gelato:

  • 85g pistachio paste
  • 45g icing sugar

To make the base: heat the milk, cream and honey in a heavy pan until steaming. Meanwhile, mix the caster sugar with the milk powder in a small bowl. Pour into the warm milk in a stream, while whisking to prevent lumps forming. Bloom the gelatin sheets in a bowl of cold water, and continue to heat the milk. When the mixture is almost simmering, with bubbles around the edge of the pan, remove from the heat and stir in the gelatin. If using agar-agar, sprinkle it over the surface and leave for 5 minutes to swell and ‘bloom’ before stirring in.

Remove the base to a bowl to cool, then chill. When you’re ready to make the ice cream, whisk in the pistachio paste and icing sugar (I did this by hand, but a blender or hand-blender would probably do a more thorough job). Churn in an ice-cream machine, then turn into a container and freeze.

Gelupo

7 Archer Street, Soho, London, W1D 7AU

If you’re ever in London, near Piccadilly Circus, I highly recommend a visit to Gelupo. They serve Italian gelato, as well as sorbets and granitas. They always have new seasonal flavours in, as well as classic Italian flavours that you don’t often see here, like Stracciatella and coffee granita. The fruit flavours are vibrant and clear. You can also pick up little treats like handmade almond biscuits.

Fresh Spring Rolls

from Rick Stein’s Far Eastern Odyssey

Fresh spring rolls

I first came across fresh spring rolls, also known as summer rolls, at a Vietnamese restaurant in Palo Alto. I’d eaten fried Chinese spring rolls many times, so ordered them thinking I would be familiar with them. But what arrived was a very different thing. These were light and springy, full of fresh mint and basil, and came with a thin, sharp dipping sauce instead of a gloopy sweet one. I was very excited when we covered Vietnamese cuisine briefly at cooking school, and I got to make some of these spring rolls. It was then that I discovered how hard they can be to get right. Like rolling burritos, there is a lot of practice needed to get the rolls tight enough to hold together.

Since then, I haven’t often had the chance to taste them. But when I started marking up Rick Stein’s book Far Eastern Odyssey to decide which recipes I would make, this was a must-have. Spring rolls aren’t an everyday dish, but you can prepare most of the ingredients in advance, and then assemble them with a little help in a few minutes. And as they are served cold, this is a really useful, fresh starter or canape to have on hand.

Making spring rolls, like making your own pizzas, is a production line job. You need to prepare all the ingredients ahead, and lots of chopping and slicing needs to be done. This means it makes more sense to make them for a crowd than just for yourself. It probably took me about an hour to put together 8 spring rolls for myself, but I could have made three times as many with just a little more time. Once you have all the pieces prepared, actually making and filling the rolls is fairly quick. This also means that having helpers to do some of the preparation would make things much easier too. You can see (just) in the photo below, my setup for making the rolls:

Set up for making spring rolls

The critical ingredients for fresh spring rolls are:
– rice paper wrappers
– fine rice noodles or mung bean (glass) noodles, briefly boiled or soaked in hot water (according to the packet instructions), then drained and rinsed with cold water.
– herbs – traditionally mint, thai basil and garlic chives. I used mint leaves, Italian basil and spring onions. The spring onions were sliced thin to go into the roll, but the herbs were left whole or in large pieces, to make the rolls more attractive. As rice paper wrappers are so thin, you can see through them, so the layout of the contents affects the appearance.
– vegetables – I used carrot, cucumber and lettuce, but beansprouts are often added. All these were chopped into long, thin strips. The lettuce was torn into small pieces.

Lettuce and pork for spring rolls

– cooked protein – in this case, cooked prawns, and cooked pork. I simmered some slices of belly pork in salted water, then left them to cool, removed the skin and surface fat, and sliced them thinly. The prawns were steamed and then cooled, and sliced in half.

Mint, basil, spring onions

The rice paper wrappers are very thin, and usually have marks on them a little like galvanised drain covers, from the bamboo mats that they dry on. They need to be soaked for about a minute in cold water until they become just pliable.

Then you can pile on just a little of all of the ingredients, starting with the prawns and herbs face down, to give an attractive appearance. Add the other ingredients on top, and roll it up, tucking in the sides to hold everything together. As the rice paper wrapper is slightly springy, you can stretch it a little around the filling, and that will help to hold the roll tight. It will take a bit of practice to get the right tension, so that you stretch but don’t break the wrapper. Some of these are neater than others, but you can see where the prawns show through.

Fresh spring roll

Vietnamese spring rolls are served with a dipping sauce common in Vietnamese cooking, nuoc cham. This is made of fish sauce, lime juice, palm sugar and chopped chilli, ginger and garlic: all the essential Vietnamese flavours in one sauce. Vietnamese food is all about balancing the key flavours of salty, sour, hot and sweet. The fish sauce is salty, the lime juice sour, the sugar balances with sweetness, and the chilli and ginger provide heat (although very little in this dish). Make sure you dip in a little lettuce and taste the dipping sauce – you want it to taste balanced to you, so adjust the quantities if you think it is too salty, sour or sweet.

Fresh spring rolls