Chocolate raspberry trifle – and a dessert wardrobe

Inside the trifle

Sometimes a dessert comes together that you know is a keeper. If you’re lucky, you know it will be good beforehand, and get all the benefit of the anticipation as well. And sometimes, just the name is enough.

I needed a dessert for lunch on New Year’s Day. It had to suit both adults and kids, and be prepared ahead, to make it easy on the day. Browsing through Nigella for ideas, I hit on trifle. Trifle is a very Christmassy dish – all that custard and cream fits with the excesses of  late December. And because it’s best served in a single bowl, it really needs a decent sized group before it’s worth making. It is indeed something to feast upon.

The original plan was to make Nigella’s Chocolate cherry trifle, but this version really started with the arrival of a bottle of Chambord (black raspberry liqueur) as a Christmas present. I had never tasted it before (and, like all fruit liqueurs, it does have a hint of Benilyn cough syrup about it), but it sparked the idea of a chocolate raspberry trifle, instead of a chocolate cherry one. And I love the combination of chocolate and raspberries – the sharpness of the raspberries is a great match for chocolate.

I had frozen raspberries, and also some shreds of flourless chocolate cake bagged up in the freezer. It did not carry good karma with it – it crumbled as I tried to unroll it as a roulade on one of those days when a bad work day, and a dropped carton of double cream make that the final straw. But I knew it tasted good.

All that was needed to make was the chocolate custard. Although Nigella suggested you make sandwiches of chocolate cake and jam, that wasn’t going to be an option with the delicate flourless cake I had (not least because it was in so many fragments). So instead I thinned the jam with a splash of water into a syrup that could be used to douse the cake.

This was an example of the ‘capsule wardrobe’ approach to dessert making: if you have great components, then you can assemble them in many combinations, and be confident about the result. This is the exception to the rule that you shouldn’t make something for the first time for guests. If you’ve made all the component recipes before, then you can be much more confident that the final result will work.

I’ve stolen this idea from Alice Medrich, who has a section in her book ‘Bittersweet‘ called ‘Basic Wardrobe for Designing Desserts’. This includes recipes for basic cake layers, mouses, fillings, frostings, glazes and decorations that can be put together in different combinations.

In making this trifle, I did what I so seldom do, and tasted everything, every component. When I am following someone else’s recipe, I sometimes assume that if I follow everything to the letter, I don’t need to taste as I go. And if it doesn’t work out, I can just shrug and blame the recipe writer. But recipes don’t work like that, and we can’t help ourselves get it right unless we taste things.

Some of this dish’s success was serendipity, but there was also a set of learned and ingrained thoughts at work. I knew that the flourless cake was light and moussy, so would match the density of the custard and whipped cream well. Having tasted the custard and syrup, they were both sweet, so I knew I needed the raspberries to be quite densely packed to provide contrast.

I’m really pleased with the result, and I’ll even go to the trouble of crumbling that cake deliberately now I know how good it can be in a new incarnation.

A teacup trifle

Recipe: Chocolate raspberry trifle

Serves 6-8

For the cake (this is Smitten Kitchen’s Heavenly Chocolate Cake Roll):

  • 170g dark chocolate, chopped
  • 3 tablespoons strong coffee
  • 6 large eggs, at room temperature
  • 150g caster sugar
  • 1/4 teaspoon salt
  • 2 tablespoons cocoa

For the chocolate custard (adapted from Nigella Lawson’s Chocolate Cherry Trifle recipe in ‘Feast‘):

  • 50g dark chocolate (64% Chocolate by Trish buttons)
  • 175ml semi-skimmed milk
  • 175ml double cream
  • 4 egg yolks
  • 65g caster sugar
  • 20g cocoa
To finish:
  • 300 ml double cream
  • 350g frozen or fresh raspberries
  • approximately 100g seedless raspberry jam
  • 3 tablespoons Chambord raspberry liqueur (optional)
  • Silver balls, stars, chocolate curls or other decorations

Make the Heavenly Chocolate Cake Roll as directed on Smitten Kitchen. You can use another sort of chocolate cake, although this one proved perfect for trifle – partly because I was unable to make it roll up (I left it to cool for too long), and so it crumbled to shreds and ended up in the freezer. But the soft, light texture made a good base for the trifle, without being heavy.

For the custard:

Melt the chocolate gently over a pan of hot water or in the microwave. Set aside. Whisk the yolks, sugar and cocoa together in a large bowl with a pinch of salt.

Heat the milk and cream together until little bubbles appear at the edge of the saucepan. Pour the hot milk and cream over the egg yolk mixture while whisking. Once everything is mixed together, scrape it all back into the saucepan. Heat gently to thicken the custard, stirring constantly and scraping the bottom with a wooden spoon. You need to take it until a thick, shiny layer appears on the back of the spoon. Once it has thickened, scrape into a bowl, cover with clingfilm in touch with the surface and chill for several hours.

Make the syrup: Warm the raspberry jam with a splash of water and about 8 frozen raspberries until the jam melts and the raspberries collapse. Remove from the heat and stir in about 3 tablespoons of Chambord (black raspberry liqueur).

Finally, assemble the trifle:

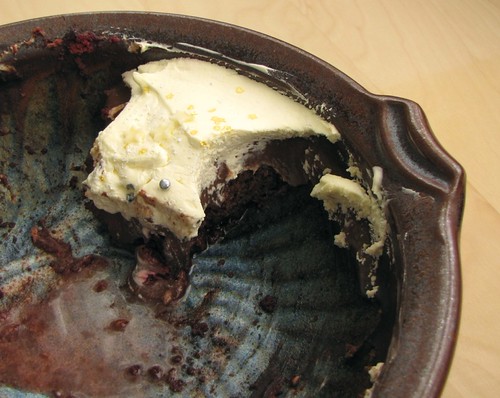
Line a dish with the chocolate roll cake, pushing the pieces together to make a single layer. Soak with the raspberry syrup. Cover the surface with the remaining raspberries, partially pressing them into the cake. Cover with the chilled chocolate custard and smooth into a single layer. Cover with clingfilm and chill for several hours or overnight.

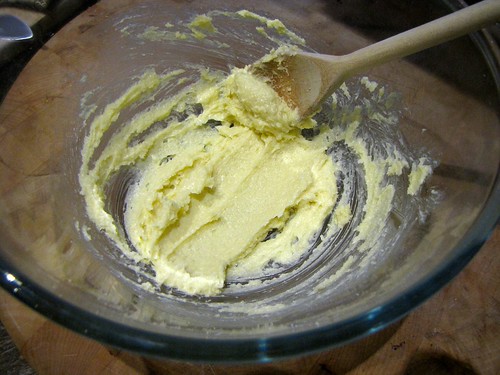
An hour or two before serving, whip the rest of the double cream (about 300ml) to very soft peaks, and spread over the custard (whipped cream thickens more and more every time you spread it, so whip it very softly, and spread it out with as few movements as possible). Decorate with silver balls, gold stars or chocolate shavings. I used edible gold stars from here.

End of the trifle

Gingerbread men (or stars, or trees…)

IMG_1162

Every year I try and make a few homemade things for Christmas to send to friends and take to family. All right, not a few, a lot. There was the year I decided to make two sorts of truffles, dipped in tempered chocolate, and also candy about 5 oranges, slice the peel really thin and dip each piece individually in tempered chocolate. Very messy. I have done brownies, David Lebovitz’s Chocolate cherry fruitcake, and last year, Raspberry truffles. This year, I went for mainly biscuits (with a few caramel brownies thrown in for good measure), and the king of Christmas biscuits is the gingerbread man.

Gingerbread is something that seems quintessentially festive. It has the deep spices that I love about Christmas cooking and decorated with white icing, it reflects ideas of snow and decoration, without being showy. You can make gingerbread biscuits with holes in to hang on the tree – and they will keep remarkably well that way – but I prefer to heap them into a tin, and snack on them. They will always outlast my appetite for them.

This year I made some biscuits to send to friends, and some to keep. I took the leftover scraps of dough with me to my mum’s, as I hadn’t had time to roll them out and bake them. They came up a little chewier and puffier than the rest of the batch, but delicious all the same: my 99 year old grandmother had two (and she doesn’t normally have sweets). Something about the almost austere plainness of these biscuits appeals across the ages. My two year old nephew pronounced them very good, and my 5 year old niece had three in a row just yesterday.

The recipe for these comes from an old issue of the veteran US cooking magazine, Gourmet, now sadly deceased. A few years ago, they did a round-up of cookie recipes from their history, choosing one recipe to represent each year the magazine was in print. This gingerbread recipe was reproduced from a 1959 issue of Gourmet. Although the recipe has now disappeared from the website, you can see the gingerbread men in this video about the project, at 1:42. All the cookie recipes they selected are now in the Gourmet Cookie Book.
IMG_1157

The first time I made these, I used currant eyes, and sliced almond mouths to make the faces. These were beautiful, but so time consuming to place every piece. I have decided I much prefer to ice with a little royal icing after they are baked instead. I can add faces and buttons to the gingerbread men, as well as dots and snowflakes to star-shaped cookies, and snow-laden branches to the christmas trees. Or they are very good just plain, as they are or dipped into a cup of tea to soften the edges a little. Like the best gingernuts you’ve ever come across.

The other benefit of not fiddling with currants before baking is that you can put the dough into the oven still cold, which makes the shapes better defined when baked, and less puffy. When first made, the dough will be quite soft. I have added even more flour than the original recipe states, to make it a little easier to handle, and to make sure that the cut-out shapes stay well defined. However, if the dough gets warm as you roll it out, the shapes will become floppy and will be hard to transfer to a baking sheet without distorting them. For this reason, I think the best answer is to make the dough ahead and chill it overnight, or for several hours at least, and then take out one piece at a time to roll out and cut. This should mean you can deal with the whole piece, and everything should remain cool enough, even in a warm kitchen. I tend to keep the scraps from each piece as I go, and then re-roll them all together at the end. The re-rolled shapes might be a little chewier and a little puffier than the earlier ones, but will still taste very good.

Recipe: Gingerbread men (or stars, or trees)

  • 350g plain flour
  • 1.5 teaspoons baking powder
  • 1/4 teaspoons bicarbonate of soda/baking soda
  • 1 tablespoon cinnamon
  • 1 teaspoon ground cloves
  • 1 teaspoon ground ginger
  • 1/2 teaspoon fine salt
  • 1/4 teaspoon ground allspice
  • 150g light brown soft sugar (I use muscovado)
  • 50g dark brown soft sugar
  • 195g black treacle
  • 30g golden syrup
  • 110g unsalted butter, softened
  • 1 large egg, beaten

Sift the flour together with all of the spices and the salt (or use a whisk to mix them all together in a bowl.

In a separate bowl (I use a mixer bowl), combine the rest of the ingredients. The butter must be soft enough to evenly mix with the rest of the ingredients – in fact, it doesn’t matter if it’s a bit melted. When combined, stir in the flour and spices. When the dough is smooth, wrap tightly in cling film and chill overnight or for several hours until firm.

Heat the oven to 375°F/190°C/170°C fan.

Flour a work surface, and roll out to about 4mm thickness. Cut out shapes with a floured cutter. Transfer the shapes carefully to a non-stick baking sheet, or a baking tray lined with baking parchment. Bake at  for 12 minutes or until very slightly browner at the edges.

Allow to cool completely, then decorate with royal icing (or icing sugar mixed with a little lemon juice).

Caramel brownie cups

IMG_3493

Tell someone you want them to try a caramel brownie, and they are almost certain to groan at the idea – but in a good way. Caramel and chocolate seems like too much of a good thing, an overload of sugar and fat. In fact, the buttery caramel can provide a nice complement to the brownie, if the brownie is kept on the bitter side with dark chocolate and a little coffee.

My first caramel brownie attempt was to follow a tweeted suggestion by Edd Kimber, The Boy Who Bakes and star of last year’s Great British Bake Off. He suggested sandwiching a layer of caramel between two layers of brownie mixture, and I knew I had to try it. I chilled the brownie layers to make it easier to spread the caramel out, and then chilled the whole thing for a few hours before baking. I was trying to minimise the amount of overflow from the caramel as it bubbles up, but I should have known that caramel will find any way out it can. Still, most of the caramel remained where it was supposed to be, the foil lining the tin prevented it from gluing itself to the tin, and the extra-cooked caramel around the edges turned into toffee, which was another good addition.

Caramel brownies

Still, I felt like a bite-sized solution was needed, both to help with the caramel overflow problem, and to provide the appropriate portion size for these intense bites. With a caramel sauce that is spoonable at room temperature, you can spoon the caramel onto the brownie mixture, top with more mixture, and then bake the whole thing in little paper cases.

Caramel brownie cups

These little cups resemble Rolos – caramel in the centre and chocolate around the outside. The brownie mixture is adapted from a recipe by Alice Medrich. Beating the flour in is not traditional, but helps hold together a mixture that would otherwise be quite crumbly.

IMG_1005
Makes 24 small cups.

Preparation time – around 45 minutes.

  • 1 jar caramel sauce or dulce de leche (bought, or see recipe below)
  • 120g unsalted butter
  • 35g cocoa
  • 90g dark chocolate, chopped or broken up
  • 200g caster sugar
  • 1 tsp vanilla extract
  • 1 tbsp strong coffee, or 1/2 tsp coffee granules dissolved in 1tbsp hot water
  • 2 large eggs
  • 75g plain flour

Heat the oven to 190C/170C fan oven/. Line two mini muffin tins with paper cases.

Put the butter, cocoa and chocolate into a heatproof bowl and melt over hot water or in the microwave. Stir gently until smooth.

Add the sugar into this bowl, along with the vanilla and coffee if using and mix thoroughly.

Add the eggs one at a time, beating the mixture after each one until thoroughly combined.

Add the flour, and stir until combined, then beat together for about 30 strokes.

Using two teaspoons, spoon about a level teaspoon of brownie mixture into each of the paper cases, filling them around one-third full.

Use another two teaspoons to add about half a teaspoon of caramel to each case. Finish with another teaspoon of brownie mixture, so that each case is almost full. If you have leftover brownie mixture, bake in muffin cases or a loaf tin for 20 minutes, or chill for up to 24 hours and use later.

Bake for about 15 minutes, or until the mixture has risen slightly and cracked just a little at the edges. The cups can also be prepared ahead, covered with cling film and refrigerated until ready to bake.

If freezing, cool the cases in the tins, then freeze until solid before putting the cases into a freezer bag and sealing.

Caramel sauce

(adapted from Dan Lepard’s All Purpose Caramel recipe)

If you have leftover cream in the fridge, making a caramel sauce will preserve the cream almost indefinitely. Making caramel is something lots of people are worried about, but it’s entirely a matter of confidence – it’s incredibly simple to make. This recipe also features in Dan’s wonderful new book, Short and Sweet.

Makes 1 jar

  • 75g granulated sugar
  • 35g unsalted butter
  • 100g double cream
  • 75g other sugars (for example, 25g dark muscovado + 25g light muscovado + 25g caster)
  • 35g golden syrup
  • 1/4 tsp sea salt

Tip the granulated sugar into a heavy based pan, and add one or two tablespoons of water – enough just to moisten all the sugar. Weigh out and have ready all the other ingredients.

Put on the lid and bring to the boil to dissolve the sugar to a clear syrup. Remove the lid, and boil hard until the sugar starts to turn golden brown. Watch it very carefully at this stage, and swirl it a little to keep the colour even.

Cook until the caramel reaches a deep reddish brown.

As soon as the caramel reaches the colour you want, remove it from the heat and add the butter. Stir carefully, as it may spit. Then add the other sugars, golden syrup, cream and salt, and stir together until smooth.

Return the caramel to the heat and bring back to the boil. Allow to simmer until the temperature reaches 114C on a sugar thermometer – this will give you a thick caramel sauce, the consistency of set honey at room temperature. If you don’t have a sugar thermometer, simply reboil the mixture for 3 minutes – you may end up with a thinner sauce, but it will still be good.

Remove from the heat and pour into a clean jam jar. Kept in the fridge, this will last at least 6 months.

Beginning to bake #9: Apple and blueberry cake

Finished cake

I wanted to finish this series with another cake – a bit of an occasion cake that you could make for a birthday or dinner party. The obvious choice is a Victoria sponge, which you can make plain or chocolate, and fill with buttercream. But to be honest, you just need to follow the cupcakes recipe from this series, double it and bake it in two 20cm sandwich tins. Very easy.

Instead, I wanted to explore one of the best things about baking – experimenting.

Experimenting with food

One of the joys of baking is that you can play around and invent your own recipes.  There are some rules to be followed, and weighing accurately is important, but the rules create a framework that you can work within to be creative. Once you understand what’s going on in a recipe, and the ratios that  make things work, you *can* play around with baking recipes. Understanding that is really liberating and opens up a whole creative world.

To do this successfully, you need to understand which elements are important to the structure of the cake, and which you can safely play around with.

This weekend, I made a cake with fruit baked into the top. This can be pudding, with custard or creme fraiche, a cake for afternoon tea (or even a late breakfast). It doesn’t require filling or icing, and can be served warm, so it’s a great last-minute option for dinner.

The recipe I started with is from Donna Hay’s book, ‘Off the Shelf’ – a book about cooking from the pantry. This one, and several earlier Donna Hay books are hard to find now in the UK, but they are really lovely. Donna is the Martha Stewart of Australia (but nicer than that sounds). She is a great food stylist and photographer as well as a cook, so all her books and her  bi-monthly magazine are beautiful, with big pictures of all the dishes.

This recipe is for a peach and raspberry tart with a sponge base. The original recipe is as follows (converting the cup measures to grams):

  • 125g butter, softened
  • 225g caster sugar
  • 1 tsp vanilla extract
  • 2 eggs
  • 185g self-raising flour
  • 2 peaches, halved and cut into thin wedges
  • 150g raspberries
  • 2 tablespoons icing sugar

[You can find the full recipe (American version) here: http://articles.nydailynews.com/2002-06-02/entertainment/18194663_1_raspberries-tart-peaches]

Just looking at the ingredients list, and the order they are presented in, I can guess  at the method and which ingredients I need to leave alone. And the method confirms this – you cream the butter and sugar together until fluffy, add the vanilla and eggs, mix the flour in gently, and then top with the fruit when the mixture is in the tin.

In a recipe like this, the ratio of the butter to sugar to flour to eggs is important. With enough knowledge, you can start playing with this too, but it’s much harder to get right.

The bits that you can safely play with are the fruit, and to a certain extent, replacing some of the flour.

For the fruit, the main thing to bear in mind is making sure that the fruit you use releases a similar amount of juice, or the finished cake could be either too dry or too soggy. Strawberries, for instance, are very juicy and get very wet when cooked. Apples and pears release much less liquid. Stone fruit such as peaches and plums, and berries, are somewhere in between.

So when I decided to replace peaches with apples, and raspberries with blueberries, I was confident that the blueberries would behave in a similar way to the raspberries. However apples give up less juice and need more cooking to become soft than peaches. I solved this problem by gently cooking the apple slices in butter before putting them on top of the cake. This made them slightly softer, giving them a head start in the cooking. They were cooked just until starting to become translucent, but still firm enough to hold together in slices.

If you did end up using much juicier fruit, you can compensate by adding something more absorbent to the flour – cornmeal, polenta, semolina will all absorb more liquid (that’s a good trick for pastry with fruit on top as well).

For this cake, I wanted to add both moisture and a different flavour by adding ground nuts to replace some of the flour. Ground nuts have a good deal of oil in them, so they don’t behave exactly like the flour. They won’t provide the structure that flour would, so the cake may sink more (although with fruit on top, this one won’t rise very high anyway). It will also keep the cake nice and moist as it keeps. I was going to use ground almonds, but then saw ground hazelnuts on special offer after passover, so used them instead.

So the final recipe I ended up with is as follows:

Apple, Blueberry and Hazelnut cake

Recipe adapted from Donna Hay’s Off the Shelf.

Oven preheated to 180C/160C fan.

  • 2 apples (Braeburn), cut into thin wedges,

— Gently fried in butter until they have softened slightly and lost some of their opacity. Put aside to cool.

Cooked apples

  • 125g butter, softened
  • 225g caster sugar
  • 1 teaspoon vanilla extract

— all beaten together in the KitchenAid until light and fluffy

Creamed butter & sugar

  • 2 eggs

— beaten together, and then slowly beaten into the creamed mixture

Added egg

  • 145g plain flour (forgot about the self-raising part, and it was fine!)
  • 45g ground hazelnuts

— added to mixture and mixed just to combine.

Flour and ground hazelnuts folded in

Scraped all of this into a lined and greased 9 inch/22cm springform tin.

Batter spread in pan

Arrange the apples on top and sprinkle over a carton of blueberries (around 150g – 200g).

Apples onto cake

Add blueberries

Bake for 1 hour, until the cake risen between the fruit is golden, and springs back. You can also use a skewer to test for crumbs, but pick a point in between the fruit.

Put on a rack to cool, and sprinkle with icing sugar before serving.

Finished cake

The final cake is firm and moist, slices cleanly and supports the fruit without it sinking through. It’s perhaps a touch on the sweet side, so I might consider experimenting with reducing the sugar in future. That is the sort of thing you want to do gradually, as you will affect the ratio of the cake.

Beginning to bake #8: A simple loaf of bread

White bread baked in a pot

I’m going to give cakes a bit of a break – too much sugar around here. Instead, let’s turn to bread. Bread is probably the baking area with the greatest gap between myth and reality. It seems hard and unachievable, the sort of thing only crazy obsessives or domestic goddesses attempt. Actually the process is easier than making a cake.

So how did breadmaking acquire this intimidating aura? A few things get in the way:

It takes time

Unlike the soda bread, which came together in just an hour, yeasted bread will need at least 2 or 3 hours from start to eating. However, for most of that time, you don’t need to do anything. What you really need is a few hours when you’ll be at home so you can dip in and out of the process. One useful thing is to make bread while you’re making something else like a casserole. That allows you to chop some carrots or stir the pot while you’re waiting for the next bread step.

You can even stretch the time out so you can start it off one evening and continue the following morning or even the next evening. There are a number of tricks to use to speed up or slow down the dough and make it work to your schedule.

Briefly, you can speed things up by using more yeast or by keeping everything warm so the yeast multiplies faster. Conversely, you can slow things down by starting with less yeast or using the fridge to store the dough for a while.

It’s not predictable

Cakes can be tricky, but you can have a reasonable expectation that if you use the right ingredients, weighed accurately, and baked at the right temperature, it should do exactly what it’s supposed to. Bread making is more unpredictable, in that factors that are hard for you to control at home (like room temperature and humidity) have a much greater influence. This is fundamentally because you’re cultivating a live organism, the yeast, to do the work of aerating the bread. It’s more like gardening than cooking. The trick lies in understanding the processes and recognising what they look like, so you can proceed until the dough is ready, rather than watching the clock.

You need to know what you’re aiming for

One reason people can be disappointed with their breadmaking is that it isn’t like their favourite bought type, and there are many different types of bread. Whether you like rough, chewy sourdough, nutty wholemeal sandwich loaves or soft white rolls, you can create each of them at home, but you’ll need to use not just a different recipe but a different approach for each one.

So, with that in mind, this recipe is for a white loaf with a crust that can be baked in a loaf tin, on a baking sheet or in a pot to make a round ‘boule’ shape.

Equipment:

  • Bowl
  • Wooden spoon
  • A little sharp knife

For baking:

  • A large round casserole dish with a lid (Pyrex or cast iron – it needs to be able to withstand high temperatures)

For the best first-time results, I would recommend the casserole approach, but you can also use a preheated baking sheet, or a loaf tin and put a roasting tin of hot water on the shelf beneath to create steam.

Basic recipe:

  • 500g strong white bread flour
  • 300g water
  • 3 tsp dried yeast, or one sachet
  • 1 1/2 tsp sea salt
  • 1 tbsp olive oil or vegetable oil

I’ve covered lots of other tips and tricks for making bread in a previous post, so I’ll go through the recipe fairly straight. This method is adapted from Dan Lepard’s technique and a really great blog post by Azelia’s Kitchen.

Method:

1. Mix

Flour, yeast, salt

Put the flour, yeast and salt into a bowl and mix briefly to distribute the yeast and salt. Add the oil and water. The water doesn’t need to be warm, but if you want things to move fast, then that will help. Mix into a rough dough with a spoon, stopping when there’s no more dry flour.

Shaggy dough

2. Rest

Rest the dough

Cover the bowl with a tea towel and leave for 10 minutes. This step starts the gluten working (remember that water + flour = gluten) by allowing the flour time to absorb the water properly.

3. Fold

Bread folding

Instead of kneading to develop the gluten, this approach folds the dough to develop and stretch the gluten. You can do this in the bowl if you’re short of space, but it’s a little easier to do on the counter. If you’re putting it on the counter, use oil rather than flour to prevent the dough from sticking. This means you won’t change the overall balance between flour and water in the recipe.

Just scrape all the dough out, push it into a single ball and then fold each side into the centre, as if it had 4 sides.  Do this three times, for 12 folds in all. This should create a nice tight ball, with a smooth surface on the side away from the folds.

12 folds

4. Rise

Ready to rise

Turn the dough so the smooth side faces up in the bowl. Cover the bowl with cling film and leave to rise for a few hours or until doubled in size.  To speed this up, put the bowl in a warm place, or to slow it down, if you need to leave it alone and come back later, put it into the fridge. If you do that, you’ll need to let it come back to room temperature before you carry on.

Risen dough

5. Shape

Once it has risen, it will be very puffy, with big bubbles. To redistribute these and form the shape of the loaf, scrape the dough out of the bowl onto a floured counter. Try to make sure the smooth upper surface is preserved, and ends up face down on the counter. Press all over with your fingertips to push down the big bubbles and flatten the dough slightly. Fold the sides into the centre again to reform the ball.

Shaped dough

6. Proof

Proofing

Put the dough onto a floured tea towel, this time smooth side down. Fold the towel over it, and leave to rise again, for somewhere between 30 minutes and an hour, until it’s expanded again and become puffy again.

Proofed dough

7. Bake

While the dough is proving, put a large casserole dish with a lid into the oven (Pyrex or cast iron are good). A good 20 minutes before you think the dough will be done (start after 20 minutes if you’re not sure) turn the oven on and set to 220c or 200c for a fan oven.

Into the hot pot

Once you’re ready to bake, take the scorching hot pot out of the oven, remove the lid and tip the dough, fold-side down, into the hot pot. Use a small sharp knife to slash the top of the dough. Replace the lid (don’t forget to use oven gloves) and put into the oven. Bake for 30 minutes, then remove the lid and bake for another 15 or 20 minutes to get the top brown.

First bake

Finished loaf

8. Cool

Tip out onto a rack and leave to cool. Be as patient as you can – important things happen to the interior of the loaf as it cools, and you’ll find it is quite doughy if you cut it early.

The bread will keep well for a couple of days because of the oil in it, but if you don’t think you’ll get through it wrap the whole loaf or a half before freezing. You can also hand-slice it and then freeze so you can toast it straight from the freezer.

Beginning to bake #7: Cupcakes (or fairy cakes)

Icing on top

To most people, cupcakes and muffins are pretty much the same thing. Certainly, if you buy them in supermarkets, both will be very sweet, quite dense, and come in individual paper cases. Cupcakes are likely to be differentiated by a swirl of thick icing or perhaps a glaze of shiny royal icing.

But in baking terms, the two are very different. Muffins have relatively little fat or sugar, and are combined very carefully. They produce moist, not-too-sweet buns, which often have fruit mixed through the centre. They rely on a big boost of baking powder or bicarbonate of soda to make them airy, and because they contain so much moisture (and water + flour = gluten), you have to mix them very gently so they won’t be tough.

Cupcakes, however, are just sponge cakes made in little cases. Think of fairy cakes or butterfly cakes you might have made at school. Although the recipe in this post is for cupcakes, you can also bake it in a larger cake tin to make a sponge cake. For that matter, almost any cake recipe in this format (where you cream the butter and sugar together first) can be converted to cupcakes by just baking it in paper cases (a useful thing to remember if you don’t have the right sized tin, or the mixture looks like it won’t fit – bake the excess as cupcakes). You just need to make sure you adjust the baking time (and in some cases, the temperature).

Structure of the batter

The structure of a cupcake is a foam, a web of flour starch and egg proteins, with many tiny bubbles. The big difference between making cupcakes and any of the previous recipes in this series is that incorporating the air is much more important. The batter you end up with is quite delicate, with just enough connection between the ingredients to hold the all-important air in there.

The starting point for incorporating air in this type of cake is creaming, mixing butter and sugar really thoroughly to create bubbles. Both of the biscuit recipes started by mixing together the butter and sugar, but this is not creaming. Creaming involves beating the butter and sugar together for a long time, to allow the sugar to create little bubbles in the butter – what Hannah Glasse in 1774 described as a ‘fine thick cream’. This is work that calls for electric assistance – Hannah Glasse suggested that using your hand, this should take an hour. Another 19th Century book suggests it is “the hardest part of cake making” and you should have your manservant do it.

In the absence of a man-servant, a handheld electric mixer or a stand mixer like a Kitchenaid makes this much, much easier. With a small quantity it can be done by hand, but expect a decent workout. You need the mixture to change colour – as the air is incorporated, the bubbles make the mixture look paler. The texture also becomes much fluffier.

Basic recipe:

(adapted from Nigella Lawson’s cupcakes in ‘How To Be A Domestic Goddess‘)

This recipe is for a plain sponge, more of an old-fashioned fairy cake than a fluffy American cupcake. However, if you master the techniques for this, then most other cupcake recipes will look familiar*.

  • 125g butter, room temperature
  • 125g caster sugar
  • 2 eggs, room temperature
  • 1/2 tsp vanilla extract
  • 125g plain flour
  • 1½ teaspoons baking powder
  • 2-3 tbsp milk

Diagram of recipe

To make sure everything mixes together easily, you need to make sure that everything is at room temperature, and that the butter is really soft but not melted. To warm eggs up, put them in a bowl with warm water for about 5 minutes. To warm butter, microwave on the lowest setting, or use a very, very low oven (60C or so.)

I’m also going to assume an electric mixer of some sort, although with enough elbow grease, you can do the same with a wooden spoon.

Start by beating the butter on its own to make sure it’s soft. Add the sugar and mix together, then beat really thoroughly until creamed – pale and fluffy. This should take at least 5 minutes with an electric mixer, probably longer.  It’s almost impossible to do this for too long.

Creaming-montage

Beat the eggs in a small jug or bowl. Add a little at a time to the butter and sugar, beating really thoroughly after each addition. Add the vanilla, or any other flavouring (such as lemon zest for lemon cupcakes). It’s at this point that the mixture can curdle, especially if things started out a bit cold – the mixture will look lumpy and a bit scrambled (see photo, ahem). If this happens, the answer is just to keep going – it might not be as light, but it will come back together when you add the flour, and the end result should be fine.

Curdled mixture with eggs

Sift in the flour and baking powder. Mix very gently, ideally by hand, just to combine and mix in any visible streaks of flour. A silicone spatula is good for this, as you can scrape the sides and right down to the bottom of the bowl.

With flour added

If the mixture is still quite stiff, you can add a little milk to loosen it up. The traditional description of this is ‘dropping consistency’, meaning if you scoop up a big spoonful and hold it upside down of the bowl, it will drop off. Mix the milk in very gently – remember that the liquid in the eggs, plus the milk will activate the gluten in the flour, and too much stretching at this stage will make the network of protein in the cake too tough.

Divide the batter between the muffin cases. Bake for 20 minutes at 190C/170Cfan until the tops are evenly golden and the centres spring back when you push them gently (meaning the centres are cooked through).

Into cake cases

Cool on a wire rack before icing. The simplest icing is to use icing sugar or royal icing sugar mixed with a very small amount of water or lemon juice and spread over the top.

Baked until golden

* There are some sponge or cake recipes that ask for you to mix the fat and the flour together first, waterproofing the flour as much as possible, and relying on the baking powder for the rise.

Variations:

The most obvious variations are flavour ones. The main thing is to use concentrated flavours so that you don’t add too much liquid or too much dry ingredients and change the balance of the mixture.

  • Replace some of the flour with 2 -3 tablespoons of cocoa to make chocolate cakes. Ice with chocolate ganache (an equal mixture of cream and chocolate, melted together).
  • Flavour the mixture with lemon zest (or Boyajian lemon oil) and use lemon juice to make the icing. Leave out the vanilla in this case.
  • Use instant coffee to make a coffee-flavoured sponge.

For further variations, see the next post on sponge cakes.

Beginning to bake #6: Cookies

Cookies 1 and 2

Biscuits or cookies – there are hundreds of variations. Providing a basic recipe for biscuits is hard – there are thousands of different biscuit or cookie recipes out there, and every country has it’s own favourite variations: bourbon biscuits, gingernuts, speculoos, chocolate chip cookies, macarons de Paris, biscotti, shortbread, digestives – the list is *long*.

But let’s start with some generalisations: most are a combination of flour, butter and sugar. Many also have egg to bind the dough together and to help it become crispy. Some will include some leavening – baking powder or bicarbonate of soda – to help it puff in the oven.

The shortbread-type cookies contain just flour, butter and sugar. They are mixed in the same way as pastry, but with softened instead of cold butter. This makes it hard to roll out, but gives you that characteristic shortbread crunch and really crumbly texture.

American cookies usually have a lot more sugar and some extra liquid or egg. They are usually designed to be scooped into balls and then spread out in the oven, and they usually have plenty of additions – chocolate chunks, nuts, dried fruit, oats.

Looking at different cookie recipes, there is a huge variation in them (and, because I’m a complete geek, I assembled a spreadsheet to check this. I know. But it keeps me in gainful employment). Look at different people’s shortcrust pastry recipes and you’ll probably find they are almost identical. No two biscuit recipes seem to be the same. That gives you a clue – if there is a very wide range in existing recipes, that tells you that you can probably play around and adjust recipes quite safely, and still come out with something that works/is edible.

To prove that, I tested two different but basic cookie recipes for this post. Use whichever you like the sound of. When you make such plain cookies, though, remember that the taste of the butter will be very prominent, so use something good, and definitely don’t use margarine or low-fat spread.

Make sure the butter is soft before you start. If you usually keep butter in the fridge, as I do, there are a couple of things you can do. One is to get the butter out of the fridge and put it on the counter several hours before you plan to bake. Hmm. No, I don’t usually remember to do that either. Instead, I most often slice the butter I’ve weighed for the recipe into thick slices on a plate and put it into the microwave. I use 1 min bursts on the lowest setting (90W) until I can press a finger in without too much trouble. You don’t particularly want to melt it, but if part of it does, just let it stand for a bit, and then mix it all together again. For cookies, it’s not a big deal, though it will get more important next time when we move on to cupcakes…

Cookie recipe 1 – shortbread type

Baked sliced cookies 1

This is a very plain dough, and almost the only difference with recipe 2 is the much reduced amount of sugar. On its own, it’s a bit boring, but it would work well as a thumbprint cookie (where you press a depression in the centre of the cookie and fill it with jam). The contrast with something very sweet would work with this plain dough. Because it’s quite fragile, I rolled this dough into a log, chilled it, and then sliced it into discs before baking. You can also use this method to make a sweet tart case – take the discs and press them together in a tart tin to form a complete crust.

  • 200g butter, room temp
  • 100g caster sugar
  • 300g plain flour
  • 1 tsp vanilla extract
  • 1 tsp baking powder
  • 1 large egg, beaten

Put the softened butter into a bowl and add the sugar. Beat together – it will make a paste.

Add the vanilla. Put a sieve over the bowl, and add the flour and baking powder. Sift into the bowl and mix together. It will be crumbly.


Add egg and knead gently until it comes together as a dough.

Cookie dough 1
Wrap into a cylinder in baking parchment and twist the ends. Chill for about 30 minutes.

Cookie dough roll

Slice into discs about 5mm thick, and place the slices onto a baking sheet lined with baking parchment. If you want, press in chopped chocolate or coarse sugar as a topping.

Sliced dough with toppings 1

Put into the oven and bake for about 14 minutes at 150C (fan)/170C. When they’re done, they will still be very pale, but should just start to colour slightly brown at the edges.

Cookie recipe 2 – cookie type

Chocolate chip cookies 2

This is more recognisably a cookie. It won’t be chewy, but crisp instead. If you want chewy you can do a few things: use brown sugar instead of caster sugar; replace plain flour with bread flour, and beat the dough to develop the gluten a bit (you’ll need a mixer or a strong arm).

  • 200g butter
  • 300 plain flour
  • 1 tsp baking powder
  • 300g caster sugar
  • 1 tsp vanilla extract
  • 1 large egg, beaten

Cream the butter and sugar together, to make a stiff paste.

Butter and sugar 2

Add the vanilla and egg, and mix together. Place a sieve over the bowl, and add the flour with the baking powder. Sift into the bowl to make sure the two are combined. Mix together – it will form a stiff dough.

Cookie dough 2

Mix in any chunks, flavourings or other additions. For this recipe I used 70g of chopped dark chocolate.
Chocolate chip cookie dough 2

At this point you can chill the dough for 10 or 15 minutes (especially if it’s very soft) or up to a couple of days. Use a scoop or a spoon to pull off about a tablespoon at a time of dough, form it into a ball and place it on a baking sheet lined with baking parchment.

Scooped cookie dough 2

Bake for 15-20 minutes at 150C(fan)/170C, depending on how crisp you want them. As for the other cookies, you are looking for at least a little colour at the edges. These won’t colour like most cookies because they don’t contain brown sugar, so they will remain quite pale.

Variations:

Beginning to bake #5: Freeform rhubarb tart

Created with Admarket’s flickrSLiDR.

Shortcrust pastry is one of the most useful baking skills. You can use it for sweet or savoury dishes, make it in any quantity, keep it for a day or two in the fridge or store it for later in the freezer. And the skills are very simple – you mix the flour and butter using the same rubbing in method as for scones.

The recipe today is for a freeform fruit tart, so you don’t need to worry about lining a pie dish or tart tin. You can use all sorts of fruit in the centre, just cut fairly small so it cooks through. Watch out for fruits that give off a lot of juice when they cook – you might want to add some breadcrumbs or cake crumbs underneath the fruit to soak up the juices. But with the rhubarb here, I just didn’t pack it too closely, and it was fine.

Rhubarb tart

Making shortcrust pastry is surrounded by a dense thicket of rules and myths:

  • Cold hands make better pastry
  • You should roll out the pastry on a marble slab
  • You need to use ice water
  • All butter pastry is best
  • You should always use lard for the best pastry

So why all the rules? What’s with keeping everything cold? For pastry, you really need the waterproofing effect of the fat to make sure the pastry ends up ‘short’, which means crisp and crumbly, like shortbread. Butter is made of only about 80% fat (depending on the brand). The rest is a mixture of water and milk solids (seriously. Check the nutrition panel on a packet). This means that anything you do to warm the pastry up risks melting a little bit of butter and releasing some water into the flour, and you want to keep that to a minimum.

Another reason for keeping things cold is to preserve some pieces of fat in the pastry. When the dough is rolled out, these pieces will form thin layers of fat, separating layers of dough. As the pastry cooks, the fat melts and separates the layers, making the cooked pastry flaky as well as crumbly. If you want a more flaky pastry, leave more large pieces of fat in the dough. When you roll it out, if you can see big streaks of fat, you can gently fold it like a business letter before proceeding. This will gives you some of the characteristics of rough puff pastry. If you want it more crumbly, rub the fat in until all the big pieces disappear. For a really shortbread-like crust, you can use softened or melted butter, along with sugar, which also interferes with the gluten.

Similarly, you want to handle it as little as possible. Rolling it out or stretching it many times will make it tough not crisp, as it develops the gluten.

Why use lard or shortening?

Those who swear by lard or vegetable shortening for their pastry do so for two reasons. One is that both are 100% fat, so there’s no risk of releasing water into the pastry as it melts. The other factor is that both melt at a higher temperature than butter, meaning you can use warm hands with less risk of melting the fat. The down side of both is that the flavour isn’t as nice as butter, so a common compromise is to use half butter and half lard.

Equipment:

  • Bowl
  • Knife
  • Baking sheet or tart tin

Basic recipe:

The phrase to remember is ‘half fat to flour’ – you always start with a ratio of half the weight of butter or other fat to the weight of flour. Richer shortcrust pastries can use more butter, and can use eggs as well, but this is the basic recipe, and a good place to start.

  • 200g flour
  • 100g cold butter (or half butter and half lard)
  • 4-5 tbsp cold, cold water
  • Big pinch of salt

For a rhubarb tart:

  • 3 sticks of rhubarb
  • 1 clementine or orange
  • Brown sugar

Method:

Weigh the flour into a bowl, add the salt, and add the cold butter, cut into chunks. Using a dinner knife, cut the butter into smaller pieces in the flour. Aim for the largest chunks to be about the size of a large pea. This will make it easier to rub the butter in.

Butter pieces cut in

Using your fingertips, rub the flour and butter together to integrate them, as in the scones recipe. Here, it doesn’t matter if the butter doesn’t disappear completely – you can leave some small lumps. Keep everything as cold as you can.

Once the butter is rubbed in, add about 3 tablespoons of fridge-cold water (about 45g if the bowl is on the scales).  Use the knife to mix it around and try to get everything equally damp. You’re not trying to get it wet enough to form a ball on it’s own, like with scones. All you need is enough dampness that when you squeeze the crumbs together, they stick to each other and don’t crumble apart again. Try that test to see if it’s ready. You will probably need another tablespoon or two to make sure it’s damp enough all the way through, but try not to use too much more than you need. The more water you use, the tougher the pastry will be, and the more likely it is to shrink when it is baked.

Use the knife to start sticking the damp crumbs together (the more you can use a knife or a scraper to push things around, the less you will have to use your hands, and the cooler everything stays).

Tip everything out onto the counter and pat and push it into a single disc of dough. Put this into a small ziplock bag or wrap it in clingfilm, and stash it in the fridge. Leave it for at least 30 minutes and up to a day.

Pressing down

Remove from the fridge, put it onto a floured counter and start to roll out with a rolling pin. If it’s too cold and stiff for the rolling pin to make an impression, leave it out for a while.

The trick when rolling out pastry is to roll it only in the middle – don’t roll off the front or the back. Just roll a little, then turn the pastry gently by about 1/8th of a turn, and roll again. This stops you making any part of the pastry too thin, and turning it helps to keep it roughly round and makes sure it is not sticking.

The pastry will probably start to crack at the edges as you roll it out. You can push these together, so that they don’t spread and get bigger as you roll further. Just push the edges of the crack together with your fingers, or pat the edges to seal it up.

Cracks at the edge
Push the cracks together

Once you have a thin sheet of pastry, transfer carefully to a baking sheet. It’s easiest to move it by draping it over the rolling pin, or by folding it gently in half and then sliding it over. Using a piece of baking parchment to line the baking sheet will make it easier to move, and will also stop any juices from the fruit sticking the tart to the baking sheet when it’s baked.

Move to baking sheet

Spread it out on the baking sheet, and move the whole thing into the fridge while you prepare the fruit. This will chill the pastry back down, and also give the gluten that was stretched out by the rolling pin a chance to relax.

Meanwhile, chop the fruit into small pieces and combine with a couple of tablespoons of sugar, and some clementine zest here.

Cut rhubarb and mix with sugar

Remove the pastry from the fridge. Arrange the fruit over the pastry, leaving a wide border around the edge. Leave any juices that have collected in the bowl. Fold the edge of the pastry over the fruit, and pinch it together to hold it in place.

Crimp edges

Crimp it all the way around, then if there are some sugary juices still in the bowl, use a pastry brush to brush them over the edge of the pastry. This is not essential, but will make it sweeter and help it brown.

Bake at 200C/180C for about 20 minutes until the pastry is brown and crisp.

Variations:

  • You can cut the pastry into pieces when it comes out of the fridge, and roll each piece out separately to make individual tarts. The ones below are actually made with a rhubarb-apple compote and roasted rhubarb pieces on top.

Small rhubarb tarts

  • French apple tart – use the same pastry to line a tart tin. Peel, halve and core about 6 or 7 medium apples. Slice thinly and arrange on the pastry. Bake for about 45 minutes, until the pastry is deep golden and the apples are all cooked and starting to colour. Brush the top with warmed apricot jam. This one adapted from a recipe in Saveur magazine.

Apple tart

  • Use the same pastry on top of a dish of beef stew or chicken to make a pot pie. Brush the dish with water or milk to make it stick, and crimp it to the dish. Cut a couple of holes in the top to let the steam escape. Brush the top with milk or egg to get a lovely golden colour. Try replacing the puff pastry in this Jamie Oliver recipe for beef and Guinness pie with your own homemade pastry.

Beginning to bake #4: Bread in an hour

We’re on to post four of my baking mission – read the original rationale here. In this Lent project, we’ve gone from pancakes to muffins to scones. And now we’re starting bread.

But not scary yeasted bread – that comes later. A soda bread that can be ready in an hour. And that’s an hour from walking in the door to eating it (I timed it in case you didn’t believe me, and you can see the timer running in the photos).

Bake 35-40 mins

Soda bread and scones are very closely related. Instead of yeast, soda bread again relies on baking powder or bicarbonate of soda for leavening. As the name suggests, soda bread is most often made with bicarbonate of soda (baking soda if you’re in North America) along with something acidic like buttermilk. And apart from flour and a bit of salt, that’s all you need. A little melted butter is often added to make it more tender. There are also recipes with more butter, some sugar and raisins that make something more like a tea cake or a scone – also very good, and see the Smitten Kitchen variation below, adapted from the New York Times, which suggests serving with some cheese and apples.

IMG_0083

Back with a more austere recipe, with so little in the way of ingredients, you really need good flour, and proper seasoning to get a good flavour from the bread. Wholemeal or a mix of plain and wholemeal flour gives you a wheaty flavour and a more interesting texture. Spelt flour is also good, and small parts of rye flour mixed in will give another flavour again. Stoneground flour has more flavour than regular flour – the grinding process will incorporate the germ and more of the oils into the flour, so you can often see a visible difference, and it looks creamier than steel-ground plain flour.

Like scones, this bread will also stale fast, so it is best made and eaten warm on the same day (although it will also make decent toast the following day). But it’s so quick that there’s no need to keep it hanging around. Just make it when you want it.

Equipment:

Nothing new here: scales and measuring spoons, plus:

  • Bowl
  • Wooden spoon
  • Baking tray

Basic recipe:

  • 200g plain flour
  • 200g wholemeal plain flour
  • 1 teaspoon bicarbonate of soda
  • 3/4 teaspoon salt
  • 190g yoghurt + 140g milk (or 330ml buttermilk)
  • 1 tsp honey (optional)

Turn the oven on and set the temperature to 200C or 180C for a fan oven.

Weigh the flours into the bowl. Add the bicarbonate of soda and salt, and combine with a whisk.

Weigh flour and bicarb

Add the milk and yoghurt to the bowl. Add the honey on top if using, then use the spoon to mix everything together until you have a sticky ball of dough.

Mixed dough

Sprinkle plenty of flour on a board or the counter. Scrape the dough out onto it.
Turn onto floured counter

Sprinkle the top with more flour, and flour your hands. Fold each edge over into the centre to make it into a ball. It will be very sticky. Use plenty of flour, and don’t handle it too much. Just get it into a rough ball shape.

Fold into a ball
Lift the ball gently onto the floured baking sheet. Pat it out to about 3cm thick, just flattening it a bit.

Flour the handle of your wooden spoon, and press it into the surface of the dough to make a cross. This will give the dough room to expand in the oven, and help the loaf to rise a little, giving a lighter crumb.
Mark cross with a spoon handle

Put the tray into the oven and set the time for 35 minutes. After that time, check the loaf. It should be a dark golden brown. If you’re not sure, bake for another 5 or 10 minutes. I baked for 40 minutes at 180C in my fan oven. An oven without a fan will take longer.
Bake 35-40 mins

Leave to cool on a rack for at least 5 minutes, and then slice and enjoy warm with butter.

Serve warm

Variations:

Lorraine Pascale Soda Bread

Lorraine Pascale has a lovely recipe which makes a large loaf. She uses treacle to give the loaf flavour and a little sweetness.

Smitten Kitchen – Skillet Irish Soda Bread

Smitten Kitchen adapted a New York TImes recipe to make a much sweeter, more cake-like loaf, that is still incredibly good. I like to bake this one in my deep oven-proof cast-iron pan, lined with baking parchment, but it will work on a baking sheet as well.

Richard Corrigan – Whole poached wild salmon with wheaten bread

In Northern Ireland, soda bread is often known as wheaten bread. Here Richard Corrigan of Lindsay House and Bentley’s Oyster Bar in London, gives his wheaten bread recipe.

Beginning to bake #3: Scones for tea

Baked scones

Scones are easy to make at home, but so hard to buy. If you’ve never had a homemade scone, the chances are you’ve never had a good one.

Scones also keep very badly. Even the next day they become dry and crumbly. So the solution is to bake them the day you want to eat them, and if necessary, freeze any leftovers that day. They are the sort of thing the fifties domestic goddess would start to make because someone had dropped around unexpectedly – quick, and best eaten fresh from the oven.

Why are scones next on the ‘how to bake’ list? Like pancakes and muffins, the ingredients for scones are pretty simple, and rely principally on baking powder to make them rise. You just need flour, butter, milk, baking powder and maybe a little sugar to to put them together. Some add eggs to the recipe, but I’m sceptical – that seems to make a much cakier thing, and not a proper cream-and-jam scone.

The differences are that you use cold butter, and you rub the butter into the flour, creating crumbs. ‘Rubbing in’ the butter is something you also do with shortcrust pastry. It involves cutting the cold butter up into pieces about the size of peas. Then you use your fingertips to rub the lumps of butter into the flour. This distributes the butter through the flour, coating some of the flour with fat, and waterproofing it to restrict the development of the gluten when the milk is added. You want soft and tender scones – too much gluten would make them tough and chewy.

For the same reason, you want to play with the scone dough as little as possible – don’t knead it or smush it around. Use a spoon to mix the dough together, then your hands very briefly to make sure all the floury bits are incorporated. You need to make sure it forms a single lump of dough, but no more than that.

To make the scones, you can flatten the dough with a rolling pin or just use your hands. It just needs to be patted out to about 2cm high. The thicker the dough at this point, the taller your final scones will be.

You can use a cutter or a glass for round scones. For minimum waste, just cut the dough into wedges or squares with a sharp knife.

Glazing the scones is optional, but it will give you a beautiful shiny golden top. The ideal is a beaten egg, or a yolk beaten with a little egg or cream. Some milk or cream on it’s own will also do, but won’t be as golden. Try not to drip glaze down the sides – it can limit the rising in the oven.

Equipment:

  • Bowl
  • Spoon
  • Knife
  • Pastry brush
  • A solid baking sheet. That means thick sheets of metal, probably aluminium. Can be non-stick, anodised or plain. You need it thick and heavy so it won’t warp and twist in a hot oven.
  • A round cutter (optional: the end of a water glass will also work, or use a knife to cut squares.

Basic recipe:

Adapted from Nigella Lawson’s ‘How to be a domestic goddess’:

  • 250g plain flour
  • 1/2 tsp salt
  • 3 tsp baking powder
  • 70g cold butter
  • 2 tbsp / 30g caster sugar
  • 130ml milk (full fat if you can)
  • 50g sultanas or raisins for fruit scones
  • 1 egg plus 1 tbsp milk for the glaze

Method:

Put the flour, salt and baking powder in a bowl and mix togther with a whisk.Slice or cube the cold butter and put it into the flour.

Flour and butter

Use a butter knife to slice through the butter, reducing it to small pieces in the flour.

Once you’ve sliced it up as much as you can, use your fingers to rub the butter and flour together. The movement you want is something like the ‘money, money, money’ gesture – rubbing your thumb along the fingers of the same hand and back again. The trick is to get the bits of butter and flour in there so that as you rub your fingers together, the butter and flour get pushed together. Using your fingertips keeps everything from warming up too much – your fingertips are cooler than your palms.

Butter rubbed into crumbs

Once the butter has almost disappeared, and the mixture looks sandy without any big lumps, add the sugar, and raisins or sultanas if you want to use them.

Add the milk and stir everything with a spoon or a knife to make a dough.

Mixing into dough

Once it’s almost all mixed, use your hands to push and squash it until there are no more floury parts and the whole thing comes together in a single ball, leaving the bowl virtually clean.

Ball of dough

Take a small handful of flour and scatter it over a counter. Tip out the ball, and if there are any big fissure or cracks, push them together. Push the ball out to flatten it to a roughly rectangular piece about 2cm thick. Use a cutter to cut round scones, or a knife to cut into 6 square ones.

Cutting scones

Cut scones

Put the scones carefully on a baking sheet.

Scones on the tray

Beat the egg with a little milk (or just use milk on its own) and use a pastry brush to glaze just the top of the scones. This will make sure they get a golden colour in the oven.
Bake for 10-15 minutes at 200C until risen and brown on the top.
Cool on a rack and eat as soon as possible (or freeze).

Baked scones

Variations:

The Guardian: as part of a series, Felicity Cloake investigates the recipe for the perfect scone

Baker Paul Hollywood was featured on BBC2’s the Great British Bake-off. He says his scone recipe is perfect.

Delia has a step-by-step on how to make scones on her website.