Links and thoughts from April

Cherry blossom in the park

April has been a waking-up month. This winter has seemed so long and cold that when the sun finally came out, and the ground started to warm and flowers started to appear, it was like emerging from hibernation. Suddenly outdoors was something to linger in, instead of something to be battled through as fast as possible.

I was nudged by someone to buy bulbs from Bloms Bulbs in the autumn, and now I am really glad I did. The tulips in particular have been spectacular. I’m always surprised by how many come up from previous years as well. I have a habit of planting them in tubs and forgetting about them as soon as they have gone over. So the ugly pot of weeds I’ve been hosting on my front step for the last six months or so is suddenly filled with creamy tulips.

Purple prince a week on

I said this on twitter but Gluten Free Girl has absolutely floored me with some of her writing this month. She writes honestly and from the heart anyway, but when her car was stolen, and when she marked an anniversary with her husband, it generated some truly absorbing prose.

60 year old Magnolia

I found this article about J Crew really interesting, especially the interaction between Jenna Lyons, the creative director, and the Chief Exec. If you’re in the UK, you may have come across J Crew in references to to Michelle Obama – she and her daughters often wear the brand. They are essentially a preppy, clean-cut clothing company, a little like Gap, but have moved towards a more cutting-edge look in recent years, as the article describes. I still have a couple of items from there that I really like that I bought when I was living in Palo Alto in 2004/5.

Although it’s just the two of us that sit down to dinner in our house (and sometimes not even that), I really enjoy Jenny Rosenstrach’s ’Dinner: A love story’ blog and [her book of the same name](“Dinner A Love Story – Amazon.co.uk”). I really loved her 100 Rules of Dinner post – not just rules for dinner, but rules for cooking, good food and life. My favourite is probably #71:

Performance enhancing drugs are to sports as butter is to cooking. Which is not
to say that butter is evil. But it is cheating.

although I am a completely on board with #29 and #54, and a total evangelist for #15:

Resist the urge to apologize when you’re cooking for people. Most of the time your
dinner guests won’t notice anything is wrong until you bring it up.

River

Making late-night birthday cake

Or How to bake a cake between 9:30pm and 11pm

Cutting the cake

There is something quite sad about supermarket birthday cakes. Don’t get me wrong – I’ve certainly bought them before now – but it’s just not the same as a homemade cake. There’s a particular large supermarket that sells a rectangular sheet cake, decorated with sweet chocolate buttercream and stars that often makes an appearance at my workplace. It looks so promising, with swirls of icing along the edges, but it always seems disappointing. The sponge is damp and collapses easily. The icing is gruesomely sweet. Even the chocolate stars on the top are have that waxy quality, more cake covering than chocolate.

I am an unashamed snob about birthday cakes. They need to be homemade, or from a good bakery. It’s not a celebration if the cake is going to coat your mouth, give you a sugar crisis, and is made of palm oil and emulsifiers. And it’s not too hard to come up with something better than those options.

Rectangular tins are perfect for low-hassle birthday cake. No complicated turning out or layering, just leave it in the tin, cover with frosting and then pop the lid on to take it to the birthday destination. I have an old traybake tin from Lakeland that I tried for the first time the other day. Although the tin is a little thin, and the non-stick looks a little fragile, its killer feature is a plastic lid with a handle that clips onto the edges for transportation. But even without a bespoke lid, if the tin is deep enough to allow the cake and icing to sit below the rim, the whole thing can be wrapped in cling film (plastic wrap) for transport.

It’s even possible to make a birthday cake if you’ve been to the pub after work and don’t get home until a bit late (as long as you’re fairly sober). Here’s how to make a late-night birthday cake:

  • Get in the door at 9:20pm
  • Immediately switch on oven, and get butter out of the fridge. Cold butter and sponge cakes don’t work well together.
  • Find Smitten Kitchen’s cookbook because you remember she has a sheet cake recipe in there (basically this one, but scaled down).
  • Find the weight of butter needed, and weigh it onto a plate. Put this into a microwave for two minutes on the lowest, lowest setting so it can soften.
  • Go back to the book and check that you really do have all the ingredients called for before you go any further. Yes, it seems OK. The only tricky one is buttermilk, but that can be taken care of with the last of the yoghurt, combined with some milk.
  • Dig out your traybake tin and check it is roughly the right dimensions. 20 x 30 cm is a typical size for a traybake recipe, but after last week and the coconut cake, I want to make sure this is deep as well. Put a piece of parchment paper in the tin – not only to stop sticking but to protect the non-stick from scratching when the cake is cut!
  • (Remember you haven’t had dinner yet, and re-heat the leftover curry)
  • Prepare the rest of the ingredients: whisk flour with the baking powder and salt in a bowl. Get the eggs from the fridge and immerse in a little bowl of warm water from the tap – everything as close to room temperature as possible. Whisk the yoghurt and milk together in a jug to make them smooth.
  • Once the butter is soft, add it to the bowl and mix it a few times to make sure it’s creamy. Weigh the sugar straight into the bowl and set the mixer running for a good five minutes or so. The mixture needs to become pale and fluffy, not sandy, and as there’s a lot of sugar in proportion to the butter, this takes a while. Don’t rush this bit – everything else is easier if you get this right. Go and eat dinner.
  • Once you have this fluffy state, add the eggs one by one (drying them so they don’t drip into the bowl). If you’re sensible, you would crack them into a cup or ramekin first, to make sure you don’t get shell in the mix. (I go for speed and crack them straight over the mixing bowl.) Mix in one at a time, until you get back to that fluffy looking mixture. Add the vanilla.
  • Now the job is to get in all the flour and the yoghurt/milk without either a) overworking the mixture once the flour is in, b) leaving big patches unmixed, or c) having it all curdle. A good rule is to alternate the two – one third of the flour; mix; half the liquid; mix; one third more flour; mix; rest of the liquid; mix; rest of the flour. This makes sure that nothing overwhelms the mixture at any one time.

Fluffy cake mixture

  • Once it’s all in (and you’re sure that you got the edges of the bowl mixed in too), scrape it all into the tin, smooth to the corners and bake. By now it’s about 10pm.
  • While the cake is baking, make some icing. The treacle chocolate fudge frosting on this page is a good option (I made it without the yolks and water, and with creme fraiche and 2 tablespoons extra icing sugar added). It uses a base of cornflour-thickened chocolate custard, with more chocolate mixed in while warm. Cover and leave until the morning. A simple buttercream of butter and icing sugar would also work.
  • When the cake is evenly golden on top, and a cocktail stick comes out clean, take it out and put onto a cooling rack. After about 10–15 minutes cooling in the tin, turned it out to cool, leaving the parchment still on the bottom. Leave to cool overnight and go to bed.

Frosting ready to spread

  • In the morning before work, put the cake back in the pan (the parchment will help). Beat the icing to make sure it’s smooth and spreadable. Scrape all of the frosting on top of the cake and spread it out with a spatula. Add sprinkles and other decorations if you want. It’s too early for piping.
  • The leftovers

Drømmekage – dream coconut cake

A slice of Drommekage

Drømmekage is a genoise sponge beneath a layer of coconut caramel – a plain cake made glamourous with a baked-on topping. This one is from a recipe by Signe Johansen, from her cookbook ‘Scandilicious’. It belongs to a class of Scandinavian baking that seems to be closely linked to German traditions of Kaffee and Kuchen – Swedish Toscakaka and German coffee-cakes with streusel toppings. There is a Danish word for the togetherness of coffee and cake, hearth and home: hygge. (It also appears on this excellent map of untranslatable non English words. These are cakes designed to be sliced and shared through an afternoon, not squirreled away in a tin for later. It was certainly devoured by my work colleagues last Friday, and generated not a little happiness.

A cake with a baked-on topping is a great thing. A plain cake, but with a little something extra. They strike a nice balance between the slight austerity of a very plain Madeira or pound cake, and the over-the-top elaborateness of a piled high cupcake or layer cake. Whether its flaked almonds on top of a bakewell tart, or a handful of granola on the top of a muffin, they provide not just decoration but a contrast in texture and flavour.

In this cake, the cake is too delicate to add the topping before it is baked, so the solution is to bake the cake, then add the topping and bake again to brown it and merge it with the cake beneath.

This makes it especially important to know when the cake is done – adding the topping too early will (as a Danish colleague warned me) sink the cake, collapsing the sponge into a dense layer. It’s also important to recognise when the caramel is thick enough to top the cake without sliding off.

I’ll give you the recipe, reproduced with very kind permission from Signe’s book, then discuss what’s happening behind the recipe – what are the critical steps?

Drommekage - Danish coconut cake

Drømmekage – Danish Coconut Dream Cake

from ‘Scandilicious – Secrets of Scandinavian Cooking’ by Signe Johansen, Saltyard Books
(and if you like this and live in London, you should definitely consider attending Signe’s Scandi brunch and supper club).

  • 4 medium eggs
  • 300g golden caster sugar
  • 1 teaspoon vanilla extract
  • 150g butter, melted
  • 150ml buttermilk (or a mixture of yoghurt and milk)
  • 300g plain flour
  • 3 teaspoons baking powder
  • 1/4 teaspoon salt

Topping
– 200g butter
– 200g light brown soft sugar
– 150g dessicated coconut
– 100ml whole milk
– 1 heaped teaspoon vanilla sea salt (I used a scant teaspoon sea salt plus half a teaspoon of vanilla bean paste)

Preheat the oven to 190C/170C fan/gas mark 5. Line a 20x30cm deep rectangular cake pan with parchment paper, leaving a 2 inch overhang to help remove the cake later. It helps to have the paper extend above the sides of the tin a little to contain the topping later.

Melt the butter and leave to cool a little. Combine the flour, baking powder and salt in a bowl, and mix with a whisk to distribute the baking powder.

Using an electric mixer beat the eggs, sugar and vanilla together until thick and pale, the batter should form a ribbon when the whisk is removed from the bowl. This will take several minutes on high speed. If you’re not sure whether it’s thick enough, give it another minute.

Pour in half the melted butter and buttermilk and sift half the flour onto the batter. Fold the batter together with a large metal spoon, trying to incorporate as much of the flour, butter and buttermilk without knocking out the air from the eggs.

Pour in the remaining butter and buttermilk and sift over the remaining flour. Fold the batter as above.

Pour the batter into the prepared cake pan and bake for 20 minutes or until the cake has doubled in size, looks light golden brown in colour and is firm to the touch. A toothpick inserted into the cake should also come out clean. You want to be sure it has baked thoroughly and will bear the weight of the topping to come.

Whilst the cake is baking make the topping by adding all the ingredients into a medium saucepan set over medium heat, stirring constantly to prevent the sugar from burning. Cook for 5 minutes until the mixture has thickened and some of the liquid has evaporated. It will reduce a little and also change colour to a slightly darker shade of brown. You want something thick enough that it will spread over the surface, and not run too much.

Once the cake is out of the oven turn the temperature up to 220C/200C fan/gas mark 7. Spread the topping evenly over the cake, return to the oven and bake on the upper-middle shelf for 5–10 minutes until the topping is a toasted deep golden colour (I found this step took more like 15–20 minutes in my oven). Cool in the tin before cutting into squares to serve. As the topping had set into a lovely chewy caramel in some places, I found it easiest to turn it over onto a board, topping side down, and slice with a serrated knife.

Behind the recipe

So what’s going on behind the recipe? Where are the critical steps? I think there are four steps that are particularly important:

Whisking the eggs well enough to support the rest of the cake

What makes this a genoise-type of sponge is that it is based on a first step of whisking the eggs and sugar together until thick, rather than the more usual process of creaming together butter and sugar. This thick mixture is known as ‘taking it to the ribbon stage’, as the mix should form a thick ribbon as it trails down from the whisk into the bowl. Once this is done, the other ingredients – in this case, flour, melted butter and buttermilk – are folded in.
Eggs and sugar whisked together – whether just egg whites or whole eggs – will form a pretty stable foam that can hold lots of air, even when deflating ingredients like butter and flour are folded in. It’s almost impossible to over whisk eggs once a substantial amount of sugar has gone in, so if you want to err on the safe side, just keep going with the whisk a bit longer. This is one of those times where you will give up your right arm for an electric mixer – the handheld ones work really well and are not expensive. I used my Kitchenaid with a whisk attachment.

Baking until firm enough to support the topping

In order to support the caramel topping, it’s important to bake the cake until all trace of liquid cake batter has disappeared, and the cake is fairly firm. The recipe gives the baking time as 20 minutes, but given all the variations in oven temperatures and baking tins, you should always check for doneness before the time is up, then at five minute intervals until it looks close. The first thing I check for with a sponge, whether genoise or creamed, is whether you can still see a wobbly lake of batter in the centre. If a gentle shake of the tin reveals there is still a puddle under the surface you can safely give it another five minutes. Once that has gone, you might want to check more frequently with either a skewer, cocktail stick or small paring knife to see that crumbs rather than liquid batter sticks. To test whether it is firm enough to support a topping, lightly pressing the surface with your finger, to see if it will resist and spring back, is another good test.

Cooking the caramel on the stove

The recipe asks for the caramel mixture to be cooked in a saucepan before adding it to the cake. Caramel is a really temperature sensitive thing, and the thing to know about caramel temperatures is that it won’t start to rise much above 100C until almost all the water is removed from the mixture. This is (I presume), why the mixture is first boiled on the stove – to remove most of the water, and create something that will readily form a set caramel in the oven. I found that the volume reduced quite a bit, and the colour changed from a pale gold to a darker shade.

Baking the caramel to caramelise it further

The aim of this final stage is to convert the sugar from a runny caramel to a chewy toffee-like topping. This means baking it in the oven long enough to caramelise it further and ensure it sets in place. I had difficulty with this stage, as my tin wasn’t deep enough, and as it baked, the topping overflowed the paper lining and spilled over into the oven. Having a very even surface to the cake will help make sure the topping browns evenly, and if you know your oven has some hot spots, keep checking and turn it around periodically, so that it evens out (I put my tin on a baking sheet at this stage to catch any overflowing topping, and also to make it easier to turn around).

Other people’s cookbooks

Books from blogs

Some of my favourite cookbooks by bloggers

One of the things I love about the web, and about twitter and food blogs in particular, is the vicarious friends you make. I get to know people so well through their writing and the little details of their lives, that when they do something big, like publish a cookbook, I want to buy it just to show my support. I’ve found myself doing this more and more in recent years. It started with Clotilde and Chocolate & Zucchini. The came Molly from Orangette and her book ‘A Homemade Life‘. The Smitten Kitchen Cookbook is probably my favourite of the year so far, and were it not for  blogs, I wouldn’t have discovered Jenny Rosenstrach and Dinner: A Love Story (not to mention her transformative pork Ragu recipe).

Jennifer Perillo and Shauna James Ahern, a.k.a. In Jennie’s Kitchen and Gluten Free Girl, are writers I only discovered in the last couple of years, although both have been writing for much longer.

Jennifer I found, like many others, when the food blogging world reached out after the sudden death of her husband Mikey. Her writing at that time was utterly compelling, full of exposed emotions and tenderness. She has written ‘Homemade with Love‘ about their family and the food they love.

Shauna I had heard of many times – she is so well-loved by other food bloggers – but I think I had assumed (wrongly) that because she was writing gluten-free recipes, it wasn’t for me. How completely wrong I was. Her latest book is ‘Gluten-Free Girl Every Day‘, about cooking for and with her family too – her chef husband and her daughter.

Both have recently written about their books and had friends make a short video as a book trailer. And both videos really convey a sense of what you expect these people to be like if you read them regularly: Jennifer, the strong, proud mama who surfaces what’s on her mind, no matter how emotional, and who is there for her girls. Someone who will tell you the story of the recipe and make you care about it. Shauna, the happy, capable mum who just wants things to taste delicious and wants to enjoy the simple things. I love that these videos give me a chance to ‘meet’ both of these writers, and figure out a little more about them.

Check out both of these posts – and see if you don’t want to cheer them both on too. Both of these books are now on my wishlist.

http://glutenfreegirl.com/2013/04/here-it-is/

http://www.injennieskitchen.com/2013/04/why-we-cook-food-curate/

Braising a blade roast of beef

Beef into the liquid

I like to braise a big piece of meat at the weekends. The smell of braising meat makes the kitchen a welcoming place to hang out, and it generates the sort of leftovers that can be very easily turned into quick after-work meals.

I love Jenny Rosenstrach’s Pork Shoulder Ragu, but this weekend I decided to do beef for a change. I asked the butcher for brisket, but they suggested it was probably too fatty for braising and proposed blade instead. And that was a great suggestion. (I bought my blade roast from the superb HG Walter in Barons Court – just the sort of place that will give you helpful advice about a good cut for braising.)

The blade roast – although I wasn’t sure when I bought it – is a cut from the shoulder. You will sometimes see beef braising meat as ‘chuck and blade’ – chuck being the other part of the shoulder. The really distinctive thing about the blade, also called the feather blade, is a central vein of connective tissue, from which radiates veins of fat, looking like a feather running through the centre of the meat. You can cut either side of this tough central vein to create flatiron steaks, or cut across for feather blade steaks. I didn’t take a picture of the meat before I started cooking, but you can see photos of what the blade steaks look like here.

Or you can do as I did, and as advised by the many, many website recipes I visited on the way home, and pot roast it until that central vein dissolves into unctuous jelly.

(I particularly liked the look of Molly Steven’s recipe for beef braised in Zinfandel).

The braising liquid could have been wine, or just stock, but I chose a dark ale – a Bath Ale stout – along with beef stock. I could also have added tomatoes to the sauce to create a more pasta-like ragu in the end, but wanted to keep the flavours cleaner, and didn’t think that the bitter of the stout plus the acid of the tomatoes would work well together.

For the stock, I used a puck of concentrated beef stock from the freezer, that I’d made when I bought beef bones last, and added to it the concentrated chicken stock that was leftover in the fridge.

Lastly, I made a couple of short videos of some the key steps – it’s a bit of an experiment.

http://cinemagr.am/show/122493631

Braised blade of beef

  • 1 blade roast of beef (or other beef shoulder joint), about 1.8kg
  • 2 medium onions, peeled and chopped
  • 1 leek, washed, halved lengthwise and chopped into thick slices
  • 2 medium carrots, peeled and chopped into chunks
  • (a stick of celery, chopped, if you have it)
  • 500ml dark ale or stout
  • 500ml beef stock
  • about 1 tsp each of thyme, rosemary and sage
  • 2 bay leaves

Tie up the beef – putting three strings around it to keep it neat and together, make it easier to turn while browning, and help it to fit into the pot. Then sprinkle with coarse salt to get a good bit of seasoning.

Heat a casserole dish big enough to take the beef – I used my 7 litre oval Le Creuset – and add a few teaspoons of olive oil. I didn’t add much more, as the beef already had a cap of fat on the top of the meat. Place the beef (fat side down) into the hot pot and let it sit and brown in the pot while you prepare the veg. You want to leave it for at least three or four minutes on a high heat for each side, to make sure you get a good brown crust. That will create lots of flavour in the final dish.

Browning the beef

Meanwhile prepare the vegetables, and gather the herbs, pausing to check the meat every now and then. These are all stock vegetables, there to flavour the braising liquid and to provide a trivet to keep the beef off the bottom of the pot. Once the cooking is done, most of the flavour will have come out and into the liquid, so the veg can be discarded. So don’t spend too long getting the pieces neat and pretty.

Chopped vegetables and stout

Once everything is browned nicely, the beef comes out onto a plate, and the veg go into the pot and start to soften.

Showing the blade

As the water comes out of the veg, it will, along with some judicious scraping, start to dissolve the sticky meaty juices on the bottom of the pot that are crucial to the flavour. After stirring veg around a little, put the lid on the pot for a few minutes to encourage more of the juices from the vegetables and to make sure that all of the sticky meat lifts from the base of the pot. (Giving the vegetables time to soften and cook a little in the fat has another benefit – it produces different flavours than you create by submerging the veg directly into the liquid. It allows sugars and other compounds to be generated in the high-heat possible by cooking in a little fat. As soon as we add the liquid, the maximum temperature will drop right down to 100C or thereabouts.)

Once you’ve developed lots of good flavours on the beef and the vegetables, it’s time to add the liquid and the rest of the flavours. First, add the stout or ale to the vegetables, stir to get up any last sticky parts, and then simmer until it’s reduced by about a third. This boils off a bit of the alcohol, and concentrates the flavours a bit.

Add the beef back to the pot, along with any juices from the plate, and finally add in the herbs and the stock, and a good bit of seasoning (if your stock wasn’t seasoned, you’ll probably need at least a couple of teaspoons of salt – taste to check).

Cover the pot with greaseproof paper (which helps to seal the pot and also makes it easier to clean up the lid afterwards!) and put into a 140C oven for 4 hours. After 30 minutes to an hour, check on the dish, and if it’s bubbling very rapidly, turn it down another 10 degrees. When done, the meat should pull apart with a fork.

After braising

Remove from the oven and leave to cool for an hour or so in the liquid. This allows the meat to rest and reabsorb some of the juices. Remove the meat into a dish to be carved. Strain the liquid to remove the vegetables and herbs, and skim off the fat (I like to use a fat-separating jug for this. Reheat the liquid and taste for seasoning. Serve thick slices of the braised meat with the strained braising liquid.

Shreds falling apart

Bonus leftovers tip: Reheat chunks of the cold meat with a couple of spoonfuls of the braising liquid (which will form a jelly in the fridge) and a splash of tomato sauce for an almost-instant beef ragu sauce for pasta.

Candied peel – why it works

Seville oranges

Whenever I make marmalade, the huge piles of wasted peel get me down. While I like the taste of orange peel, i dont like my marmalade to be jam packed with it, so I tend to include only some of the peel in the preserve. But those shiny, bright orange skins disappearing into the food waste bin is such a sad sight. Its only the exhaustion induced by the particularly time consuming method of marmalade production that leads me to discard these skins. Because instead, I could be making candied peel – and this is what I did this time.

But what is it that turns orange peel into candied peel successfully? All the recipes say different things, even though it’s a very simple recipe. The idea is to remove some of the bitterness that makes orange peel unpleasant to eat raw, soften it so you can bite through easily, and then steep in sugar syrup to sweeten and preserve it, without causing the sugar to recrystallise.

Candied orange peel

The problem is that hardly any of the recipes explain why they have the steps they do. Not understanding what’s going on really annoys me. If I don’t know the purpose of each step, then it’s much harder for me to work out when each stage is done, or to spot if something has gone wrong.

And this is a baking-type recipe – it should be precise – but when all the recipes disagree slightly, how do you know which one to follow?

In the case of the candied peel, the basic steps are:
1. Remove the peel, either by scoring the entire peel, or by peeling just the zest with a peeler (if you do that, there generally isn’t a requirement to blanch it).
2. Blanch the peel – in anything from 1–5 changes of water. (Sometimes, boil the peel until tender) as well.
3. Immerse in sugar and water, anything from 1:1 ratio to 2 parts sugar to 1 part water. This might also include some corn syrup, or some cream of tartar. Boil for anything from 30 minutes to 2 hours.
4. Put out on a rack to drain. Roll in sugar straight away or leave out to dry for a day or several days.

That’s a lot of variation for very few steps of instruction. Obviously, you’re dealing with two big uncertainties: a natural product, the orange, that can be sweet or bitter, thick-skinned or thin skinned; there’s also another uncertainty that is acknowledged in recipes much less often: your individual palate. Relatively few recipe writers encourage you to taste as you go and then adjust suit what you would prefer. Do you quite like the bitter tang of orange peel or do you have a sweeter tooth? Are you planning to use this peel in recipes where the sour contrast is going to be appreciated, or would you like to eat these with chocolate where you want things a bit sweeter?

The first part, the blanching is there primarily to remove the bitterness from the pith – or at least moderate it. Harold McGee explains:

“The outer epidermis contains the aromatic oil glands while the spongy, pectin-rich
albedo usually contains protective bitter phenolic substances. Both the oil with its
terpenes and the antioxidant phenolics are valuable phytochemicals. The bitters are
water-soluble, while the oils are not. Cooks can therefore leach the peel repeatedly
with hot (rapid) or cold (slow) water to remove the bitter compounds, then gently
cook the peel if still necessary to soften the albedo, and finally infuse it with a
concentrated sugar syrup. Through all the processing, the water-insoluble oils stay
largely in the rind.” – from ‘On Food and Cooking’

So blanching the orange peel makes it edible by removing the bitter compounds and softening the pectin. This means you should be able to taste it, and test the softness, to determine how many times you want to blanch the peel.

When you infuse it with sugar syrup to preserve it, you are trying to reach a certain concentration of sugar, and this is most easily measured with the boiling temperature of the syrup. As you boil a sugar syrup, the temperature increases as the amount of water decreases, and the sugar gets more concentrated – this is essentially what a sugar thermometer is measuring. At a boiling point of 230 degrees F / 110C you get to about 80% concentration of sugar. This is a good level for candied fruit. If you stop at a lower level, there is a risk of crystallisation, as well as a risk that the peels will remain too sticky and not keep well. This also means that it doesn’t matter too much what ratio of sugar to water you start out with – except that a weaker solution will take longer to reach the right concentration, meaning that the peel will be submerged for longer, and this can help make sure that the syrup penetrates all the way through properly, especially with thick pieces of peel.

Candied orange peel
Traditional candying processes for whole fruits – for cherries, tangerines, melon in places like France – require the fruit to be cooked in increasingly concentrated syrups over many days. This allows the sugar to penetrate into the thick fruit and ensures that the water is displaced.

Adding cream of tartar (an acid) along with the sugar helps to prevent crystallisation of the sugar in the final peels. The acid helps encourage the sucrose in the granulated sugar to break down into glucose and fructose, its two smaller units. These get in the way of the sucrose reforming nice neat sugar crystals. Adding corn syrup does a similar job – it already has glucose and fructose in it, so they also help interfere with crystallisation.

The peel should cook for a good long time in the syrup – 45 minutes to 2 hours is the general guidance. Slow is good, to make sure the peel is well infused. Then remove the peel from the syrup and spread onto a cooling rack to dry a little, and become tacky rather than sticky to the touch. Then you can roll in sugar, or dip in chocolate, as you prefer.

Links:

June Taylor and Martha Stewart making candied Meyer lemon peel – recipe and video

Smitten Kitchen making orangettes

Candied ginger, candied lemon peels, and science

Looking back at January

January snow

The snow coming down this morning has reminded me to look back at the first month of the year. January was a funny old month. A long Christmas break made it seem just a little shorter than normal, as did the extra-mild weather in that first week. But then we reverted, first to a bit of snow, and then to good old English rain and cold. Oh joy.

Parkrun 26 Jan

The resolutions I made are still broadly intact. I’ve been a pretty constant attendee at Parkrun. I missed one day of 750 words writing (a dinner party where we didn’t get back until after midnight), although I still need to figure out how to filter through the nonsense for things that might appear here on the blog.

The dinner diary has faired less well, with some serious gaps. Dinner has been fairly haphazard, a victim of both of our changing schedules, and we’ve eaten out a fair bit.

January is the best month for citrus fruits, because they are in season, but also because those clean, sweet-sharp flavours are just want January needs. I ordered Seville oranges with my veg box, and made marmalade with them, as well as candied peel with the rest of the skins.

Bergamot

I also came across bergamots in Gelupo, and took one home to experiment with. I decided on madeleines from a Stevie Parle recipe, and although they came out well, I would have had a tough time telling it was bergamot in there, and not something else.

Bergamot madeleines - finishing off batter from the weekend

There was also some brilliant Scandinavian pastries from Signe Johansen’s book Scandilicious Baking. These twists of cardamom-scented dough with an almond cream filling and crunchy sugar crystals on top are part croissant, part Danish pastry, part doughnut. I froze them all, and have been ekeing out the supply, taking one to work every now and then for a mid-morning pick-me-up. Some of my baking makes it to work to share, but not these 😉

Cardamom almond twists from @scandilicious baking.

I’ve also got back in touch with my RSS reader (currently using Reeder on both iPohne and iPad) and read some great pieces by food bloggers this month:

I came across the blog ‘Playing with fire and water’ when it was featured in January’s Saveur magazine, and I promptly devoured a stack of posts in a trance. It’s the perfect combination of scientific, exploratory, adventurous and beautiful. Then she wrote about the back story to that feature on her blog, and the story it was originally going to be, of her kitchen remodel, and it was like opening a treasure chest. And it’s a beautiful kitchen to boot.

Both Jenny Rosenstrach and Adam Roberts had funny, honest, helpful writing advice this month. I found them both inspiring, as I continue to struggle with getting posts up and onto this blog.

Seville orange marmalade

Untitled

I have made marmalade a number of times, with some notable successes as well as notable failures. I have had everything from a dark brown orange syrup to a set so thick you could bounce things off it. No one seems to have the same recipe, and several of them flat-out contradict each other. Nigel Slater, in the Kitchen Diaries II, at least acknowledges that every marmalade maker has their own peculiarities and that none of them can agree.

Marmalade making requires getting three things right: enough pectin in the mixture to create a gel; a balance of sugar, acid and pectin that will enable the gel to set at room temperature; and cooking the peel through enough to make it edible and not too chewy. There are a huge number of routes that you can take to get to this end result, and most regular marmalade-makers will have a preferred route, as well as desired result. Some are aiming for a tawny, caramel-tinged, dark marmalade with hearty chunks; others a light, clear jelly with threads of peel through it.

My real conversion to marmalade making was discovering June Taylor’s approach. Although recipes from her are frustratingly hard to track down, her handmade approach and attention to detail have produced stellar results when I have tried them – a softly set bright orange jelly with an amazing fresh flavour. This comes (I think) from a much lower-than-normal amount of sugar in her recipes, as well as a time consuming process which involves segmenting the fruit, and removing the membranes into a bag with the pips, so they can contribute pectin, but not cloud the jelly.

With marmalade, you have to balance the simplicity of making it with your satisfaction with the end result. How far are you willing to go? If you’re ready to make your own marmalade, we can safely assume you’re willing to go quite a long way, but segmenting each orange is a very different amount of active effort needed, compared to boiling the fruit whole and then chopping it all up. But for me, it comes down to how happy I will be with the end result. I am almost incapable of throwing away food that I have spent large chunks or time or money preparing, so if I end up with 5 jars of not-very-good marmalade, I know from experience that they will sit in the cupboard for a long, long time while I reluctantly work my way through them. If they are not great, I won’t want to give them away either, making their stay in the cupboard even longer.

I would rather spend an extra half hour on preparation to end up with a sparkling result that I’m incredibly proud of and can’t wait to share with other people. That, to me, is a much better reward for my time than a few jars of dark and muddy orange-flavoured jam.

Having tried a tangerine and grapefruit recipe before, with good results, I decided to try and work out what a June Taylor-style Seville orange marmalade recipe might look like. This was a tricky task, as she doesn’t make Seville orange marmalade at all – it’s one of very few citrus fruits that you never see in California. So I read through quite a few alternative approaches, as well as some blog entries that had also attempted to replicate her approach, to see if I could come up with something appropriate.

I started with her recipe for Thick cut orange marmalade, published in the San Francisco Chronicle. However, as this was a recipe for the thinner-skinned, juicier sweet oranges, I felt that I would need to modify it somewhat. One of the things I particularly liked about the tangerine and grapefruit recipe is that you get to slice across the segments, creating juicy chunks of citrus flesh with peel attached, which survive into the finished jam. However, doing this for all the oranges seemed like it would both take too long and leave me with way too much peel in the final result. I have tried making marmalade with whole oranges before (the method where you boil them whole, and then chop them) and have found that with the thick peels, you get far too much peel for my liking.

So I took a hybrid approach, slicing one lemon and one blood orange in segments with the skin on, and removing the peel before segmenting for the Seville oranges. As I did this, I removed the (copious) pips and, on Dan Lepard’s advice, popped them straight into a small dish of water. By the time I had finished the fruit preparation, this little bowl had gelled solid, demonstrating just how much pectin there is in those pips.

The final fiddly thing I did was to take the pieces of orange peel, and blanch them. I’m sure this stage is not essential, but I thought it worth doing for two reasons: one, when making candied peels, you are almost always asked to blanch the peel, sometimes repeatedly, to ‘remove bitterness’. I thought the same thing might apply here. It would also give them a headstart on softening, making it easy to slice them, and ensuring that I could cook the rest of the mixture for a fairly short period – something that’s important if you want to preserve a fresh, citrus flavour rather than aiming for a caramel one. So these were blanched, drained, about half of them sliced finely and added to the fruit. I kept the rest back to make candied peel with.

Candied orange peel

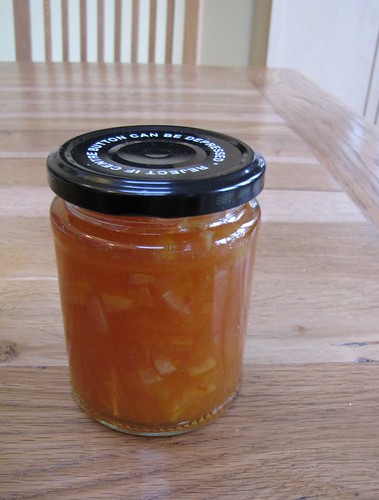
Recipe: Seville orange marmalade

This does make a rather acidic marmalade – something to really wake you up. If you are partial to chewing pieces of candied orange peel, it should be right up your street. If you prefer a sweeter marmalade, you may want to increase the sugar.

  • 1.5 kg Seville oranges (I ordered mine from Riverford organics)
  • 1 lemon
  • 1 blood orange (not essential – I happened to have one leftover)
  • 1.7kg of fruit in all
  • 600ml water
  • 750g granulated sugar

Segment the blood orange and the lemon, with the skin on and slice thinly.
Top and tail the seville oranges. Slice off the peel taking as little pith with it as possible. Then slice off the pith, exposing the flesh. Collect the strips of pith in the muslin. Segment the Seville oranges, removing the pips into a small bowl of water as you go. Squeeze any juice from the membranes that are left into the same bowl as the segments and the sliced segments, and then add the membranes to the muslin with the pith.

First boil

Take the strips of peel and cover with cold water in a medium saucepan. Bring to a boil for 2 minutes, and then drain and cool.
Slice about half of them into thin strips and add to the juice and segments.
Leave overnight.

The next day, wash your jam jars thoroughly (or put them in the dishwasher) and then place into a 110C degree oven to keep warm. Wash the lids at the same time, but leave them out of the oven.

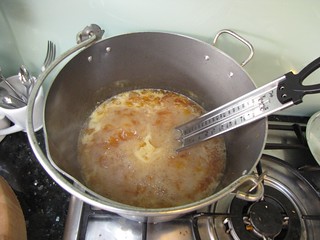
Add the pips to the muslin, and their soaking water to the fruit in a preserving pan. Tie the muslin up with string and suspend it in the pan. Bring everything to a boil for about half an hour, to make sure the peel is really tender. It should be possible to mash it between finger and thumb. Take off the heat and remove the muslin bag. When it is cool enough to handle (after about 30 minutes), squeeze it out to release the pectin and add into the pan of fruit. You need to squeeze and massage this for a good few minutes to extract as much pectin as possible. This takes some time, but is strangely satisfying.

Pectin from pips

When you have squeezed out all the pectin you can, add a candy thermometer to the pot, add the sugar and bring back to a boil. Stir occasionally until the sugar has dissolved (it will stop making a scratchy noise on the pan as you stir) and then let it bubble quite fast until it reaches 105C on the thermometer, then test for a set.

Boiling with sugar

Pour the whole lot immediately into a Pyrex jug, and then into the hot jars. Using a tea towel, screw on the lids and inverted each jar for five minutes before returning them to the right way up to finish cooling. This helps to ensure the lids and surface are sterilised and prevents anything growing on the surface.

Resolutions

Looks a bit warm for a run

The New Year is not a great time to try changing your life. You’re coming off the back of a series of unusual, break-from-the-routine days. Days filled with food, and travel, and spending time with people you don’t often see. You’ve been watching sentimental TV, loading up on more carbs than you thought possible, and generally separating yourself from the daily grind as much as you can. This is a bad state in which to try and make committments to change your daily routine. The circumstances are strange, and unrepeatable (at least until next year). It’s almost inevitable that you will try and over-reach and swing the pendulum too far the other way.

So, when you’re tempted to start thinking about resolutions, it’s definitely a good idea to revisit Mr. Merlin Mann, and a great post about New Year’s Resolutions:

“I’ll go further and say that the repeated compulsion to resolve and resolve and
resolve is actually a terrific marker that you’re not really ready to change anything
in a grownup and sustainable way. You probably just want another magic wand.
Otherwise you’d already be doing the things you’ve resolved to do. You’d already
be living those changes. And, you’d already be seeing actual improvements rather
than repeatedly making lists of all the ways you hope your annual hajj to the self-
improvement genie will fix you.”

He talks in this, and in a previous podcast, about Fresh Starts and Modest Changes, instead of resolutions. Doing something that’s achievable, and that you care about. Not expecting to transform into a new person overnight. And not getting discouraged when you fall off the wagon. You will. The first pancake in the batch will always suck. What matters more is getting comfortable with the idea that you will fail, and continuing to try anyway.

I am bad at resolutions at any time of year. Blogging, running, photographing, writing – all these things, increasingly captured in unflinching digital detail, testify to my ability to get to around 4–6 weeks of a habit before falling off the wagon again. This pattern is now so obvious, it’s getting very hard to ignore.

Still, ever the optimist, I have started again, with the New Year, and the blank sheet of digital paper it offers, to try a number of habits I have tried before, that I have seen benefits from, and see how long I can keep them going:

1) Run 5km with parkrun every Saturday. This is a committment to turning up at a specific time and place, which is always easier to keep. In practice, it hopefully means I also make an effort to run at least once in the week, as the thought of facing 5km without having done anything in the previous week is a daunting one.

2) 750 words, written every day on 750words.com. I’ve kept this one a few times before – and a couple of times have completed an unbroken month. It’s hard though. I find it most effective when I do it in the morning before work, but not being a morning person, this is a struggle. And if I miss that window, I often forget until the very last thing at night, when I’m climbing the stairs, and that’s a recipe for stumbling onwards and into bed. Still, the great thing about 750 words is that you don’t score your day until you’ve reached 750 words, and that it only operated from midnight to midnight – you can’t catch up on your words with twice as many the next day. Once the day has finished, that’s it. You can’t rewrite the past. You can only write again today.

3) Keep a dinner diary for every day. This idea comes from ‘Dinner: A Love Story’. I have tried doing weekly meal planning many times before, and it never even makes it to the end of the same week. However, this committment is very simple: by the time I leave for work in the morning, I need to have written down in a notebook what we will have for dinner that evening, and I need to have done whatever necessary to get it started. That might mean simply removing something from the freezer to defrost, or noting down which ingredients I need to pick up on the way home. But a committment like that makes it easier for me to consider how to best use what I have in the house, without resorting to takeaway or pasta again, just because I’m too tired to think.

These are the simple things I’m going to try to do. I hope they will improve a number of aspects of my life, and help keep some things in order. But it doesn’t matter if it lasts or not. All I can do, each day, is try again for today. You can’t do anything about yesterday. It either worked or it didn’t; it sucked or it worked. All you can work on is today. So do that.

Cinnamon buns

Baked buns

I was going to start this post with something about the days of cupcake being numbered, because it seems that wherever you look at the moment, there’s another cinnamon bun recipe. I went to Google Trends in search of proof , and found a fairly reassuring chart that trends upwards to support this theory.

But when I added ‘cupcakes’ to the search, it became clear just what a long way there is to go. Cinnamon rolls are still a drop in the cupcake ocean.

Still, I brightened, that just means that this still counts as ‘ahead of the curve’! So go ahead and make some cinnamon buns, safe in the knowledge that you are still counted as trendsetting 🙂

Cinnamon rolls, or cinnamon buns, are much more straightforward to make than they might seem. You make an ‘enriched’ bread dough, roll it into a rectangle, spread with butter and sprinkle with cinnamon sugar, then roll it up like a rug, slice it across and arrange the slices in a tin to bake them.

Of course, there are a few techniques that make things easier. Enriched dough means using milk, butter and probably an egg instead of plain water in the dough. The fat helps soften the texture of the final roll, as do the milk proteins. I find that rolling out the dough into an even shape is easier if it has chilled for a bit – that can mean leaving it to rise overnight in the fridge, or just chilling it for an hour or so before rolling out.

Dough after folding & rising

It was one of the biggest revelations of cooking school to me that you can adjust the shape of something as you roll it out. Before then, I had just tried changing the pressure of the rolling pin to try and get the right shape when rolling out a pastry crust or something. But you can just push and pull the edges as you go, to keep the shape even. So if you’re not getting a rectangle, but more of a blob, just push and pull the corners a bit to make them square, push the edges with a dough scraper to make them straight again, and carry on. This is, if anything, even easier with bread dough, which is much more forgiving of being pushed and pulled around than pastry is.

Rolling out - nearly there

Be liberal with the butter and sugar – stinting on the filling is not the answer. Roll the log up as tightly as you can, working your way up and down the length to make it even.

Front edge rolled

Use a ruler to mark sections along the roll so you get even sized rolls. If you want to be super neat, you can trim each end off, but I can never bring myself to sacrifice any proportion of the dough for neatness.

Cut into sections

Lay them out in a grid in a roasting tin (having sides helps to stop them spreading out too much), in a circle in a cake tin (like this Signe Johanesen cinnamon bun cake) or put individual rolls into a bun or muffin tin, as long as they are well-greased.

Each section sliced in three

Leave the rolls to proof, puff up and fill in all the gaps, then bake, not too hot (bread should be baked pretty well as hot as your oven will go, whereas dough enriched with sugar should be baked at a cake temperature – around 180C or 350F – so it doesn’t burn.

Recipes