Caramel brownie cups

IMG_3493

Tell someone you want them to try a caramel brownie, and they are almost certain to groan at the idea – but in a good way. Caramel and chocolate seems like too much of a good thing, an overload of sugar and fat. In fact, the buttery caramel can provide a nice complement to the brownie, if the brownie is kept on the bitter side with dark chocolate and a little coffee.

My first caramel brownie attempt was to follow a tweeted suggestion by Edd Kimber, The Boy Who Bakes and star of last year’s Great British Bake Off. He suggested sandwiching a layer of caramel between two layers of brownie mixture, and I knew I had to try it. I chilled the brownie layers to make it easier to spread the caramel out, and then chilled the whole thing for a few hours before baking. I was trying to minimise the amount of overflow from the caramel as it bubbles up, but I should have known that caramel will find any way out it can. Still, most of the caramel remained where it was supposed to be, the foil lining the tin prevented it from gluing itself to the tin, and the extra-cooked caramel around the edges turned into toffee, which was another good addition.

Caramel brownies

Still, I felt like a bite-sized solution was needed, both to help with the caramel overflow problem, and to provide the appropriate portion size for these intense bites. With a caramel sauce that is spoonable at room temperature, you can spoon the caramel onto the brownie mixture, top with more mixture, and then bake the whole thing in little paper cases.

Caramel brownie cups

These little cups resemble Rolos – caramel in the centre and chocolate around the outside. The brownie mixture is adapted from a recipe by Alice Medrich. Beating the flour in is not traditional, but helps hold together a mixture that would otherwise be quite crumbly.

IMG_1005
Makes 24 small cups.

Preparation time – around 45 minutes.

  • 1 jar caramel sauce or dulce de leche (bought, or see recipe below)
  • 120g unsalted butter
  • 35g cocoa
  • 90g dark chocolate, chopped or broken up
  • 200g caster sugar
  • 1 tsp vanilla extract
  • 1 tbsp strong coffee, or 1/2 tsp coffee granules dissolved in 1tbsp hot water
  • 2 large eggs
  • 75g plain flour

Heat the oven to 190C/170C fan oven/. Line two mini muffin tins with paper cases.

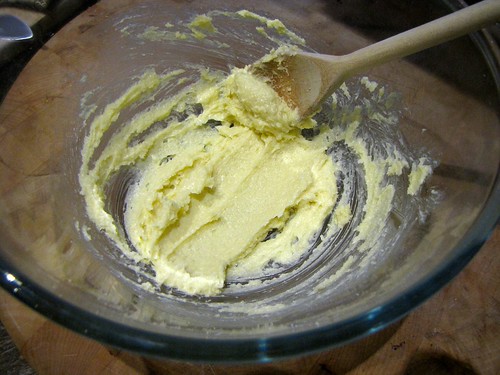
Put the butter, cocoa and chocolate into a heatproof bowl and melt over hot water or in the microwave. Stir gently until smooth.

Add the sugar into this bowl, along with the vanilla and coffee if using and mix thoroughly.

Add the eggs one at a time, beating the mixture after each one until thoroughly combined.

Add the flour, and stir until combined, then beat together for about 30 strokes.

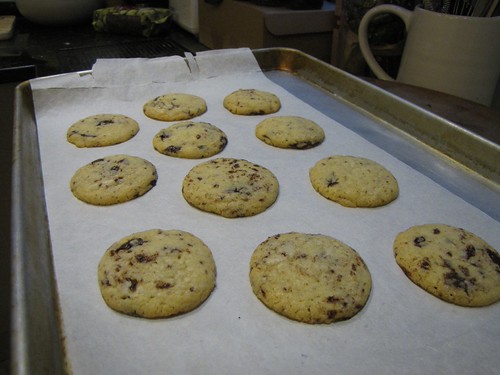
Using two teaspoons, spoon about a level teaspoon of brownie mixture into each of the paper cases, filling them around one-third full.

Use another two teaspoons to add about half a teaspoon of caramel to each case. Finish with another teaspoon of brownie mixture, so that each case is almost full. If you have leftover brownie mixture, bake in muffin cases or a loaf tin for 20 minutes, or chill for up to 24 hours and use later.

Bake for about 15 minutes, or until the mixture has risen slightly and cracked just a little at the edges. The cups can also be prepared ahead, covered with cling film and refrigerated until ready to bake.

If freezing, cool the cases in the tins, then freeze until solid before putting the cases into a freezer bag and sealing.

Caramel sauce

(adapted from Dan Lepard’s All Purpose Caramel recipe)

If you have leftover cream in the fridge, making a caramel sauce will preserve the cream almost indefinitely. Making caramel is something lots of people are worried about, but it’s entirely a matter of confidence – it’s incredibly simple to make. This recipe also features in Dan’s wonderful new book, Short and Sweet.

Makes 1 jar

  • 75g granulated sugar
  • 35g unsalted butter
  • 100g double cream
  • 75g other sugars (for example, 25g dark muscovado + 25g light muscovado + 25g caster)
  • 35g golden syrup
  • 1/4 tsp sea salt

Tip the granulated sugar into a heavy based pan, and add one or two tablespoons of water – enough just to moisten all the sugar. Weigh out and have ready all the other ingredients.

Put on the lid and bring to the boil to dissolve the sugar to a clear syrup. Remove the lid, and boil hard until the sugar starts to turn golden brown. Watch it very carefully at this stage, and swirl it a little to keep the colour even.

Cook until the caramel reaches a deep reddish brown.

As soon as the caramel reaches the colour you want, remove it from the heat and add the butter. Stir carefully, as it may spit. Then add the other sugars, golden syrup, cream and salt, and stir together until smooth.

Return the caramel to the heat and bring back to the boil. Allow to simmer until the temperature reaches 114C on a sugar thermometer – this will give you a thick caramel sauce, the consistency of set honey at room temperature. If you don’t have a sugar thermometer, simply reboil the mixture for 3 minutes – you may end up with a thinner sauce, but it will still be good.

Remove from the heat and pour into a clean jam jar. Kept in the fridge, this will last at least 6 months.

Ferran Adria and The Family Meal

New book, The Family Meal

I was prepared to dislike Ferran Adria. Through a combination of his own publicity and the attention of the world’s food critics, he has assumed a god-like culinary status. It seems likely that any human could endure that degree of praise without becoming arrogant.

Last night, he was speaking at an event organised by Waterstones for the launch of his new book, ‘The Family Meal’, a compilation of the staff meals from El Bulli, laid out with step-by-step photos for the home cook. There is not doubt that he has some arrogance – he is fond of statements like ‘before us, no-one shared anything [in professional cooking]’. He is also an infectious, passionate speaker, talking about humility in this profession, the importune of creativity, but also the important role of those who reproduce others recipes with love and professionalism.

I wasn’t sure what to expect from the evening. I was intrigued to meet the man in question, but in truth my expectations were probably on the low side. Book events can be very formulaic, with a brief talk about the contents of the book, followed by lots and lots of time for buying and signing of books. As this book is about home cooking, I wondered what sort of a talk it would be, and how much we would hear about El Bulli.

Ferran, translator and helpers

I needn’t have worried. Along with his translator Lucy, Ferran Adria gave an energetic talk covering the need to think when cooking, his theories of creativity in cuisine, a history of El Bulli, the background and purpose of the new creativity institute, a video of the drawings for the new buildings, and in a 15 minute answere to the last question of the evening, a long description of the origins of the term ‘molecular gastronomy’, via Escoffier, Michel Guerard and Herve This.

Ferran obviously has very clear ideas about what constitutes genuine creativity in cooking. He explained a hierarchy of efforts, from the basic level – simply to reproduce recipes with love and professionalism, the minimum we should expect in a restaurant – to the apex of creativity. Above the basic level of reproduction are those who adapt recipes with their own amendmentsand tweaks. At the next level, there are those combining different techniques or ingredients to make something new – he gave the example of a millefeuille of strawberries and rare amazon fruits. It may be a new set of flavours, but it depends on the existing idea of a millefeuille from a pastry tradition.

At the peak, are those creating an entirely new concept or technique. He clearly thinks of chefs operating at this level as being in a different league, and feels that this represents a clear and measurable distinction between this group and the rest. He was careful, though, to emphasise that this was a difference in great creativity, not the designation of a great chef. You can be a great chef, a great cook by reproducing recipes with care.

He described the omelette, for example, as a concept that was created at some point. He also described the difference between creating a concept and invention, with an unusual device. He asked if anyone in the audience was wearing a miniskirt – when they came up to the front, he asked if anyone knew who first created the miniskirt. Mary Quant, the audience said. Yes, correct, invented in London, he said. Except, of course, it wasn’t. Have you seen films of Romans, and ancient Egyptians? They all wore short skirts. Being the first isn’t important – it’s the conceptualisation that is important.

I think this works up to a point, but this description still doesn’t give an adequate description of what conceptualisation means. In Mary Quant’s case, it might be that this became part of her brand, what she was known for. It might be about defining the new concept in opposition to other concepts, in how it is a leap forward, not a recombination of two existing things.

His second diagram of the evening described a continuum of food preparations, with natural ‘product-based’ cooking at one end, as close to nature as you can be (the platter of figs approach, perhaps) and what he called ‘elaborative’ cooking at the other end, where the natural state of the ingredients is almost impossible to find. At this end might be a puree, a sorbet, a foam, a consommé. He took trouble to explain that this was not a distinction between new and old cooking (as he wanted to explain in great detail why he didn’t think molecular gastronomy was a good term to use). He gave an example of someone who says of an asparagus sorbet, why is it necessary when asparagus on its own is so good, but then is happy to eat a strawberry sorbet for dessert at another restaurant. He also said that some people will say to him that they are unconvinced by the idea of mixing sweet dishes and savoury dishes – and then will happily go and eat a hamburger with ketchup and a coke.

His thoughts on home cooking were kept fairly brief, but were refreshing, and echoed some things I have thought about, and Trish Deseine’s recent blog post. He said that we are giving the wrong messages about home cooking. “Home cooking now means cooking pizza at home. I love pizza but I have never made it at home – it takes ages!” Restaurants are good at some things, home cooks at others, and in common with many other chefs, he would not consider making restaurant dishes in a home kitchen.

Seventies styled ingredient layouts

The impression I got was of an incredibly energetic and passionate individual, who has thought deeply about what he works on every day. The book itself is much more likeable than I expected, with seventies style layouts that show you all the ingredients and a timeline for the meal, and simple, inexpensive recipes that sound really tempting, and photos that make the whole thing feel doable. The ingredient layouts echo those in Thomas Keller’s Ad Hoc at home, but without any pretensions about sourcing or dng everything from scratch. He has a fondness for bought sauces and dishes like crisp omelettes and piña colada for dessert are appealingly trashy. I’ll have to wait to try the recipes out to see if they really are doable, but at the moment it looks very good – a thoughtful book, where the producers have really thought about how people will use it.

Although he made specific mention of the degree of testing that has been done at the restaurant for these recipes, I wonder whether the book has also been tested by home cooks. As others have pointed out, some of the basic recipes for sauces and stocks to freeze ahead seem to have quantities completely at odds with the amount of ingredients specified (more than 2kg of ingredients for 1kg of output, without much mention of reducing). The timelines look very helpful, but don’t specify whether the step should start or finish at the listed time. When some of the steps are likely to take even a competent cook 30 minutes or more, this seems an important distinction. But the proof of these things will be in the making. I’m preparing to clear some space in my freezer and get started.

Home cooking and changing the world

A group of nine chefs, including Ferran Adria of El Bulli (but perhaps not Heston Blumenthal) put their names to a ‘G9’ statement this week. The sense of it was that they committed, as a group, to improving the environment and people’s lives. This was fairly quickly seized on as being a somewhat hypocritical statement made by a group of chefs for extremely high end restaurants, who often have guests that fly in specially, and who themselves had flown into Peru for the conference at which the statement was made.

More disturbing than the hypocrisy was the impression they could and should influence a significant part of the world’s eating and cooking. Trish Deseine, an Irish food writer based in France, where her books are very successful, commented on this statement, and Jay Rayner’s critique with a discussion of what chefs have to do with home cooking.

I have a lot of sympathy with this view. I am as interested in El Bulli as the next gastronome, and have enjoyed the videos of the Harvard series on Science and Cooking that Ferran Adria and many other molecular gastronomes have lectured at (more coming in the autumn – you can get the audio and videos on iTunes University). However, I’m more interested in the science than the cooking. What any of these restaurants and chefs have to say about home cooking is fairly minimal.

It often surprises me that most people, even those who eat regularly in restaurants (or especially them), have little idea how a professional kitchen works, and how different it is to a home kitchen. I think most people have this slightly romantic idea that when they order a dish, the chefs start from scratch, chopping ingredients, making sauces, and then putting the whole plate together. This view of the professional kitchen is as a scaled-up version of a home kitchen and a dinner party – but this is not at all what happens.

A restaurant needs individual portions of protein, that can be portioned in advance, and then cooked to order in a short time. This will usually be things like steaks, chicken breasts, lamb chops, although the technique of sous-vide cooking makes it possible to cook tougher items like short ribs for a long time, and then just reheat them briefly before serving. All the accompaniments will be prepared as far as possible before service even starts (the mise en place) up to and including making all the sauces and keeping them warm. It’s easy and sensible to keep things like veal stock on hand, as it can be used in many different dishes, uses up leftovers or cheap ingredients that the kitchen might otherwise waste, and can cook all day (or overnight) in an out-of-the-way place. The restaurant needs to consider the margin of each menu item, how to use leftovers and scraps, and how to minimise waste and the time between order and service.

This way of cooking is completely different to a home kitchen. Having worked, albeit briefly, in a restaurant kitchen, I understand a little of the rhythms and resources that they work within, and I know they are completely different to a home cooking set up. When I reflect on the things I learnt at cooking school, I often think that what it did was to simplify the things I cook at home, not complicate them. I don’t even want to try and replicate that very different environment at home. I would rather do the things that home kitchens are good at, and get the most out of those.

At home, the important things are making a quantity that can serve many people (or over many nights) rather than individual portions. The time you get to cook is more likely in small chunks at the end of each day, and larger chunks at the weekends. Dishes like chilli and curries that can be cooked in a large batch, and that develop additional flavour when left in the fridge, are especially useful to a home cook. Baked dishes of beans or pasta, and roast joints of meat, that are portioned at the table as soon as they are done are much harder to do successfully in a restaurant. At home, you can cook something for a long time, and serve it precisely when it’s done. When was the last time you had a really good Yorkshire pudding in a restaurant? It’s really hard unless you serve it immediately.

There are good reasons to try and replicate restaurant food. Carol Blymire has progressed through the entire French Laundry cookbook, and is a long way through the Alinea cookbook too. In preparing these incredibly elaborate, multi-step recipes at home, she has learned so much more than I have about cookery, and added quite a few recipes to her home cooking repertoire. I have incredible admiration for the way she takes on these projects as a way to stretch her cooking abilities, but she never pretends that this is everyday cooking (nor do the authors of those books).

The sad thing, as Trish points out, is that we all want to be chefs. We watch Masterchef, and revere restaurant cookery, even if it’s just finding out what the chefs cook on their days off. Plain home cookery is a little out of style – perhaps with the exception of Mary Berry, flying the flag for home baking in an admirable way.

There is one major exception I would make to the general rule of keeping restaurant practice out of home kitchens, and that’s knife skills. I watched someone on the Great British Bake Off this week wielding a chefs knife while they made pork pies, and I winced. Learning to use a decent size (20cm plus) chef’s knife properly is an incredibly useful skill that will reduce the effort you make, and save your fingers. Find a course, or ask a friend who knows what they are doing to show you. It will make much more difference to your cooking than knowing how to make, say, a buttery biscuit base.

Vegetarian-ish – food that’s mostly plants

Spelt risotto with mushrooms

Spelt risotto topped with mushrooms, chorizo and thyme

The idea of reducing meat consumption seems to be everywhere at the moment. Whether it’s called ‘flexitarian’ (ugh), semi-vegetarian, or something else, the idea is to make your meals largely vegetarian or vegan, keeping dishes with meat at the centre for a minority of meals. Mark Bittman practices ‘vegan until 6’, keeping his meat-eating to the evenings. Weekday vegetarians get their fix on the weekends instead.

These trends all roughly follow healthy eating recommendations that have probably best been summed up by Michael Pollan as:

“Eat food. Not too much. Mostly plants.”

[There is a NYT article which explains what this means in greater detail. But the short version is that  ‘eat food’ means things your grandmother would recognise as food – not highly processed confections. “Not too much” is more obviously about portion control, and everything in moderation. It’s the mostly plants bit where many of us fall down.]

There are many good reasons to do this, both for yourself and for sustainability reasons. Although figures are very disputed, it it generally less resource-intensive to produce vegetables and grains than meat, and agriculture is the greatest contributor to greenhouse gases – more than all forms of transportation together. By forcing you to put grains or vegetables at the centre of the meal, you will increase your consumption of these foods, which are universally agreed to be good things to eat. It is also a cheaper way to eat, and can be a good way to challenge yourself to try new things.

Despite all these good reasons, finding guidance to help you plan mostly-vegetarian food is relatively difficult. Perhaps it’s because restaurants are generally organised around a central piece of expensive, quick-cooking protein (steak, fish fillet, pork chop, chicken breast) and we all want to cook restaurant food. Or because it’s just a relatively foreign way of cooking to baby boomer Americans and Brits.

I have found planning vegetarian meals a challenge. It’s hard to break the English conditioning, which says that planning a meal should start with a big piece of protein, adding some starchy carbohydrates and one or two portions of vegetables (and I say this as someone who was brought up on a very varied diet, with plenty of veggie dishes). Too often, I would default to pasta or cheese-based foods as obvious vegetarian options: macaroni and cheese, quiche, cheese souffle, etc.

As modern as I think I am, getting past meat and two veg is hard. And when you’re out of the habit of planning a week of meals ahead (as most of us likely are), it becomes even harder to exercise those muscles at short notice on a daily basis – when pressed for time, we are much more likely to revert to a familiar pattern of meat and two veg.

But this is not a new idea: there are many dishes that historically would have used just a little meat, bulked out with other filling ingredients, that have become meat-heavy recipes only recently. Ragu sauce with pasta would traditionally have been short on meat and long on pasta. An Irish stew would have made the most of a little meat and stretched it with broth and vegetables. Even roast beef and Yorkshire pudding are paired so that diners can fill up on the cheap starch of the pudding, and have just a small amount of beef.

The most helpful advice I have had on this, is to put the grain first. On the blog Herbivoracious, Michael suggests following three questions to plan a vegetarian meal:

  • What grain or starch do I feel like eating?
  • What food culture am I in the mood for?
  • What’s fresh?

Armed with these three questions, I’ve found it much easier to compose vegetarian meals that are filling, not full of cheese, and easy to adapt. You don’t have to make these meat free – and many are improved by judicious application of pork in particular – a few slices of chorizo, a little sizzled pancetta can boost flavour without making these meat-heavy dishes. A wide range of grains, beans and lentils are now available, and each can form the foundation of a dish in a way that provides both protein and filling fibre and starch, the role traditionally ascribed to meat and potatoes. Seasonings and vegetables can then be added to this base.

Helpful cookbooks

Looking through my cookbook collection, I was pretty surprised how few of them take this approach. Even those that feature vegetarian dishes tend to feature wholly vegetarian dishes, or else lots of vegetable and salad recipes, but without much that resembles a main meal.

Great examples of cookbooks that do this well include:

  • Super Natural Cooking, and I’m assuming, its follow up, Super Natural Every Day. Heidi writes the enormously popular 101cookbooks blog, and has a great way of combining interesting whole grains and flours with vegetables and fresh flavour combinations to make everything seem mouthwatering. However, it has some hard-to-find ingredients, as she’s based in San Francisco.
  • Leon: Naturally Fast Food cookbook – which has a specific section on meat as a garnish.
  • Ottolenghi: The Cookbook – and, although I don’t have it, I’m assuming Plenty too. You might have thought this would be perfect, but a large number of the recipes in here are for the salads and vegetable dishes that make up their lunch counters. These make a great meal with a few served together, but that all feels a bit less achievable for a weekday dinner.
  • Although short, the ‘Meatless Feasts’ chapter in Nigella’s Feast is lovely, featuring not just vegetarian meals, but vegetarian menus that hang together sensibly. It also contains one of my favourite recipes for a mixed party of veggies and non-veggies – the Tunisian meatballs and couscous, featuring a root vegetable stew that does very well on its own, but is even better when sprinkled with some of the lamb meatballs.
  • The Cranks Bible is, as you might expect, very good on vegetarian dishes, and includes one of my favourites: a version of Aubergine Parmigiana made with garlic-spiked creme fraiche instead of bechamel.

Types of mostly-plant dishes

To help me think about planning more veggie-centric meals, I have broken down the dishes into a few types, based more on the end result than the starting ingredients. This list provides a range of different starting points and

Dry grains: separate grains with deeply flavoursome toppings e.g. pilaffs, fried rice dishes, lentil salads, rice and peas.

For good fried rice, you need chilled rice and a very hot, well-seasoned wok to stop it sticking. It took me ages and many stuck-to-the-pan, soggy examples before I got it together. Especially with brown rice, this lends itself really well to lunch the next day as well. Which is just as well, because by the time I’ve fried two portions of rice with an egg, a little pork and lots of veg, I have at least 3 portions of food.

Creamy grains: rice and other grains cooked with an absorption method to make a type of  risotto e.g. true risotto, spelt in tomato sauce. Yotam Ottolenghi’s Barley, tomato and garlic risotto is a great example of this. Amazingly savoury and satisfying.

Stewed beans: beans, chickpeas, lentils cooked into a thick sauce, e.g. chillies, baked beans, curries thickened with lentils, dal

For example, Green’s Black Bean Chilli – just onions, garlic, spices and cooked black beans. When finished with a little lime juice and creme fraiche this is one of the meatiest and most satisfying of chillies. Thinned with a little more water, it’s really a black bean soup, and a good one of those too.

Savoury broth: soups and brothy stews e.g. minestrone, ribollita, harira, noodle soups

IMG_0158

Bread based: heaping vegetables onto tortillas, pittas, pizza bases, bruschetta

e.g. Vegetarian (0r nearly vegetarian) tacos, from Tommi Mier’s Mexican Food book. Fillings of roast butternut squash with a little chorizo, creamy greens with potatoes, courgette and sweetcorn, and mushrooms and shallots, combined with tortillas are both delicious and filling.

And that’s not counting pasta dishes…

The authentic and the realistic

IMG_1354

The most intimidating cuisines are the unfamiliar ones. Even experienced cooks can fall when contemplating strange ingredients and patterns of cookery. This is true for me when working on French sauces, curries, even vegetarian food. Your instincts can desert you when all the usual cues are absent.

My native cuisine would probably be seventies to nineties English – pastry, quiches, béchamel and bolognese sauce, oven chips, meat and two veg. This is all great stuff, but leaves you with a deficit when it comes to creating a spice base, or a cuisine such as Chinese that virtually never uses the oven. It even presents a challenge to cooking vegetarian food without a great deal of dairy, as I’m constantly fighting my built-in instinct for some protein (meat, eggs) plus a starch and some veg on the side. (A better pattern for healthy eating is to start with a grain, add two or three veg, and maybe some protein to garnish, but it took me a long time to work out that this was a credible option.)

When faced with unfamiliar territory, you are left with two options: get the cookbook, buy all the ingredients and follow the instructions to the letter, in the hope of producing something authentic. Then end up not making the dishes regularly enough to justify the litre of fish sauce, the 200g bag of turmeric or the block of tamarind. Or just buy a ready meal.

Two things liberated me from this idea. One is the premise that you can make base components for many dishes in a form that can be easily stored for long periods. This is true of homemade curry powder, curry sauce base (that can be frozen) and even Pad Thai sauce, which as Chez Pim advises, can be made in a large quantity and stored in the fridge for (nearly) instant Pad Thai gratification. (Completely love her Pad Thai recipe, and it’s the only one that gave me the confidence to do it at home – the blog format had enough space and detailed description to reassure me).

The other realisation is hard to reach, but comes from a deeper understanding of the particular cues and necessities of each cuisine. Understanding the bones, the structure of stir fry cooking, or North Indian curries can liberate you as much as understanding the science behind baking can. You can suddenly see in a recipe what is essential, and what is optional. You understand where to make sensible substitutions and where it will ruin the dish. After all, many of the international dishes we love come from home or peasant cooking, where no-one is adhering to exactly the same recipe every time.

One of the books that started me on this path was the Pat Chapman book, ‘Quick After Work Curries‘, a hand-me-down hardback that made it suddenly plain to me that a fried onion, some good curry powder, tomato paste, chicken and stock and a little yoghurt could be make into a good basic curry. It might not be authentic, and would depend crucially on the quality of the curry powder. But it would nonetheless be good, tasty, and amenable to lots of experimentation.

Ching-He Huang’s Chinese Food Made Easy did something similar for my stir fries. It was the TV programme that, by simple repetition, got it into my head that a good stir fry would start with garlic, chilli and ginger fried in hot oil very briefly, before adding the protein, and maybe a splash of rice wine. Yes, you can marinade the meat, you can play with different flavours and sauces. But if you can strip the process down to the absolute essentials (very hot wok, those key flavours) then you are liberated to throw something together based on whatever’s in the fridge, and you don’t need to drag out the books every time.

There is a huge amount I need to learn about all sorts of cuisines – Mexican, Thai, Vietnamese, South indian, Sichuan, Greek… But starting to understand the unspoken, the common sense of another culture starts to unlock it and gives you a skeleton on which you hang all the variations and other pieces of knowledge.

Beginning to bake #9: Apple and blueberry cake

Finished cake

I wanted to finish this series with another cake – a bit of an occasion cake that you could make for a birthday or dinner party. The obvious choice is a Victoria sponge, which you can make plain or chocolate, and fill with buttercream. But to be honest, you just need to follow the cupcakes recipe from this series, double it and bake it in two 20cm sandwich tins. Very easy.

Instead, I wanted to explore one of the best things about baking – experimenting.

Experimenting with food

One of the joys of baking is that you can play around and invent your own recipes.  There are some rules to be followed, and weighing accurately is important, but the rules create a framework that you can work within to be creative. Once you understand what’s going on in a recipe, and the ratios that  make things work, you *can* play around with baking recipes. Understanding that is really liberating and opens up a whole creative world.

To do this successfully, you need to understand which elements are important to the structure of the cake, and which you can safely play around with.

This weekend, I made a cake with fruit baked into the top. This can be pudding, with custard or creme fraiche, a cake for afternoon tea (or even a late breakfast). It doesn’t require filling or icing, and can be served warm, so it’s a great last-minute option for dinner.

The recipe I started with is from Donna Hay’s book, ‘Off the Shelf’ – a book about cooking from the pantry. This one, and several earlier Donna Hay books are hard to find now in the UK, but they are really lovely. Donna is the Martha Stewart of Australia (but nicer than that sounds). She is a great food stylist and photographer as well as a cook, so all her books and her  bi-monthly magazine are beautiful, with big pictures of all the dishes.

This recipe is for a peach and raspberry tart with a sponge base. The original recipe is as follows (converting the cup measures to grams):

  • 125g butter, softened
  • 225g caster sugar
  • 1 tsp vanilla extract
  • 2 eggs
  • 185g self-raising flour
  • 2 peaches, halved and cut into thin wedges
  • 150g raspberries
  • 2 tablespoons icing sugar

[You can find the full recipe (American version) here: http://articles.nydailynews.com/2002-06-02/entertainment/18194663_1_raspberries-tart-peaches]

Just looking at the ingredients list, and the order they are presented in, I can guess  at the method and which ingredients I need to leave alone. And the method confirms this – you cream the butter and sugar together until fluffy, add the vanilla and eggs, mix the flour in gently, and then top with the fruit when the mixture is in the tin.

In a recipe like this, the ratio of the butter to sugar to flour to eggs is important. With enough knowledge, you can start playing with this too, but it’s much harder to get right.

The bits that you can safely play with are the fruit, and to a certain extent, replacing some of the flour.

For the fruit, the main thing to bear in mind is making sure that the fruit you use releases a similar amount of juice, or the finished cake could be either too dry or too soggy. Strawberries, for instance, are very juicy and get very wet when cooked. Apples and pears release much less liquid. Stone fruit such as peaches and plums, and berries, are somewhere in between.

So when I decided to replace peaches with apples, and raspberries with blueberries, I was confident that the blueberries would behave in a similar way to the raspberries. However apples give up less juice and need more cooking to become soft than peaches. I solved this problem by gently cooking the apple slices in butter before putting them on top of the cake. This made them slightly softer, giving them a head start in the cooking. They were cooked just until starting to become translucent, but still firm enough to hold together in slices.

If you did end up using much juicier fruit, you can compensate by adding something more absorbent to the flour – cornmeal, polenta, semolina will all absorb more liquid (that’s a good trick for pastry with fruit on top as well).

For this cake, I wanted to add both moisture and a different flavour by adding ground nuts to replace some of the flour. Ground nuts have a good deal of oil in them, so they don’t behave exactly like the flour. They won’t provide the structure that flour would, so the cake may sink more (although with fruit on top, this one won’t rise very high anyway). It will also keep the cake nice and moist as it keeps. I was going to use ground almonds, but then saw ground hazelnuts on special offer after passover, so used them instead.

So the final recipe I ended up with is as follows:

Apple, Blueberry and Hazelnut cake

Recipe adapted from Donna Hay’s Off the Shelf.

Oven preheated to 180C/160C fan.

  • 2 apples (Braeburn), cut into thin wedges,

— Gently fried in butter until they have softened slightly and lost some of their opacity. Put aside to cool.

Cooked apples

  • 125g butter, softened
  • 225g caster sugar
  • 1 teaspoon vanilla extract

— all beaten together in the KitchenAid until light and fluffy

Creamed butter & sugar

  • 2 eggs

— beaten together, and then slowly beaten into the creamed mixture

Added egg

  • 145g plain flour (forgot about the self-raising part, and it was fine!)
  • 45g ground hazelnuts

— added to mixture and mixed just to combine.

Flour and ground hazelnuts folded in

Scraped all of this into a lined and greased 9 inch/22cm springform tin.

Batter spread in pan

Arrange the apples on top and sprinkle over a carton of blueberries (around 150g – 200g).

Apples onto cake

Add blueberries

Bake for 1 hour, until the cake risen between the fruit is golden, and springs back. You can also use a skewer to test for crumbs, but pick a point in between the fruit.

Put on a rack to cool, and sprinkle with icing sugar before serving.

Finished cake

The final cake is firm and moist, slices cleanly and supports the fruit without it sinking through. It’s perhaps a touch on the sweet side, so I might consider experimenting with reducing the sugar in future. That is the sort of thing you want to do gradually, as you will affect the ratio of the cake.

Beginning to bake #8: A simple loaf of bread

White bread baked in a pot

I’m going to give cakes a bit of a break – too much sugar around here. Instead, let’s turn to bread. Bread is probably the baking area with the greatest gap between myth and reality. It seems hard and unachievable, the sort of thing only crazy obsessives or domestic goddesses attempt. Actually the process is easier than making a cake.

So how did breadmaking acquire this intimidating aura? A few things get in the way:

It takes time

Unlike the soda bread, which came together in just an hour, yeasted bread will need at least 2 or 3 hours from start to eating. However, for most of that time, you don’t need to do anything. What you really need is a few hours when you’ll be at home so you can dip in and out of the process. One useful thing is to make bread while you’re making something else like a casserole. That allows you to chop some carrots or stir the pot while you’re waiting for the next bread step.

You can even stretch the time out so you can start it off one evening and continue the following morning or even the next evening. There are a number of tricks to use to speed up or slow down the dough and make it work to your schedule.

Briefly, you can speed things up by using more yeast or by keeping everything warm so the yeast multiplies faster. Conversely, you can slow things down by starting with less yeast or using the fridge to store the dough for a while.

It’s not predictable

Cakes can be tricky, but you can have a reasonable expectation that if you use the right ingredients, weighed accurately, and baked at the right temperature, it should do exactly what it’s supposed to. Bread making is more unpredictable, in that factors that are hard for you to control at home (like room temperature and humidity) have a much greater influence. This is fundamentally because you’re cultivating a live organism, the yeast, to do the work of aerating the bread. It’s more like gardening than cooking. The trick lies in understanding the processes and recognising what they look like, so you can proceed until the dough is ready, rather than watching the clock.

You need to know what you’re aiming for

One reason people can be disappointed with their breadmaking is that it isn’t like their favourite bought type, and there are many different types of bread. Whether you like rough, chewy sourdough, nutty wholemeal sandwich loaves or soft white rolls, you can create each of them at home, but you’ll need to use not just a different recipe but a different approach for each one.

So, with that in mind, this recipe is for a white loaf with a crust that can be baked in a loaf tin, on a baking sheet or in a pot to make a round ‘boule’ shape.

Equipment:

  • Bowl
  • Wooden spoon
  • A little sharp knife

For baking:

  • A large round casserole dish with a lid (Pyrex or cast iron – it needs to be able to withstand high temperatures)

For the best first-time results, I would recommend the casserole approach, but you can also use a preheated baking sheet, or a loaf tin and put a roasting tin of hot water on the shelf beneath to create steam.

Basic recipe:

  • 500g strong white bread flour
  • 300g water
  • 3 tsp dried yeast, or one sachet
  • 1 1/2 tsp sea salt
  • 1 tbsp olive oil or vegetable oil

I’ve covered lots of other tips and tricks for making bread in a previous post, so I’ll go through the recipe fairly straight. This method is adapted from Dan Lepard’s technique and a really great blog post by Azelia’s Kitchen.

Method:

1. Mix

Flour, yeast, salt

Put the flour, yeast and salt into a bowl and mix briefly to distribute the yeast and salt. Add the oil and water. The water doesn’t need to be warm, but if you want things to move fast, then that will help. Mix into a rough dough with a spoon, stopping when there’s no more dry flour.

Shaggy dough

2. Rest

Rest the dough

Cover the bowl with a tea towel and leave for 10 minutes. This step starts the gluten working (remember that water + flour = gluten) by allowing the flour time to absorb the water properly.

3. Fold

Bread folding

Instead of kneading to develop the gluten, this approach folds the dough to develop and stretch the gluten. You can do this in the bowl if you’re short of space, but it’s a little easier to do on the counter. If you’re putting it on the counter, use oil rather than flour to prevent the dough from sticking. This means you won’t change the overall balance between flour and water in the recipe.

Just scrape all the dough out, push it into a single ball and then fold each side into the centre, as if it had 4 sides.  Do this three times, for 12 folds in all. This should create a nice tight ball, with a smooth surface on the side away from the folds.

12 folds

4. Rise

Ready to rise

Turn the dough so the smooth side faces up in the bowl. Cover the bowl with cling film and leave to rise for a few hours or until doubled in size.  To speed this up, put the bowl in a warm place, or to slow it down, if you need to leave it alone and come back later, put it into the fridge. If you do that, you’ll need to let it come back to room temperature before you carry on.

Risen dough

5. Shape

Once it has risen, it will be very puffy, with big bubbles. To redistribute these and form the shape of the loaf, scrape the dough out of the bowl onto a floured counter. Try to make sure the smooth upper surface is preserved, and ends up face down on the counter. Press all over with your fingertips to push down the big bubbles and flatten the dough slightly. Fold the sides into the centre again to reform the ball.

Shaped dough

6. Proof

Proofing

Put the dough onto a floured tea towel, this time smooth side down. Fold the towel over it, and leave to rise again, for somewhere between 30 minutes and an hour, until it’s expanded again and become puffy again.

Proofed dough

7. Bake

While the dough is proving, put a large casserole dish with a lid into the oven (Pyrex or cast iron are good). A good 20 minutes before you think the dough will be done (start after 20 minutes if you’re not sure) turn the oven on and set to 220c or 200c for a fan oven.

Into the hot pot

Once you’re ready to bake, take the scorching hot pot out of the oven, remove the lid and tip the dough, fold-side down, into the hot pot. Use a small sharp knife to slash the top of the dough. Replace the lid (don’t forget to use oven gloves) and put into the oven. Bake for 30 minutes, then remove the lid and bake for another 15 or 20 minutes to get the top brown.

First bake

Finished loaf

8. Cool

Tip out onto a rack and leave to cool. Be as patient as you can – important things happen to the interior of the loaf as it cools, and you’ll find it is quite doughy if you cut it early.

The bread will keep well for a couple of days because of the oil in it, but if you don’t think you’ll get through it wrap the whole loaf or a half before freezing. You can also hand-slice it and then freeze so you can toast it straight from the freezer.

Beginning to bake #7: Cupcakes (or fairy cakes)

Icing on top

To most people, cupcakes and muffins are pretty much the same thing. Certainly, if you buy them in supermarkets, both will be very sweet, quite dense, and come in individual paper cases. Cupcakes are likely to be differentiated by a swirl of thick icing or perhaps a glaze of shiny royal icing.

But in baking terms, the two are very different. Muffins have relatively little fat or sugar, and are combined very carefully. They produce moist, not-too-sweet buns, which often have fruit mixed through the centre. They rely on a big boost of baking powder or bicarbonate of soda to make them airy, and because they contain so much moisture (and water + flour = gluten), you have to mix them very gently so they won’t be tough.

Cupcakes, however, are just sponge cakes made in little cases. Think of fairy cakes or butterfly cakes you might have made at school. Although the recipe in this post is for cupcakes, you can also bake it in a larger cake tin to make a sponge cake. For that matter, almost any cake recipe in this format (where you cream the butter and sugar together first) can be converted to cupcakes by just baking it in paper cases (a useful thing to remember if you don’t have the right sized tin, or the mixture looks like it won’t fit – bake the excess as cupcakes). You just need to make sure you adjust the baking time (and in some cases, the temperature).

Structure of the batter

The structure of a cupcake is a foam, a web of flour starch and egg proteins, with many tiny bubbles. The big difference between making cupcakes and any of the previous recipes in this series is that incorporating the air is much more important. The batter you end up with is quite delicate, with just enough connection between the ingredients to hold the all-important air in there.

The starting point for incorporating air in this type of cake is creaming, mixing butter and sugar really thoroughly to create bubbles. Both of the biscuit recipes started by mixing together the butter and sugar, but this is not creaming. Creaming involves beating the butter and sugar together for a long time, to allow the sugar to create little bubbles in the butter – what Hannah Glasse in 1774 described as a ‘fine thick cream’. This is work that calls for electric assistance – Hannah Glasse suggested that using your hand, this should take an hour. Another 19th Century book suggests it is “the hardest part of cake making” and you should have your manservant do it.

In the absence of a man-servant, a handheld electric mixer or a stand mixer like a Kitchenaid makes this much, much easier. With a small quantity it can be done by hand, but expect a decent workout. You need the mixture to change colour – as the air is incorporated, the bubbles make the mixture look paler. The texture also becomes much fluffier.

Basic recipe:

(adapted from Nigella Lawson’s cupcakes in ‘How To Be A Domestic Goddess‘)

This recipe is for a plain sponge, more of an old-fashioned fairy cake than a fluffy American cupcake. However, if you master the techniques for this, then most other cupcake recipes will look familiar*.

  • 125g butter, room temperature
  • 125g caster sugar
  • 2 eggs, room temperature
  • 1/2 tsp vanilla extract
  • 125g plain flour
  • 1½ teaspoons baking powder
  • 2-3 tbsp milk

Diagram of recipe

To make sure everything mixes together easily, you need to make sure that everything is at room temperature, and that the butter is really soft but not melted. To warm eggs up, put them in a bowl with warm water for about 5 minutes. To warm butter, microwave on the lowest setting, or use a very, very low oven (60C or so.)

I’m also going to assume an electric mixer of some sort, although with enough elbow grease, you can do the same with a wooden spoon.

Start by beating the butter on its own to make sure it’s soft. Add the sugar and mix together, then beat really thoroughly until creamed – pale and fluffy. This should take at least 5 minutes with an electric mixer, probably longer.  It’s almost impossible to do this for too long.

Creaming-montage

Beat the eggs in a small jug or bowl. Add a little at a time to the butter and sugar, beating really thoroughly after each addition. Add the vanilla, or any other flavouring (such as lemon zest for lemon cupcakes). It’s at this point that the mixture can curdle, especially if things started out a bit cold – the mixture will look lumpy and a bit scrambled (see photo, ahem). If this happens, the answer is just to keep going – it might not be as light, but it will come back together when you add the flour, and the end result should be fine.

Curdled mixture with eggs

Sift in the flour and baking powder. Mix very gently, ideally by hand, just to combine and mix in any visible streaks of flour. A silicone spatula is good for this, as you can scrape the sides and right down to the bottom of the bowl.

With flour added

If the mixture is still quite stiff, you can add a little milk to loosen it up. The traditional description of this is ‘dropping consistency’, meaning if you scoop up a big spoonful and hold it upside down of the bowl, it will drop off. Mix the milk in very gently – remember that the liquid in the eggs, plus the milk will activate the gluten in the flour, and too much stretching at this stage will make the network of protein in the cake too tough.

Divide the batter between the muffin cases. Bake for 20 minutes at 190C/170Cfan until the tops are evenly golden and the centres spring back when you push them gently (meaning the centres are cooked through).

Into cake cases

Cool on a wire rack before icing. The simplest icing is to use icing sugar or royal icing sugar mixed with a very small amount of water or lemon juice and spread over the top.

Baked until golden

* There are some sponge or cake recipes that ask for you to mix the fat and the flour together first, waterproofing the flour as much as possible, and relying on the baking powder for the rise.

Variations:

The most obvious variations are flavour ones. The main thing is to use concentrated flavours so that you don’t add too much liquid or too much dry ingredients and change the balance of the mixture.

  • Replace some of the flour with 2 -3 tablespoons of cocoa to make chocolate cakes. Ice with chocolate ganache (an equal mixture of cream and chocolate, melted together).
  • Flavour the mixture with lemon zest (or Boyajian lemon oil) and use lemon juice to make the icing. Leave out the vanilla in this case.
  • Use instant coffee to make a coffee-flavoured sponge.

For further variations, see the next post on sponge cakes.

Beginning to bake #6: Cookies

Cookies 1 and 2

Biscuits or cookies – there are hundreds of variations. Providing a basic recipe for biscuits is hard – there are thousands of different biscuit or cookie recipes out there, and every country has it’s own favourite variations: bourbon biscuits, gingernuts, speculoos, chocolate chip cookies, macarons de Paris, biscotti, shortbread, digestives – the list is *long*.

But let’s start with some generalisations: most are a combination of flour, butter and sugar. Many also have egg to bind the dough together and to help it become crispy. Some will include some leavening – baking powder or bicarbonate of soda – to help it puff in the oven.

The shortbread-type cookies contain just flour, butter and sugar. They are mixed in the same way as pastry, but with softened instead of cold butter. This makes it hard to roll out, but gives you that characteristic shortbread crunch and really crumbly texture.

American cookies usually have a lot more sugar and some extra liquid or egg. They are usually designed to be scooped into balls and then spread out in the oven, and they usually have plenty of additions – chocolate chunks, nuts, dried fruit, oats.

Looking at different cookie recipes, there is a huge variation in them (and, because I’m a complete geek, I assembled a spreadsheet to check this. I know. But it keeps me in gainful employment). Look at different people’s shortcrust pastry recipes and you’ll probably find they are almost identical. No two biscuit recipes seem to be the same. That gives you a clue – if there is a very wide range in existing recipes, that tells you that you can probably play around and adjust recipes quite safely, and still come out with something that works/is edible.

To prove that, I tested two different but basic cookie recipes for this post. Use whichever you like the sound of. When you make such plain cookies, though, remember that the taste of the butter will be very prominent, so use something good, and definitely don’t use margarine or low-fat spread.

Make sure the butter is soft before you start. If you usually keep butter in the fridge, as I do, there are a couple of things you can do. One is to get the butter out of the fridge and put it on the counter several hours before you plan to bake. Hmm. No, I don’t usually remember to do that either. Instead, I most often slice the butter I’ve weighed for the recipe into thick slices on a plate and put it into the microwave. I use 1 min bursts on the lowest setting (90W) until I can press a finger in without too much trouble. You don’t particularly want to melt it, but if part of it does, just let it stand for a bit, and then mix it all together again. For cookies, it’s not a big deal, though it will get more important next time when we move on to cupcakes…

Cookie recipe 1 – shortbread type

Baked sliced cookies 1

This is a very plain dough, and almost the only difference with recipe 2 is the much reduced amount of sugar. On its own, it’s a bit boring, but it would work well as a thumbprint cookie (where you press a depression in the centre of the cookie and fill it with jam). The contrast with something very sweet would work with this plain dough. Because it’s quite fragile, I rolled this dough into a log, chilled it, and then sliced it into discs before baking. You can also use this method to make a sweet tart case – take the discs and press them together in a tart tin to form a complete crust.

  • 200g butter, room temp
  • 100g caster sugar
  • 300g plain flour
  • 1 tsp vanilla extract
  • 1 tsp baking powder
  • 1 large egg, beaten

Put the softened butter into a bowl and add the sugar. Beat together – it will make a paste.

Add the vanilla. Put a sieve over the bowl, and add the flour and baking powder. Sift into the bowl and mix together. It will be crumbly.


Add egg and knead gently until it comes together as a dough.

Cookie dough 1
Wrap into a cylinder in baking parchment and twist the ends. Chill for about 30 minutes.

Cookie dough roll

Slice into discs about 5mm thick, and place the slices onto a baking sheet lined with baking parchment. If you want, press in chopped chocolate or coarse sugar as a topping.

Sliced dough with toppings 1

Put into the oven and bake for about 14 minutes at 150C (fan)/170C. When they’re done, they will still be very pale, but should just start to colour slightly brown at the edges.

Cookie recipe 2 – cookie type

Chocolate chip cookies 2

This is more recognisably a cookie. It won’t be chewy, but crisp instead. If you want chewy you can do a few things: use brown sugar instead of caster sugar; replace plain flour with bread flour, and beat the dough to develop the gluten a bit (you’ll need a mixer or a strong arm).

  • 200g butter
  • 300 plain flour
  • 1 tsp baking powder
  • 300g caster sugar
  • 1 tsp vanilla extract
  • 1 large egg, beaten

Cream the butter and sugar together, to make a stiff paste.

Butter and sugar 2

Add the vanilla and egg, and mix together. Place a sieve over the bowl, and add the flour with the baking powder. Sift into the bowl to make sure the two are combined. Mix together – it will form a stiff dough.

Cookie dough 2

Mix in any chunks, flavourings or other additions. For this recipe I used 70g of chopped dark chocolate.
Chocolate chip cookie dough 2

At this point you can chill the dough for 10 or 15 minutes (especially if it’s very soft) or up to a couple of days. Use a scoop or a spoon to pull off about a tablespoon at a time of dough, form it into a ball and place it on a baking sheet lined with baking parchment.

Scooped cookie dough 2

Bake for 15-20 minutes at 150C(fan)/170C, depending on how crisp you want them. As for the other cookies, you are looking for at least a little colour at the edges. These won’t colour like most cookies because they don’t contain brown sugar, so they will remain quite pale.

Variations:

Beginning to bake #5: Freeform rhubarb tart

Created with Admarket’s flickrSLiDR.

Shortcrust pastry is one of the most useful baking skills. You can use it for sweet or savoury dishes, make it in any quantity, keep it for a day or two in the fridge or store it for later in the freezer. And the skills are very simple – you mix the flour and butter using the same rubbing in method as for scones.

The recipe today is for a freeform fruit tart, so you don’t need to worry about lining a pie dish or tart tin. You can use all sorts of fruit in the centre, just cut fairly small so it cooks through. Watch out for fruits that give off a lot of juice when they cook – you might want to add some breadcrumbs or cake crumbs underneath the fruit to soak up the juices. But with the rhubarb here, I just didn’t pack it too closely, and it was fine.

Rhubarb tart

Making shortcrust pastry is surrounded by a dense thicket of rules and myths:

  • Cold hands make better pastry
  • You should roll out the pastry on a marble slab
  • You need to use ice water
  • All butter pastry is best
  • You should always use lard for the best pastry

So why all the rules? What’s with keeping everything cold? For pastry, you really need the waterproofing effect of the fat to make sure the pastry ends up ‘short’, which means crisp and crumbly, like shortbread. Butter is made of only about 80% fat (depending on the brand). The rest is a mixture of water and milk solids (seriously. Check the nutrition panel on a packet). This means that anything you do to warm the pastry up risks melting a little bit of butter and releasing some water into the flour, and you want to keep that to a minimum.

Another reason for keeping things cold is to preserve some pieces of fat in the pastry. When the dough is rolled out, these pieces will form thin layers of fat, separating layers of dough. As the pastry cooks, the fat melts and separates the layers, making the cooked pastry flaky as well as crumbly. If you want a more flaky pastry, leave more large pieces of fat in the dough. When you roll it out, if you can see big streaks of fat, you can gently fold it like a business letter before proceeding. This will gives you some of the characteristics of rough puff pastry. If you want it more crumbly, rub the fat in until all the big pieces disappear. For a really shortbread-like crust, you can use softened or melted butter, along with sugar, which also interferes with the gluten.

Similarly, you want to handle it as little as possible. Rolling it out or stretching it many times will make it tough not crisp, as it develops the gluten.

Why use lard or shortening?

Those who swear by lard or vegetable shortening for their pastry do so for two reasons. One is that both are 100% fat, so there’s no risk of releasing water into the pastry as it melts. The other factor is that both melt at a higher temperature than butter, meaning you can use warm hands with less risk of melting the fat. The down side of both is that the flavour isn’t as nice as butter, so a common compromise is to use half butter and half lard.

Equipment:

  • Bowl
  • Knife
  • Baking sheet or tart tin

Basic recipe:

The phrase to remember is ‘half fat to flour’ – you always start with a ratio of half the weight of butter or other fat to the weight of flour. Richer shortcrust pastries can use more butter, and can use eggs as well, but this is the basic recipe, and a good place to start.

  • 200g flour
  • 100g cold butter (or half butter and half lard)
  • 4-5 tbsp cold, cold water
  • Big pinch of salt

For a rhubarb tart:

  • 3 sticks of rhubarb
  • 1 clementine or orange
  • Brown sugar

Method:

Weigh the flour into a bowl, add the salt, and add the cold butter, cut into chunks. Using a dinner knife, cut the butter into smaller pieces in the flour. Aim for the largest chunks to be about the size of a large pea. This will make it easier to rub the butter in.

Butter pieces cut in

Using your fingertips, rub the flour and butter together to integrate them, as in the scones recipe. Here, it doesn’t matter if the butter doesn’t disappear completely – you can leave some small lumps. Keep everything as cold as you can.

Once the butter is rubbed in, add about 3 tablespoons of fridge-cold water (about 45g if the bowl is on the scales).  Use the knife to mix it around and try to get everything equally damp. You’re not trying to get it wet enough to form a ball on it’s own, like with scones. All you need is enough dampness that when you squeeze the crumbs together, they stick to each other and don’t crumble apart again. Try that test to see if it’s ready. You will probably need another tablespoon or two to make sure it’s damp enough all the way through, but try not to use too much more than you need. The more water you use, the tougher the pastry will be, and the more likely it is to shrink when it is baked.

Use the knife to start sticking the damp crumbs together (the more you can use a knife or a scraper to push things around, the less you will have to use your hands, and the cooler everything stays).

Tip everything out onto the counter and pat and push it into a single disc of dough. Put this into a small ziplock bag or wrap it in clingfilm, and stash it in the fridge. Leave it for at least 30 minutes and up to a day.

Pressing down

Remove from the fridge, put it onto a floured counter and start to roll out with a rolling pin. If it’s too cold and stiff for the rolling pin to make an impression, leave it out for a while.

The trick when rolling out pastry is to roll it only in the middle – don’t roll off the front or the back. Just roll a little, then turn the pastry gently by about 1/8th of a turn, and roll again. This stops you making any part of the pastry too thin, and turning it helps to keep it roughly round and makes sure it is not sticking.

The pastry will probably start to crack at the edges as you roll it out. You can push these together, so that they don’t spread and get bigger as you roll further. Just push the edges of the crack together with your fingers, or pat the edges to seal it up.

Cracks at the edge
Push the cracks together

Once you have a thin sheet of pastry, transfer carefully to a baking sheet. It’s easiest to move it by draping it over the rolling pin, or by folding it gently in half and then sliding it over. Using a piece of baking parchment to line the baking sheet will make it easier to move, and will also stop any juices from the fruit sticking the tart to the baking sheet when it’s baked.

Move to baking sheet

Spread it out on the baking sheet, and move the whole thing into the fridge while you prepare the fruit. This will chill the pastry back down, and also give the gluten that was stretched out by the rolling pin a chance to relax.

Meanwhile, chop the fruit into small pieces and combine with a couple of tablespoons of sugar, and some clementine zest here.

Cut rhubarb and mix with sugar

Remove the pastry from the fridge. Arrange the fruit over the pastry, leaving a wide border around the edge. Leave any juices that have collected in the bowl. Fold the edge of the pastry over the fruit, and pinch it together to hold it in place.

Crimp edges

Crimp it all the way around, then if there are some sugary juices still in the bowl, use a pastry brush to brush them over the edge of the pastry. This is not essential, but will make it sweeter and help it brown.

Bake at 200C/180C for about 20 minutes until the pastry is brown and crisp.

Variations:

  • You can cut the pastry into pieces when it comes out of the fridge, and roll each piece out separately to make individual tarts. The ones below are actually made with a rhubarb-apple compote and roasted rhubarb pieces on top.

Small rhubarb tarts

  • French apple tart – use the same pastry to line a tart tin. Peel, halve and core about 6 or 7 medium apples. Slice thinly and arrange on the pastry. Bake for about 45 minutes, until the pastry is deep golden and the apples are all cooked and starting to colour. Brush the top with warmed apricot jam. This one adapted from a recipe in Saveur magazine.

Apple tart

  • Use the same pastry on top of a dish of beef stew or chicken to make a pot pie. Brush the dish with water or milk to make it stick, and crimp it to the dish. Cut a couple of holes in the top to let the steam escape. Brush the top with milk or egg to get a lovely golden colour. Try replacing the puff pastry in this Jamie Oliver recipe for beef and Guinness pie with your own homemade pastry.