Creaming – the foundation of cake making

Baked until golden

Cakes are demanding, and learning to make a good cake needs more than a recipe. So many little details are important. One of the essential details, at least for most British cakes, is beating the butter and sugar until truly pale and fluffy – creaming them together. If you’re making a Victoria sponge, a layer cake or a cupcake, you almost always start by creaming together the butter and sugar.

What is creaming?

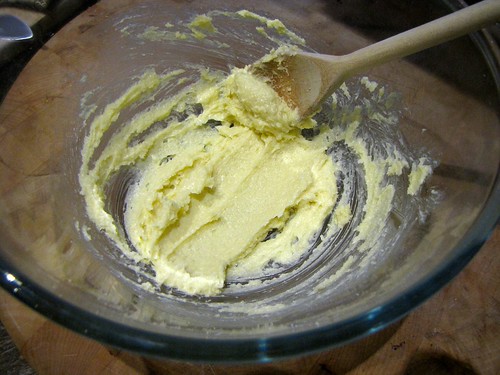
For a long time I didn’t understand creaming at all. The recipe phrase is usually ‘cream the butter and sugar together, or ‘beat until light and fluffy’ or ‘beat until it turns a shade paler’. The big problem with these directions is that they don’t convey the change you need to see. You start off with a greasy paste of butter and sugar, but end up with something more like slightly yellowed whipped cream instead of butter.

Creamed butter and sugar

I only really got creaming when watching a demonstration by Alice Medrich, an American baker and chocolatier. She was making her Tribute cake, a layer cake of featherlight chocolate sponge with whipped chocolate ganache filling and a smooth, shiny chocolate glaze. She left the mixer running for a good five minutes when creaming the butter and sugar – much longer than I had expected.

Think about it this way instead: most of the frosting that is now applied in towering heaps to American cupcakes is made of this same mixture. They tend to use icing sugar instead, so the texture is even smoother, but the volume and the fluffy texture are the things you’re aiming for.

Why is creaming important in making cakes?

Cake texture

The structure of a cupcake is a foam, a web of flour starch and egg proteins, with many tiny bubbles. The batter you end up with is quite delicate, with just enough connection between the ingredients to hold the all-important air in there. This is the biggest difference between a sponge and other types of cake.

Marrying butter and sugar is a task at once completely simple and immensely complicated. It is the foundation of cake bakery, the structure upon which everything else stands. Build it carelessly, and the rest of the structure may wobble and fall. Of course, you can insure yourself against these errors with other supporting structures, but when you want to move on to the virtuoso pieces that really depend on the foundation, that strip everything else back, you will find it hard.

What is happening when you cream together butter and sugar is that the sugar crystals are helping to create bubbles in the fat as they are beaten. Air is what creaming is all about. Beating faster and longer creates more and more bubbles, and creates a finer texture. Any time you introduce bubbles of one thing into something else, it will become more opaque and paler. This is true of vinaigrette, of hollandaise, of whisked egg whites and of creamed butter and sugar. All the little bubbles start to interfere with the light, bouncing it around more and making it look paler.

How do you cream butter and sugar for sponge cakes?

Hannah Glasse in 1774 described the final state as a ‘fine thick cream’. She suggested that using your hand, this should take an hour. Another 19th Century book suggests it is “the hardest part of cake making” and you should have your manservant do it.

In the absence of a man-servant, a handheld electric mixer or a stand mixer like a Kitchenaid makes this much, much easier. With a small quantity it can be done by hand, but expect a decent workout. You need the mixture to change colour – as the air is incorporated, the bubbles make the mixture look paler. The texture also becomes much fluffier.

Creamed butter & sugar

When you’re creaming butter and sugar together, it’s more or less impossible to mix for too long. You at least need the mixture to become one shade lighter. By mixing it for long enough, it should be possible to make it turn almost white, as the sugar crystals introduce more and more air into the fat. All of this isn’t really conveyed by the simple words ‘cream the butter and sugar’.

In a follow up post, I’ll talk about the subsequent steps in making a sponge cake, which follow on from the creaming step.

10 tips for baking from American blogs in the UK

I lived and cooked in the States, in Palo Alto, for a little over a year. Many things about it frustrated me to tears – although that was partly my fault for being determined to make mince pies and Christmas cake in a fit of homesickness. But that was where I learned to really cook over  six months at Tante Marie’s cooking school in San Francisco. It gave me a huge affection for American food writers, restaurants and recipes.

There are many differences in the ingredients and equipment available in the UK compared to the US. Although we share a language (just), many aspects of American life are completely foreign to us. US food bloggers had a head start on us Brits, and many of the very best blogs are by American writers, so it’s a shame to avoid them because the recipes are hard to tackle. With a few tips, its very easy to adapt US recipes to make in the UK – and some bloggers, such as Smitten Kitchen, have become such converts to using a scale, they provide gram measures as well as cups.

The first thing to know about American baking is that almost no publisher or blogger can assume that a home baker owns a scale – a very small proportion of homes own them, so most will only provide cup measures. Where they do provide weights, it is likely to be in ounces (the US being almost the only country on the planet still sticking to the Imperial system of weights).

I have put together a list of the key differences to be aware of when using American recipes, particularly in baking, with suggestions on how to convert and appropriate substitutions. I hope you find this helpful, and try to tackle a few more recipes from the huge array of inspiring American bloggers.

  1. A stick of butter weighs 4 ounces (110g) and is the same as half a cup. American butter has more water than European butter – it’s usually around 80 per cent fat, compared to 85% or more in the UK. This won’t make a difference for most recipes, but is worth bearing in mind if something turns out overly heavy or greasy.
  2. While we’re at it, 1 cup = 8 fluid ounces and 1 fluid ounce = 2 tablespoons. You will sometimes see references to tablespoons of butter – you can assume that 1 tablespoon of butter weighs half an ounce.
  3. American granulated sugar is somewhere between caster sugar and UK granulated sugar in the size of the grains. Superfine sugar means something similar to caster sugar and confectioners sugar refers to icing sugar.
  4. A cup of all-purpose flour is somewhere between 4oz and 5oz – there is no standard weight, it all depends on the cook. I generally start with 130g per cup and adjust if the texture seems wrong.
  5. All-purpose flour is slightly higher in protein than British plain flour, but most of the time you can substitute without any problems. If the recipe is particularly delicate, you can reproduce a similar protein content by using half plain flour and half strong white flour. Cake flour in the US is very low in protein, and usually bleached, a process which is outlawed in Europe. This makes it very hard to reproduce the superfine sponge used for American layer cakes.
  6. Golden raisins are the same as sultanas. When it comes to other dried fruit, you almost never see currants, candied peel or glace cherries in America, so you won’t often find them in recipes.
  7. Molasses is a dark syrup, much like black treacle, but usually more liquid. I will usually substitute about two-thirds black treacle and one-third golden syrup if molasses is called for.
  8. Kosher salt is not Jewish salt – it simply means a flaky salt, used for koshering meat. Kosher salt is widely available in the US, and isn’t as expensive as sea salt here. It is best approximated with a fine sea salt, or with about half the volume of fine-grained table salt.
  9. American baking often makes use of buttermilk, which can be bought in any grocery store in quart cartons like the milk. I usually substitute a mixture of two-thirds plain yoghurt and one-third semi-skimmed milk, which works well.
  10. American cream is a sad thing, and their heavy cream (the thickest) never gets past the fat content of our whipping cream. So feel sorry for them, but bear in mind that when using cream, they are dealing with much less fat. Half and half is more or less what it says: half (whole) milk and half cream – single cream let down with a little milk would be about right.

Beginning to bake #6: Cookies

Cookies 1 and 2

Biscuits or cookies – there are hundreds of variations. Providing a basic recipe for biscuits is hard – there are thousands of different biscuit or cookie recipes out there, and every country has it’s own favourite variations: bourbon biscuits, gingernuts, speculoos, chocolate chip cookies, macarons de Paris, biscotti, shortbread, digestives – the list is *long*.

But let’s start with some generalisations: most are a combination of flour, butter and sugar. Many also have egg to bind the dough together and to help it become crispy. Some will include some leavening – baking powder or bicarbonate of soda – to help it puff in the oven.

The shortbread-type cookies contain just flour, butter and sugar. They are mixed in the same way as pastry, but with softened instead of cold butter. This makes it hard to roll out, but gives you that characteristic shortbread crunch and really crumbly texture.

American cookies usually have a lot more sugar and some extra liquid or egg. They are usually designed to be scooped into balls and then spread out in the oven, and they usually have plenty of additions – chocolate chunks, nuts, dried fruit, oats.

Looking at different cookie recipes, there is a huge variation in them (and, because I’m a complete geek, I assembled a spreadsheet to check this. I know. But it keeps me in gainful employment). Look at different people’s shortcrust pastry recipes and you’ll probably find they are almost identical. No two biscuit recipes seem to be the same. That gives you a clue – if there is a very wide range in existing recipes, that tells you that you can probably play around and adjust recipes quite safely, and still come out with something that works/is edible.

To prove that, I tested two different but basic cookie recipes for this post. Use whichever you like the sound of. When you make such plain cookies, though, remember that the taste of the butter will be very prominent, so use something good, and definitely don’t use margarine or low-fat spread.

Make sure the butter is soft before you start. If you usually keep butter in the fridge, as I do, there are a couple of things you can do. One is to get the butter out of the fridge and put it on the counter several hours before you plan to bake. Hmm. No, I don’t usually remember to do that either. Instead, I most often slice the butter I’ve weighed for the recipe into thick slices on a plate and put it into the microwave. I use 1 min bursts on the lowest setting (90W) until I can press a finger in without too much trouble. You don’t particularly want to melt it, but if part of it does, just let it stand for a bit, and then mix it all together again. For cookies, it’s not a big deal, though it will get more important next time when we move on to cupcakes…

Cookie recipe 1 – shortbread type

Baked sliced cookies 1

This is a very plain dough, and almost the only difference with recipe 2 is the much reduced amount of sugar. On its own, it’s a bit boring, but it would work well as a thumbprint cookie (where you press a depression in the centre of the cookie and fill it with jam). The contrast with something very sweet would work with this plain dough. Because it’s quite fragile, I rolled this dough into a log, chilled it, and then sliced it into discs before baking. You can also use this method to make a sweet tart case – take the discs and press them together in a tart tin to form a complete crust.

  • 200g butter, room temp
  • 100g caster sugar
  • 300g plain flour
  • 1 tsp vanilla extract
  • 1 tsp baking powder
  • 1 large egg, beaten

Put the softened butter into a bowl and add the sugar. Beat together – it will make a paste.

Add the vanilla. Put a sieve over the bowl, and add the flour and baking powder. Sift into the bowl and mix together. It will be crumbly.


Add egg and knead gently until it comes together as a dough.

Cookie dough 1
Wrap into a cylinder in baking parchment and twist the ends. Chill for about 30 minutes.

Cookie dough roll

Slice into discs about 5mm thick, and place the slices onto a baking sheet lined with baking parchment. If you want, press in chopped chocolate or coarse sugar as a topping.

Sliced dough with toppings 1

Put into the oven and bake for about 14 minutes at 150C (fan)/170C. When they’re done, they will still be very pale, but should just start to colour slightly brown at the edges.

Cookie recipe 2 – cookie type

Chocolate chip cookies 2

This is more recognisably a cookie. It won’t be chewy, but crisp instead. If you want chewy you can do a few things: use brown sugar instead of caster sugar; replace plain flour with bread flour, and beat the dough to develop the gluten a bit (you’ll need a mixer or a strong arm).

  • 200g butter
  • 300 plain flour
  • 1 tsp baking powder
  • 300g caster sugar
  • 1 tsp vanilla extract
  • 1 large egg, beaten

Cream the butter and sugar together, to make a stiff paste.

Butter and sugar 2

Add the vanilla and egg, and mix together. Place a sieve over the bowl, and add the flour with the baking powder. Sift into the bowl to make sure the two are combined. Mix together – it will form a stiff dough.

Cookie dough 2

Mix in any chunks, flavourings or other additions. For this recipe I used 70g of chopped dark chocolate.
Chocolate chip cookie dough 2

At this point you can chill the dough for 10 or 15 minutes (especially if it’s very soft) or up to a couple of days. Use a scoop or a spoon to pull off about a tablespoon at a time of dough, form it into a ball and place it on a baking sheet lined with baking parchment.

Scooped cookie dough 2

Bake for 15-20 minutes at 150C(fan)/170C, depending on how crisp you want them. As for the other cookies, you are looking for at least a little colour at the edges. These won’t colour like most cookies because they don’t contain brown sugar, so they will remain quite pale.

Variations:

Cake – a quest for an everyday muffin

I’ve been in denial, but now I need to accept that I have a problem and address it. I like cake.

I make cake at home, I share it with friends. I bake birthday cakes for people. I think most of the cakes I make are better than those that I buy.

And yet, I buy far too many expensive, mediocre cakes and biscuits during the week at work.

THIS HAS GOT TO STOP.

You see, the problem is that I tell myself I don’t need cake in the week, that it’s just for dessert and occasional weekend treats. But this is not true. I eat some form of cake, biscuit or pastry every day, often twice a day. So what I should really do is make my own cakes, try and make them as healthy as I can, with whole grains and fruit in, and take them with me to work, so that I won’t buy the Paul Pain au Chocolat, the Eat Banana cake or the Pret Flapjack thing. (I might have to stick with the Leon Lemon and Ginger cake for a while, just until I figure out the recipe).

The first step then, was to bake some muffins, which freeze very happily, are very accommodating of modification, and fill that mid-morning gap perfectly.

Gordon Ramsay has a nice recipe for blueberry muffins in his ‘Healthy Appetite’ book, which uses wholemeal flour and mashed bananas, so that seemed like  a good place to start.

And then, I was reading Eggbeater, and came across this description by shuna of a muffin she had made for the weekend pastry basket at 10 Downing Street (the New York restaurant where she works):

” buckwheat-banana-walnut-coffee-candied ginger muffin”

Doesn’t that sound amazing? I knew I had to give it a go.

So I started with the Gordon Ramsay recipe and modified it. Unfortunately my modifications weren’t bold enough the first time. The coffee made the dough convincingly brown, but didn’t contribute much to the flavour. The ginger appeared when you got a nugget of candied ginger, but otherwise was quiet. So I tried again, and increased the quantities of flavouring, adding the ginger syrup, and more coffee. I ended up with a great flavourful muffin. The bitter flavours of the coffee and walnuts balance the sugar and bananas to make a not-to-sweet breakfast muffin. The walnuts and demerara give crunch and the bananas keep the whole thing moist. And I get to tell myself that its entirely healthful, so I can tuck in every day of the week.

Ginger coffee walnut banana muffins

Introduction

Based on a single line from Shuna Fish Lydon: buckwheat-banana-walnut-coffee-candied ginger muffin”.

The recipe is adapted from Gordon Ramsay’s recipe for blueberry muffins in ‘Healthy Appetite’.

This is a great breakfast muffin, because the bitter flavours of the coffee and walnuts balance the bananas and sugar to make sure it is not too sweet.

Tips

You can freeze bananas when they are ripe, even all brown, for baking with later. They will go very squashy, but that doesn’t matter if you’re going to mash them up anyway.

Flour develops gluten when it comes into contact with liquid – the protein that makes bread strong and elastic. If this develops in muffins, it makes them seem tough and chewy, so minimise the gluten by keeping the dry and wet ingredients separate until the last minute, and by then mixing gently together until they are just combined.

Ingredients

  • 2 large ripe bananas

  • 200g wholemeal self-raising flour and 100g rye flour

  • 1/2 tsp baking powder

  • 1 tsp bicarbonate of soda

  • pinch of salt

  • 100g light brown muscovado sugar

  • 1 tsp ground ginger

  • 2 tbsp of instant espresso powder dissolved in 3 tbsp of just-boiled water, or a double shot of espresso

  • 180g yoghurt and 40ml semi-skimmed milk (or 220ml buttermilk)

  • 1 egg

  • 75ml vegetable oil

  • 150g walnuts, toasted and chopped

  • 50g candied stem ginger in syrup, finely chopped (about 3 balls), plus 1 tbsp of the syrup

  • 2 tbsp demerara sugar –> to sprinkle on the top

Method

  • Preheat the oven to 180C.

  • Mash the bananas.

  • Put the flours, baking powder, bicarb, salt, sugar and ground ginger into a large bowl and combine with a whisk, to make sure the leavening is evening mixed through the flour.

  • Add the yoghurt, milk, bananas, egg, coffee, ginger syrup and oil and stir gently until just combined, but still with a couple of floury streaks.

  • Add the chopped nuts and ginger and fold in until fairly evenly distributed. Mix gently, and don’t overmix or the texture will become tough as the gluten in the flour develops.

  • Divide the mixture between 12 muffin cases in a muffin tin. Sprinkle the top of each muffin generously with demerara sugar.

  • Bake for about 20 minutes or until the tops are brown and crusted, and the top springs back. If you are unsure, test with a toothpick or skewer to check there is no liquid mixture in the centre.

  • Cool for 5 minutes in the tin, then remove the cases to a cooling rack until completely cold. Eat immediately while warm, or freeze on the same day. You can take out a frozen muffin to take to work, and it should thaw during the day (or you can help it along with a quick burst in a microwave).

Birthday cake

Chocolate - from iStockphoto

Chocolate - from iStockphoto

Birthday cakes need to be so many things: celebratory; they need to fulfill the wishes of the birthday boy or girl rather than the baker; and demonstrate an appropriate level of effort. It’s this last one that can give me trouble. While I love to make a cake, and will use any excuse to do so, it sometimes feels odd to create something really elaborate for a work colleague or boss. And besides, I don’t often have the time to go overboard. This is where the chocolate torte comes in.

Chocolate torte is one name for a soft chocolate cake made with ground almonds. Other names are Reine de Saba, or Queen of Sheba cake, or it can simply be referred to as a flourless chocolate cake.

To give some idea of the amount of variation possible, I compiled this table from books I own (oh stop: you didn’t already know I was a geek?):

Author Nigella Lawson Sybil Kapoor Gordon Ramsay Alice Medrich Elizabeth David Julia Child
Book How to Eat Taste Just Desserts Bittersweet French Provincial Cooking Mastering the Art of French Cookery
Recipe Torta alla Gianduja Catherine’s Chocolate Cake Dark and Delicious Torte Queen of Sheba Reine de Saba Reine de Saba
Butter 125g 60g 100g 140g 85g 110g
Chocolate 100g 1 cup 350g 170g 110g 110g
Eggs 6 3 4 4 3 3
Sugar 0 85g 200g 170g 85g 150g
Flour 0 2 tbsp 0 2 tbsp 0 50g
Ground nuts 100g 0 0 70g 85g 55g
Others 400g Nutella Water, brandy, coffee Brandy, almond essence Brandy, coffee Rum, coffee

As with so many of my chocolate experiments, it began with Alice Medrich’s ‘Bittersweet’. She devotes a chapter to a number of variations on this recipe, and reassures the reader that this is a recipe that will accommodate, even welcome changes. She provides us with that elusive license to create almost infinite experimental variations, and still produce an edible result. There can be few experienced home cooks who don’t read through a recipe and mentally edit it. However, we are often admonished that one really ought to follow a recipe to the letter the first time, so you can understand the starting point. While that remains good advice, the freedom to add your own stamp right away is a great inducement to try this recipe. So here at last is a recipe that you can rearrange and make your own, and still produce something that everyone will be happy to eat – and provides a suitable celebration cake at the same time.

Chocolate torte:

Prepare a 20cm/8 inch springform or loose-bottomed tin, by lining the base with baking parchment.

150g dark chocolate (I used 64% Valrhona Manjari)
150g butter

–> melt together, and stir until smooth

1 cup espresso (I used about 1/2 tbsp instant espresso powder in enough water to just dissolve it)

2 tbsp brandy

–> mix into melted chocolate, and set aside

100g ground almonds

45g flour

–> measure and mix together

4 large eggs

–> separate into yolks and whites. If you have a stand mixer, use that bowl for the whites.

110g sugar

–> combine with the yolks and beat until well blended (you can do this by hand, or briefly with a machine)

–> stir in the melted chocolate to combine.

–> separately, whisk the egg whites to soft peaks

50g sugar

–> whisk in 50g sugar to make a meringue, and continue whisking until you have stiff peaks.

–> Fold the whites into the chocolate mixture, by first adding one-quarter, and thoroughly beating it in, then folding in the remainder.

–> Bake for around 30 minutes at 190C/375F, or until a skewer inserted about 4cm from the edge comes out clean, but one inserted in the centre is still gooey.

Surprise cake


Surprise cake
Originally uploaded by louise_marston.

The picture looked quite appetising. You can see it too if you have a copy of ‘Jamie’s Kitchen’ by Jamie Oliver. Go ahead, take a look. “That looks good” I thought. “That looks moist, a little crumbly, a lovely teatime cake”. And I even had beetroot. the recipes most esoteric ingredient, lying around from my organic box a few weeks ago. So I set to work. Something should have tipped me off though. Maybe the use of olive oil instead of butter or another fat. Maybe the need for virtually a whole jar of honey to sweeten it, as there was no other sugar in the recipe. And maybe the colour of the batter after I had added the beetroot mash. It was purple – very purple indeed. But I persevered, popped it in the oven, and prepared to unveil it for pudding that evening when my parents were coming round to eat.

Everyone was suitably amused at the colour, and not a little apprehensive when they heard that this was a beetroot-based cake. But all bravely accepted and tasted a slice. I think it was my other half who first voiced his opinion. “This is terrible” he said. Unfortunately my mum and I were pretty much in agreement. There was no getting away from it – it tasted mostly of beetroot and little else. It wasn’t sweet enough to really be cake, with a harsh, bitter note which I put down to the beetroot combined with my use of Chestnut Honey. My Dad bravely finished his slice, but could not be prevailed on to accept seconds. And the conclusion? Beetroot and cake are not natural partners, so beware any recipe that calls for over 1lb of them. And Jamie Oliver must have been thinking of an entirely different recipe when he took that photo. Reassuringly, I have not been the only one to come to these conclusions – others have had a similar experience.