Friday food links – 6 Mar 2015

Snowdrops

This week has shown a hint of Spring. Sunny days have brought out crocuses, daffodils and the first spikes of tulip leaves. The wind is still cold, but at least it shows that things are moving in the right direction. I’ve once again been spoilt by my mum’s cooking all week, so not much to update on for my cooking. We’re trying Five O’Clock Apron’s Chicken Shawarma for dinner tonight.

Meanwhile, I have a day off from being a mum, and I’m very excited to be heading to Bread Ahead’s cooking school at Borough Market for a day all about pastry. I’m hoping to get comfortable with pastry again. Lately it seems like my shortcrust always shrinks, my choux generally comes out lumpy and under-inflated, and there’s never time for flaky pastry or puff.

Reading this week:

Friday food links – 17 Oct 2014

Copper beech leaves are falling

I managed to get some autumnal baking in this week with grape schiacciata, plum and almond cakes, and oatmeal, raisin and coconut cookies. Hoping to get time today to finish off Mary Berry’s Bara Brith.

Behind the sweets – part 2 – chocolate and tempering

Dipped truffles 2

This is part two looking at the techniques used in the BBC series ‘Sweets Made Simple‘. Part 1 looked at sugar work and caramel.

Kitty Hope encourages you to temper chocolate for any of the recipes that involve making a chocolate shell or cup to contain a filling. She also makes it look quick and simple – which it is if everything goes right. But why bother tempering chocolate, rather than just melting it?

As they say on the programme, tempered chocolate is smooth & shiny and has a ‘snap’ when you break or bite it. It will also shrink away from moulds, making it easy to unmould, and resists melting on your fingers, but melts all at once on your tongue. All chocolate bars that you buy should be tempered when you get them.

To see the difference, break up part of a bar of chocolate (dark shows the difference most clearly, because it only contains cocoa fat (cocoa butter) and no milk fat). Something like a bar of Lindt 70% is usually well tempered and you can really hear the snap with the thin squares. Melt a couple of squares, stir it around and leave them to set again on a piece of baking parchment – something you can peel them off easily.
When they are solid again, you will likely be able to see swirls and speckles of white on the surface, and if you break it, it will seem more crumbly than the stuff straight from the packet. Added to this, if you taste it, it will melt less smoothly, perhaps tasting a bit grainy.

untempered chocolate

Why the difference?
Cocoa fat/cocoa butter turns put to be quite complicated stuff that can form six different types of crystals. Tempered chocolate contains just one or two types that stack neatly together and melt all at the same temperature. When you melt and resolidify chocolate without tempering, you get a mix of all the types, melting at different temperatures, and stacking together in a jumbled way.

Tempering melts all the crystals out, then, by controlling the temperature, encourages just the good crystals to form.

So with tempering, you’re trying to encourage even crystals to form; with sugar work, you’re usually doing everything to prevent those nice even white sugar crystals forming in your syrup.

How to temper chocolate

I won’t provide a list of steps for tempering chocolate, as others have done this much better:

Kitty Hope from the series has this article on how and why to temper chocolate.

Alice Medrich, Californian chocolate queen, goes into some detail about the method and pitfalls of tempering.

Using tempered chocolate

Some of the things you can use tempered chocolate for:

  • Coating chocolate truffles
  • Making chocolate shells or cups to fill with ganache or cream
  • Dipping candied orange peel to make orangettes
  • Coating biscuits or florentines
  • Dipping fruit such as cherries

What makes meringues chewy?

piped meringue stars

Meringues are one of the simplest things to bake, with just two ingredients. But because of this simplicity, there isn’t much room for error. As with many baked goods that are difficult to get right, there is also a wide range of views on what the ideal meringue is like. Some want a completely crisp shell that shatters on the touch of a fork – ideal for something like Eton Mess where the meringue is smashed into pieces.

Others are looking for a chewy centre, almost like nougat. This is often the ideal state of a pavlova base. Finally, there’s the type of soft pillowy meringue used to top a lemon meringue pie.

Chewy almond meringue

All these are meringues that use egg whites and sugar – so what’s the X factor?

What is a meringue?

A meringue is an egg white foam that is made more stable by adding sugar. The sugar syrup supports the bubbles, and holds them up while they dry, leaving behind the sugar and egg-white-protein structure. Egg whites are pretty amazing at creating a foam anyway, owing to all these stretchy proteins they have. However, if you keep beating egg whites on their own, they will go too far – first becoming grainy and then collapsing on themselves.

Tips for making meringues:

  • Adding sugar to the eggs right at the start will make it slower to foam in the first place, so wait until you have a foam.

egg whites - soft foam

  • However, unlike egg whites on their own, it’s really hard to overbeat meringue, so if in doubt, add it early on, when the foam is still quite soft (a lot of recipes ask you to wait until you have stiff peaks before adding the sugar, but this isn’t necessary, especially if you’re using an electric whisk or a stand mixer). After the sugar is all added, you can also leave it whisking for a good few minutes to make sure you have a really stiff foam.
  • The more sugar you add the more stable the foam – you can use anything from 1:1 sugar to egg white (by weight) to 2:1, with the upper end being more common. For a 2:1 ratio, weigh your egg whites out, and then add twice the weight of sugar.
  • The sugar needs to dissolve, so use caster (superfine) sugar or icing sugar, and add it gradually. Warm or room temperature egg whites will make it easier to dissolve. Yotam Ottolenghi has a nice trick for his salted almond meringues – heating the sugar in the oven, then adding it gradually.
  • A little bit of acid helps egg whites to foam – you can wipe the bowl with a lemon, add a little cream of tartar or a few drops of vinegar.

And one more thing? Because egg whites are pretty much just protein and water, there isn’t much in them to go off. This means that you can keep egg whites quite safely for several weeks in the fridge. Or they freeze well (but never defrost in the microwave – they cook too quickly!).

For a crisp meringue

Here, we are after a meringue with all of the moisture removed so all that is left is the brittle egg white and sugar structure. To do this, use a ratio of 2 parts sugar (by weight) to 1 part egg white. As a large egg white is about 28g, that means about 110g (4oz) sugar for two large egg whites (or 100g for medium whites).

You also then need a very low temperature and a long time to make sure that all the water evaporates without browning the sugar. Something around 100°C/212°F is about right. When you have finished baking, leave the meringues in the turned off oven to cool, and remove any last moisture.

salted almond meringues to be baked

For a chewy meringue

If a meringue is chewy in the centre, it just means that it managed to hang on to some of the moisture in the foam. You still want a hard shell, so use 2 parts sugar again, or something close to it. You can add things to the mixture to help it hang on to this moisture – a little bit of cornflour being used most often. Chopped or ground nuts, as in french macarons or dacquoise, will also do this, partly by adding a bit of fat.

The other thing that will help make a chewy meringue is to bake them a little hotter and for a shorter time, meaning the centre doesn’t have the chance to dry out. Be careful of baking too hot though – this will cause the meringues to swell, and may overbrown the outside. A temperature of about 130°C/265°F is good.

For a pie meringue

Meringue-topped pies can be difficult. It can be particularly tricky to make sure it sits nicely on top of the topping, and to avoid moisture from the filling moving into the meringue, and making it ‘weep’. But in principle, it’s like the chewy meringue, but more extreme – it needs even more moisture in it, needs to stay stable, and you want the outside to cook very quickly and brown, before the inside dries at all. So add cornflour to stabilise it, and bake in a much hotter oven – around 170°C/340°F – to get a nice crisp top. Felicity Cloake’s Perfect Lemon Meringue Pie is a good guide.

Meringue recipes

I’ve made a couple of really good meringue recipes recently. Via pinterest, and this blog post by Jillian Leiboff, Yotam Ottolenghi’s salted almond meringues are really lovely – crisp outsides, chewy in the middle, and scented with both toasted almonds and almond extract.

This one, however, is an old favourite – adapted from a recipe in Flo Braker’s ‘Sweet Miniatures’. These are gluten-free, dairy-free chocolate cookies – little drops of meringue flecked with chopped chocolate.

Chocolate Meringue Stars

adapted from Flo Braker’s ‘Sweet Miniatures’

Chocolate meringue bubbles

– 100g caster sugar
– 2 large egg whites (55g)
– 45g dark chocolate

Line a baking sheet with parchment. Heat the oven to 110°C/100°C fan/225°F.

Grate or finely chop the chocolate, or grind it in a food processor until fairly fine.

Whisk the egg whites with an electric hand whisk or the whisk attachment of a stand mixer. Whisk slowly to start, as the protein unravels and the egg whites loosen up. Then increase the speed and whisk until a soft foam forms. Add the sugar a few spoonfuls at a time, whisking thoroughly between each, and then keep whisking for about three minutes until you have a very stiff and shiny foam.

stiff, shiny meringue

Remove the whisk and fold in the chopped chocolate until it is fairly evenly distributed.

folding in the chocolate

Use your finger to put a little meringue on the four corners of the parchment, and turn over to stick the parchment to the baking sheet (this stops it moving around when you pipe onto it).

Scrape the mixture into a piping bag with either a plain or star-tipped nozzle. If you don’t want to pipe them, simply use teaspoons to drop pieces of meringue about the size of a golf ball onto the baking sheet.

Bake for 1 hour. The finely chopped chocolate, combined with a short bake time means the centres should be chewy and chocolatey.

chocolate meringue stars

Further reading:

You might also be interested in these posts:

Chocolate raspberry trifle – and a dessert wardrobe

Inside the trifle

Sometimes a dessert comes together that you know is a keeper. If you’re lucky, you know it will be good beforehand, and get all the benefit of the anticipation as well. And sometimes, just the name is enough.

I needed a dessert for lunch on New Year’s Day. It had to suit both adults and kids, and be prepared ahead, to make it easy on the day. Browsing through Nigella for ideas, I hit on trifle. Trifle is a very Christmassy dish – all that custard and cream fits with the excesses of  late December. And because it’s best served in a single bowl, it really needs a decent sized group before it’s worth making. It is indeed something to feast upon.

The original plan was to make Nigella’s Chocolate cherry trifle, but this version really started with the arrival of a bottle of Chambord (black raspberry liqueur) as a Christmas present. I had never tasted it before (and, like all fruit liqueurs, it does have a hint of Benilyn cough syrup about it), but it sparked the idea of a chocolate raspberry trifle, instead of a chocolate cherry one. And I love the combination of chocolate and raspberries – the sharpness of the raspberries is a great match for chocolate.

I had frozen raspberries, and also some shreds of flourless chocolate cake bagged up in the freezer. It did not carry good karma with it – it crumbled as I tried to unroll it as a roulade on one of those days when a bad work day, and a dropped carton of double cream make that the final straw. But I knew it tasted good.

All that was needed to make was the chocolate custard. Although Nigella suggested you make sandwiches of chocolate cake and jam, that wasn’t going to be an option with the delicate flourless cake I had (not least because it was in so many fragments). So instead I thinned the jam with a splash of water into a syrup that could be used to douse the cake.

This was an example of the ‘capsule wardrobe’ approach to dessert making: if you have great components, then you can assemble them in many combinations, and be confident about the result. This is the exception to the rule that you shouldn’t make something for the first time for guests. If you’ve made all the component recipes before, then you can be much more confident that the final result will work.

I’ve stolen this idea from Alice Medrich, who has a section in her book ‘Bittersweet‘ called ‘Basic Wardrobe for Designing Desserts’. This includes recipes for basic cake layers, mouses, fillings, frostings, glazes and decorations that can be put together in different combinations.

In making this trifle, I did what I so seldom do, and tasted everything, every component. When I am following someone else’s recipe, I sometimes assume that if I follow everything to the letter, I don’t need to taste as I go. And if it doesn’t work out, I can just shrug and blame the recipe writer. But recipes don’t work like that, and we can’t help ourselves get it right unless we taste things.

Some of this dish’s success was serendipity, but there was also a set of learned and ingrained thoughts at work. I knew that the flourless cake was light and moussy, so would match the density of the custard and whipped cream well. Having tasted the custard and syrup, they were both sweet, so I knew I needed the raspberries to be quite densely packed to provide contrast.

I’m really pleased with the result, and I’ll even go to the trouble of crumbling that cake deliberately now I know how good it can be in a new incarnation.

A teacup trifle

Recipe: Chocolate raspberry trifle

Serves 6-8

For the cake (this is Smitten Kitchen’s Heavenly Chocolate Cake Roll):

  • 170g dark chocolate, chopped
  • 3 tablespoons strong coffee
  • 6 large eggs, at room temperature
  • 150g caster sugar
  • 1/4 teaspoon salt
  • 2 tablespoons cocoa

For the chocolate custard (adapted from Nigella Lawson’s Chocolate Cherry Trifle recipe in ‘Feast‘):

  • 50g dark chocolate (64% Chocolate by Trish buttons)
  • 175ml semi-skimmed milk
  • 175ml double cream
  • 4 egg yolks
  • 65g caster sugar
  • 20g cocoa
To finish:
  • 300 ml double cream
  • 350g frozen or fresh raspberries
  • approximately 100g seedless raspberry jam
  • 3 tablespoons Chambord raspberry liqueur (optional)
  • Silver balls, stars, chocolate curls or other decorations

Make the Heavenly Chocolate Cake Roll as directed on Smitten Kitchen. You can use another sort of chocolate cake, although this one proved perfect for trifle – partly because I was unable to make it roll up (I left it to cool for too long), and so it crumbled to shreds and ended up in the freezer. But the soft, light texture made a good base for the trifle, without being heavy.

For the custard:

Melt the chocolate gently over a pan of hot water or in the microwave. Set aside. Whisk the yolks, sugar and cocoa together in a large bowl with a pinch of salt.

Heat the milk and cream together until little bubbles appear at the edge of the saucepan. Pour the hot milk and cream over the egg yolk mixture while whisking. Once everything is mixed together, scrape it all back into the saucepan. Heat gently to thicken the custard, stirring constantly and scraping the bottom with a wooden spoon. You need to take it until a thick, shiny layer appears on the back of the spoon. Once it has thickened, scrape into a bowl, cover with clingfilm in touch with the surface and chill for several hours.

Make the syrup: Warm the raspberry jam with a splash of water and about 8 frozen raspberries until the jam melts and the raspberries collapse. Remove from the heat and stir in about 3 tablespoons of Chambord (black raspberry liqueur).

Finally, assemble the trifle:

Line a dish with the chocolate roll cake, pushing the pieces together to make a single layer. Soak with the raspberry syrup. Cover the surface with the remaining raspberries, partially pressing them into the cake. Cover with the chilled chocolate custard and smooth into a single layer. Cover with clingfilm and chill for several hours or overnight.

An hour or two before serving, whip the rest of the double cream (about 300ml) to very soft peaks, and spread over the custard (whipped cream thickens more and more every time you spread it, so whip it very softly, and spread it out with as few movements as possible). Decorate with silver balls, gold stars or chocolate shavings. I used edible gold stars from here.

End of the trifle

We Should Cocoa: Chocolate, ginger and cardamom tea loaf

As a fan of Katie’s chocolates at Matcha Chocolat, and especially her masala chai caramels, I knew I should enter this month’s We Should Cocoa, the monthly chocolate challenge co-ordinated by Choclette. This month’s challenge was tea with chocolate, a great combination. Unfortunately, I was on holiday for most of this month (I was in Mexico – so not *that* unfortunate), so I needed something I could do at short notice to get in before the deadline.

I would have loved to spend some time on different tea infusions for this, but with limited time, and the need to do this after work, I needed something more straightforward. This tea loaf is a recipe I had bookmarked some time back when going through Paul A Young’s stunning book ‘Adventures with Chocolate‘. It sounded like a potentially overwhelming set of flavours, but also one that really appealed. The recipe calls for a huge amount of crystallised ginger, no fat and lots of ground cardamom. The tea is there to moisten the loaf, and also provide a malted, caramel background to these other flavours.

[Update: Choclette also made this recipe as part of the challenge – read about hers here.]

The recipe is unusual for a cake, as it includes just the tea-soaked fruit, sugar, eggs and flour – no butter or oil is used. However, this is the traditional tea loaf recipe. Tea loaves are an old traditional recipe, and can be called Tea Brack in Ireland, and similar to the Welsh Bara Brith. Irish Tea Brack recipes date from the 1800s, and would seem to be somewhat similar to soda bread, with the leavening from baking powder.

I made very few changes to the original recipe, even though the amount of ginger – 250g – seemed potentially overwhelming. Given the strong flavours, I wanted to try the recipe on its own terms before making changes. I baked this in two small loaf tins rather than one large one, so I could freeze one. I also swapped wholemeal self-raising for white self-raising, as that’s what I had in the cupboard, and I thought it would fit well with the rustic idea of a tea loaf. As this calls for Assam tea, which is a major component of English Breakfast blends, you could probably substitute with your everyday teabag. I used loose leaf Assam to make sure I got the strong and malted flavours Paul described.

I used two different brands of crystallised ginger, because I already had a packet open, and needed to get more to make up the large amount. Both come in large chunks, and I decided to slice the chunks into fairly thin pieces, so that the final cake wouldn’t be overwhelming with chewy lumps of ginger. The softer of the two was Humdinger Traditional Stem Ginger, that came with large sugar crystals on. The Waitrose Cooks Ingredients ginger comes in a cute plastic jar, and is firmer and drier, and cut into more even cubes. That made it easier to slice into pieces, so might be worth bearing in mind if you need to chop ginger finely for another recipe.

The smell of the ginger and raisins soaking was incredibly aromatic, with both the orange and cardamom coming through clearly. Even when baking, you could smell this amazing perfume, along with the chocolate. I was right about the flavours – it’s a really intensely flavoured cake, which sets your mouth buzzing with the ginger. Having said that, I think it works really well – the chocolate comes through, the orange holds its own with the ginger, and the cardamom is just about there in the background. My teaspoons of cardamom were a bit scant, so I probably could have used the full measure. It reminds me a lot of Divine’s orange and ginger dark chocolate – that also has quite a bit of crystallised ginger embedded in the chocolate. So I’d definitely recommend making this, but it’s not for the faint-hearted!

Chocolate, ginger and cardamom tea loaf

barely adapted from Paul A Young’s ‘Adventures with Chocolate‘.

  • 250g crystallised stem ginger
  • 100g raisins
  • 75g light brown muscovado sugar
  • 2 tsp ground cardamom (about 1 tbsp green cardamom pods)
  • zest of 1 orange
  • 200ml strong assam tea
  • 1 large egg
  • 200ml wholemeal self-raising flour
  • 100g dark chocolate, chopped into chunks (I used Divine 70%)

Slice the ginger chunks into slices, and combine with the raisins and sugar in a heatproof bowl.

Warm the cardamom pods until fragrant in a dry pan, then cool. Pop the black and brown seeds out of the shells and grind into a powder in a pestle and mortar. (This step is optional – you can buy ready-ground cardamom, or grind the pods without toasting them, but this method will get you the most aromatic powder).

Brew 200ml strong assam tea (1tbsp of loose tea leaves, 200ml boiling water) for 4-5 minutes, and strain over the raisins and ginger. Cover and leave overnight or for about 8 hours. (I prepared the ingredients one evening, poured the tea over the following morning, then made the cake the second evening).

After soaking, the tea should almost all be absorbed, with some syrup where the sugar has dissolved. Don’t remove any liquid, but add 1 beaten egg directly to the fruit and mix in. Mix in the flour, then fold in the chocolate to combine. The texture is very similar to a traditional fruit cake at this stage, fairly stiff but still moist.

Put the mixture into two lined 1lb loaf tins (or one large loaf tin).

Bake for an hour at 160C. Check with a skewer that it is cooked through. Cool for 30 minutes in the tin, then remove and cool completely. Wrap in fresh paper and store in a tin for a day before cutting and eating, on its own or buttered slices.

Raspberry Truffles

Every year I make elaborate plans for all the biscuits, cakes and other food presents I will make for friends and family at Christmas. And every year, my ambition exceeds the time available, after I’ve accounted for time to buy presents, go to parties and travel to see family. I usually end up with some sort of cooking marathon or a couple of evenings where I’m in the kitchen until midnight, wrapping caramels or dipping orangettes or whatever I decided was a good idea this year.

For 2010, I made brownies (obviously), chocolate balsamic vinegar (which not everyone was wild about, but was worth it just for me), mini chocolate walnut cookies and … homemade chocolates. I made raspberry truffles, described below, but I also made Azelia’s caramel truffles, which were amazing and easier to work with (I increased the proportion of chocolate to make the centres a little easier to dip). I definitely recommend trying that recipe, and as a great side effect, you get to make Dulce de Leche.

As I noted in my 2010 review, this was something of a year of chocolate. I went to demos, tried tempering again, and generally immersed myself in the world of UK fine chocolate.

Probably the most surprising chocolate recipe I came across was the raspberry ganache recipe I made at Divertimenti with William Curley. It is made only of raspberry puree and melted chocolate, but tastes creamy, and yet with such pure fruit flavour. It’s also so easy and impressive to make for other people.

About ganache

Ganache is usually described as an emulsion of chocolate and cream. This is used to make chocolate truffles, but also often used as a simple, sophisticated chocolate icing for cakes, a filling for a chocolate tart or a starting point for chocolate caramels.

However, a ganache can also be made with water or something water-based like a fruit puree (after all, cream is mostly water, even if the rest is fat).

Truffles

The simplest way to make a truffle that I know is to heat cream, pour it over finely chopped chocolate, stir until you get a smooth ganache, and then pour into a foil-lined square tin. Leave until set, preferably overnight, refrigerate (or freeze if it’s a very soft mixture) and then cut into 1 inch squares.

I saw this simple method demonstrated by Alice Medrich, and it was a revelation. She made mint chocolates, by infusing the cold cream overnight in the fridge with a bunch of chopped fresh mint, straining it out, then heating the cream. It avoids the need to scoop or roll little balls, and if you’re eating them fairly quickly, you can just set out the squares on a plate and hand them around.

I made some of the raspberry ganache this way in the summer, and just coated the squares lightly in cocoa, and then kept them in an airtight container in the fridge.

But for sending gifts, I needed something more robust and more long lasting – and that means a chocolate coating for the truffles.

Tempering

Tempering chocolate is a tricky enterprise and always, always ends up with you, the kitchen, and a range of utensils coated in a layer of chocolate. But it is what gives you that lovely shiny, snap on chocolate, that crisp crack as you bite into it.

Chocolate is a really complicated material. It consists of cocoa butter, cocoa solids (the cocoa powder) and sugar (or at least the good stuff does). But cocoa butter is a very complicated fat, having seven different types of crystals it can form. I’m not going to go into huge detail about the mechanism for tempering here, as Katie has done a much better job over on her blog, so go look there. She also has a great primer on truffles. And you can buy her lovely tea-flavoured chocolates here.

The short version of tempering is to heat the chocolate to melt all the fat crystals thoroughly, melting it quite hot, then cool it in a controlled way to the temperature where the ‘good’ fat crystals form, which is below body temperature, and when the chocolate is quite thick. FInally you heat it very slightly again, so it’s thin enough to work with, but not so hot that the crystals all melt out again.

Recipe: Raspberry truffles

  • 320g raspberry puree
  • 320g chocolate
  • 50g softened butter
  • 1 tbsp vodka

This makes a huge amount, enough to pour into an 8 inch square pan or even larger. You can certainly make half this quantity or even less. And this also gives you less work to do when dipping them.

I made the raspberry puree at the end of the summer, with fresh raspberries that were on special offer at the supermarket, close to their expiration date. It doesn’t matter if they are a bit soft and bruised, but they shouldn’t be mouldy. I heaped them in a pan with a tablespoon or two of water, and heated it with a lid on to break down the berries and release the juice a little bit, but didn’t bring it quite to the boil. I then pureed with a hand blender and passed it through a fine sieve to remove the seeds. I then froze the puree until Christmas.

To make the ganache, heat the raspberry puree until warm but not boiling. Taste it, and if it is very acidic, sweeten it a little with some icing sugar. You want the bright, fresh fruit flavour, but too much acid combined with the bitter of the chocolate may be too astringent. It’s up to you how much you sweeten it.

Melt the chocolate in the microwave, in short bursts, until it’s barely melted. Stir to melt the remaining pieces until it’s just smooth. Add the raspberry puree and stir until it is completely smooth.

Stir in the softened butter, and the vodka if using,  until completely combined. The vodka is optional, but helps to preserve the ganache a little longer.

Pour and scrape the ganache into a 7 inch or so square tin, lined with foil or baking parchment. Tap on the kitchen counter quite firmly to make sure that any air bubbles are expelled. Leave at room temperature to set, then put into the freezer. This is a very soft ganache, so you will need to freeze it in order to cut it easily. Alternatively, you can add more chocolate to the recipe to make it firmer and easier to handle.

Once you have cut the ganache into one inch squares, it is a good idea to leave them to cure for a while in the fridge. This seems to set the outside of the truffles, making them firmer and easier to dip.

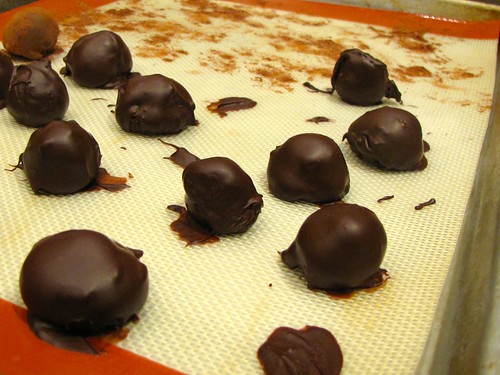
You then need to take them one by one, dip them quickly in the tempered chocolate, and then tap to remove excess chocolate before putting onto parchment. As this is a very soft ganache, you need to do this fast, so that the ganache doesn’t start to melt into the chocolate or stick to your fingers too much.

Once the truffles are set, you should store them in a cool place in a sealed container. Storing them in the fridge will make them last longer, but you need to make sure they don’t get wet from the condensation, and allow them to come to room temperature before eating them. You can also wrap them in individual squares of foil, to make them look like Quality Street (as my sister described them)! I ordered mine from the Cakes Cookies & Crafts Shop.

Making chocolate caramels

Chocolate caramels on Flickr

Buying a sugar thermometer seems like the sort of thing only crazy people do. It seems to sit along deep fat fryers and foam-generating siphons as the sort of equipment only professionals and obsessives really need.

The crucial thing about a sugar thermometer is that it allows you to measure a very simple property – the concentration of sugar in a syrup. That’s it.

Water  boils at 100°C (at sea level), and adding sugar to the water raises the boiling point up and up. Caramel is just very hot sugar, that has started to develop complex flavours, a little like browning meat. So a sugar thermometer makes caramel as well as jam a much more predictable affair, and removes much of the guesswork. I have both a glass thermometer, and a new and shiny digital thermopen. If using a glass one, be careful that you have enough liquid to immerse to the line it indicates, or the temperature won’t be accurate. You also need to make sure you put the thermometer in the pan early on – adding a cold thermometer to boiling caramel is a recipe for broken glass in your caramel. A good idea would be to warm the thermometer in the cream, then put into the caramel mixture once the cream is mixed in.

I like making caramel, because the ingredients are so simple and cheap: sugar, butter, cream – but the results are so complex in flavour. Depending on how long you cook this, and to what temperature, you can have a caramel sauce, soft, chewy caramels or hard toffee. I prefer a fairly soft caramel, that is still firm enough to slice and wrap.

These chocolate caramels are a beautiful combination of the buttery flavour of caramel with dark chocolate to balance the sweetness. I was surprised that the recipe asks you to cook the caramel with the chocolate in to a high temperature – I expected the chocolate to burn. I stirred fairly frequently to make sure it didn’t catch on the bottom of the pan, and there was no trace of burnt flavour in the caramel, so I guess it worked.

For more on regular caramels (without the chocolate), Dan Lepard has a great all-purpose caramel recipe he wrote for the Guardian a while back.

Salted chocolate caramels

Adapted from Smitten Kitchen, who in turn, adapted from Gourmet

Usually I would list the ingredients as I go, but it’s especially important to have everything prepared in advance for caramel making, so I have separated the preparation and cooking stages.

Preparation:

Line an 8 inch square pan with foil or two strips of baking parchment at right angles. If using foil, brush with a thin coating of vegetable oil. Set aside.

Chop:

150g dark chocolate

into small pieces and put into a heatproof bowl.

Place

240ml double cream

into a small pan.

200g granulated sugar

Put into a thick-bottomed pan, something quite tall as it will bubble up later (use your best pan for the sugar, and second best for the cream)

Measure out:

60g golden syrup

and

30g butter

and

1/2 tsp coarse sea salt, crushed into fairly small crystals

(this is optional, but very good. Maldon salt or fleur de sel is good. Table salt is not – it will be far too salty).

and put aside, near the stove.

Cooking:

Heat the cream until tiny bubbles start to form at the edge of the pan

Pour immediately over the chocolate, and stir gently until the chocolate is completely melted and the whole thing is smooth.

Add a tablespoon of water to the sugar in the pan, just enough to make it a little damp, and put over medium heat until the sugar dissolves. Keeping a lid on will help it heat faster, and make sure that the sugar gets dissolved properly. Once it is all clear and liquid, remove the lid, turn the heat up to high and boil furiously to make caramel. You want to bring it to a fairly dark amber, without burning it. When it starts to become golden, turn the heat down a little so you can control the process a little better.

Remove from the heat and add the golden syrup, and then, gradually,  the chocolate and cream ganache. Stir after each addition. It will bubble up furiously as the water in the cream is liberated to steam all at once – the caramel will be much hotter than the boiling point of water.

Once everything is combined, return to the heat with a sugar thermometer and bring to the boil again. Heat until the temperature reaches 255F/124C. Any lower, and you risk a pourable, liquid caramel (although if you want caramel sauce, that’s fine). You can take it higher, and get a firmer caramel, until it starts to become toffee.

Immediately remove from the heat, stir in the butter and the salt if using. Stir to incorporate the butter thoroughly, then pour into the prepared tin, and leave to cool and set.

Once completely cold, lift the caramel out of the pan with the paper or foil, and turn upside-down onto a cutting board. Use a large knife to slice into strips and then squares. Wrap each piece in a square of baking parchment or greaseproof paper. Or just eat quickly 🙂

Store in a sealed container – exposure to the air will allow the caramel to absorb water from the air, and it will start to become too sticky.

Mini chocolate walnut cookies

There’s something in the air about miniature desserts. Dan Lepard profiled mini-cakes in Sainsbury’s magazine last month. Yotam Ottolenghi wrote a piece for the Guardian‘s weekend food column on miniature financiers, mini cheesecakes, mini cookies. Could the mini-dessert become (gasp) the New Cupcake? (or the new whoopie pie, by now). But foolish food trends aside, there is something quite compelling about demolishing a little cookie or a baby cake, in its entirety.

Mini chocolate walnut cookie on Flickr

Although this might look large, this is an espresso cup and saucer.

It was this that attracted me to Heidi’s Itsy Bitsy chocolate chip cookies when they appeared on her blog. I returned to the recipe recently when I wanted to make some cookies, and only then remembered that I had adapted it to be almost a one-bowl recipe, if you have a food processor. If you don’t have one, you can head over to 101 Cookbooks, and Heidi has great instructions for making this by hand. But I love the simplicity of this method, combined with the cute-factor of the tiny cookies, and the amazing toasted flavour that comes from the walnuts and the crisp edges. These are not chewy chocolate chip cookies – they are crisp little discs, with a nubbly quality from the nuts and chocolate rubble – perhaps invoking a souped-up hobnob? They are flavourful, but not cloying; crisp but not too crumbly or greasy – ideal cookie jar-cookies in other words.

Mini chocolate walnut cookies:

(adapted from 101 Cookbooks’ Itsy Bitsy Chocolate Chip Cookies)

Preheat the oven to 180°C /160°C fan / 350°F.

  • 140g dark chocolate (I used Green & Blacks cooking chocolate, 72%, but something sweeter would also work)
  • 70g walnuts

–> Break the chocolate into pieces, add the walnuts and process to rubble in a food processor.

  • 140g wholewheat self-raising flour
  • 1/4 tsp bicarbonate of soda
  • 1/2 tsp salt

–> Add to processor with the nuts and process again to mix everything together, and grind the chocolate and nuts a little finer.

–> Empty the processor contents into a separate bowl (you’ll add them back later).  Add to this bowl:

  • 110g rolled oats

–> Add to the empty processor:

  • 110g butter, softened
  • 120g dark brown muscovado sugar
  • 120g caster sugar

–> Process together until fairly smooth and creamy. Add

  • 1 large egg
  • 1.5 tsp vanilla

–> and process again until smooth, scraping down the sides to make sure it is combined fairly evenly.

–> Return the chocolate, nuts and flour to the processor.

–> Process fairly briefly to mix everything together – you don’t want to overmix, or the gluten will start to develop and the cookies will get tough. Scrape down with a spatula to make sure there are no more floury patches.

Either refrigerate (for up to two days) or use immediately. Scoop off teaspoons of mixture, roll into a small ball, less than an inch across, flatten a little with a fork and bake at 180C/160C fan for 10-12 minutes, until slightly cracked around the edge and crisp. They will crisp up further as they cool.

[Refrigerating chocolate chip cookie dough is a NY Times recipe trick, attributed to Maury Rubin of City Bakery, and it does seem to develop a bit of extra flavour, but these are fine without it as well.]

The Great Brownie Bake-off

Saturday was a momentous day for me. My first piece of competitive baking – and my first win! Yes, my brownies were voted the best of 25 entries on Saturday at The Great Brownie Bake-off. I was amazed when I found out. Firstly, I was convinced I had underbaked them, so when my back started to give out on the day, I headed home a mere 20 minutes before the results were announced. And secondly because the judging panel included the amazing Paul A Young, as well as a host of other professional cake and chocolate experts.

If you’ve been here before, you’ll know that brownies have appeared before. I make them pretty regularly because they can be mixed quickly in one bowl, but the results still feel special enough for a celebration. So when Louise Thomas, The Chocolate Consultant announced that she was organising a brownie bake-off, I thought I would give it a go.

I started with my old recipe, which is a hybrid of a couple of versions in Alice Medrich’s book ‘Bittersweet‘ (one of my favourites) and gave it a few different tweaks to try it out on my work colleagues.

Brownies

I baked more for the Macmillan Coffee morning a couple of weeks later. These were tougher and overbaked, so I knew I had to do something different for the final version.

I went back to the drawing board to make the result softer and less dense. I toasted hazelnuts to give a subtle flavour compared to the more aggressive Frangelico or alcohol. Leon’s brownies include ground almonds which make them very gooey, so I ground some of the nuts to create the same effect. Finally, I replaced the caster sugar with some soft brown sugar and golden syrup for extra stickiness, and I hoped a little extra caramel flavour.

The bake-off was a great day, with demonstrations going on throughout the day. It was pretty packed though, so hard to get to the samples, and I wish I had muscled in a bit more firmly and introduced myself to more people.

Thanks so much to Louise for organising the day, all the judges: Paul A Young, Abigail Phillips, James Hoffmann, Tom Kevill-DaviesLee McCoy and Jennifer Earle, Jane MansonKavita Favelle and Mathilde Delville and Fred Ponnavoy from Gu Chocolate Puds.

Also lots of thanks to the demonstrators: Fred Ponnavoy, Caroline Aherne from Sugargrain Bakery, Edd Kimber, winner of the Great British Bake-off (and doing his first live demo!) Sasha Jenner from Hobbs House Bakery, and Stacie Stuart from Masterchef.

The Winning Recipe:

Ingredients

  • 100g unsalted butter
  • 100g dark chocolate(Valrhona Manjari 64%)
  • 30g Green & Blacks cocoa
  • 30g/2 tbsp Hazelnut chocolate spread (Nutella)
  • 100g light muscovado sugar
  • 85g caster sugar
  • 15g golden syrup
  • 2 large eggs, cold
  • 70g plain flour
  • pinch of salt
  • 150g whole hazelnuts

Method

  • Preheat the oven to 180ºC / 160ºC fan.
  • Toast the hazelnuts, by putting into the oven for 8 minutes. Rub off the skins.
  • Line an 18cm square tin with foil or baking parchment.
  • Put 35g of the toasted hazelnuts into a food processor and grind to a powder. Use some of the flour to prevent the mixture becoming too oily. Combine with the rest of the flour and set aside.
  • Combine the butter, cocoa, chocolate and chocolate spread. Melt in a microwave or in a pan on the stove until the butter and chocolate are completely melted and the whole thing is combined.
  • Stir in the sugars and golden syrup, then beat in the cold eggs one at a time until the mixture is glossy.
  • Add the flour and nut mixture and salt, and beat the mixture 40 times with a wooden spoon, until the mixture thickens slightly. Fold in the remaining whole hazelnuts.
  • Pour into the pan and bake at 180C/160C fan for 20-25 minutes, until it is cracked very slightly at the edges, but still soft in the centre.
  • To cut cleanly, put the cooled pan into the fridge, covered in cling film until thoroughly chilled or overnight. Remove the cold pan, invert over a board and peel off the foil or baking parchment. Cut into squares with a sharp knife.