Baking with jam

Strawberry jam

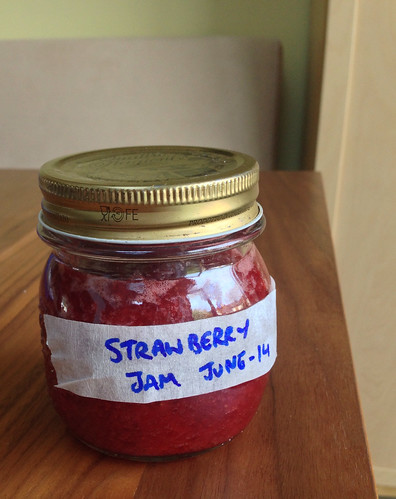
I have a bit of jam fetish. At the present moment, my fridge contains homemade strawberry jam, marmalade and lemon curd, as well as bought apricot and lingonberry jams. In the cupboard is more marmalade, as well as Christine Ferber’s Mirabelle, more strawberry jam and apple butter. So I keep an eye out for recipes that show off jam and help me to deplete my stock. One great use is to make a Victoria sandwich. Here the sweet cake and the bland cream form a perfect contrast with a fruity jam. But I don’t make a Victoria sponge very often, because it needs to be eaten the same day, and with two of us in the house, that’s a tall order. It’s useful to have some recipes for using up jam on hand, whether to use up a jar, or to show off a good pot of the homemade stuff (if you’re not into eating it with a spoon!).

Here I have gathered together four different takes on the idea of a jam bake, contrasting different types of pastry or dough with a jammy centre.
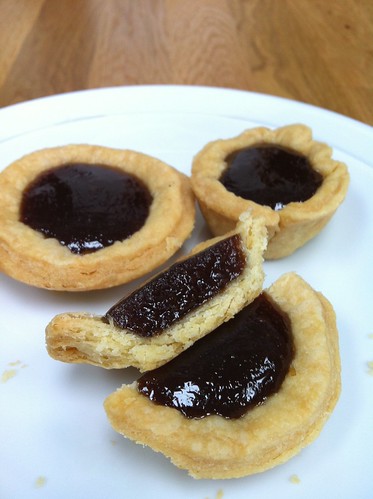
Jam tarts

The classic route is a simple jam tart. This is one of those simple, classic recipes that needs all of the ingredients to be impeccable – it can be done cheaply and be ordinary, or done with care and quality, and be delicious. I like Dan Lepard’s recipe that bakes the tart cases blind, and then boils the jam separately before filling the cases, avoiding the problem of jam boiling over and cementing the tarts into the tins).

Greengage jam tarts


Jam scones

I’ve come across two recipes that use jam along with something between a pastry and a scone dough. The first was these walnut jam ‘scones’ from LA baker Zoe Nathan. Scones is a bit of a misnomer, as the dough is rich with butter, along with ground nuts. In fact, it’s so rich that you need to freeze the shaped dough before baking so that it will keep its shape in the oven. But what you get for all that butter is a really delicate, crumbly texture around the jam, so the central puddle of jam almost holds the whole thing together. Also, freezing the dough means that you can bake them in small quantities at a time and eat them fresh.
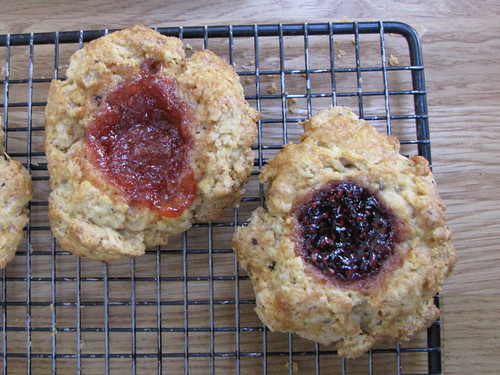
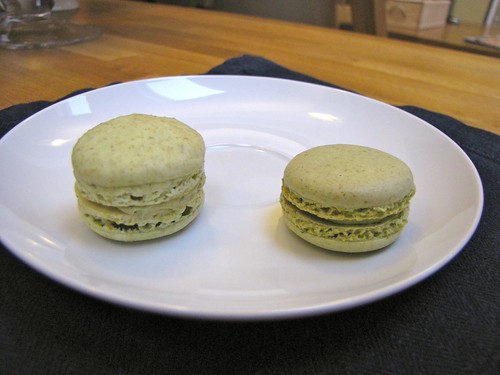
Hazelnut jam scones

Jam thumbprints

The second variation on this theme is a recipe for Linzer thumbprint cookies that appeared in Yotam Ottolenghi’s column a few weeks ago. Here he specifies something between a shortbread and scone dough, flavoured with citrus zest, fennel seeds and spices, and adding crunch with flaked almonds in the dough. I made the ones below with lingonberry jam and lemon curd – the lemon worked particularly well with the fennel seeds.

Ottolenghi Linzer thumbprint cookies


Jam crumble bars

Finally, using the soft set strawberry jam in the last post, I made a recipe from Kim Boyce’s brilliant book ‘Good to the Grain’, which showcases different grains and flours. This is a shortbread base, made with rye flour, topped with a good layer of jam, and then covered in a rye and oat crumble topping. Although the crumble was a bit too crumbly for me – I would probably add a spoonful of liquid next time to create bigger crumbles – this was delicious. The toasted, round flavour of the rye contrasted beautifully with the sweet jam. She suggests apple butter as a winter version, and I think that would be delicious too.

Strawberry crumble bars from @KimBoyceBakes recipe - using my homemade jam


What makes meringues chewy?

piped meringue stars

Meringues are one of the simplest things to bake, with just two ingredients. But because of this simplicity, there isn’t much room for error. As with many baked goods that are difficult to get right, there is also a wide range of views on what the ideal meringue is like. Some want a completely crisp shell that shatters on the touch of a fork – ideal for something like Eton Mess where the meringue is smashed into pieces.

Others are looking for a chewy centre, almost like nougat. This is often the ideal state of a pavlova base. Finally, there’s the type of soft pillowy meringue used to top a lemon meringue pie.

Chewy almond meringue

All these are meringues that use egg whites and sugar – so what’s the X factor?

What is a meringue?

A meringue is an egg white foam that is made more stable by adding sugar. The sugar syrup supports the bubbles, and holds them up while they dry, leaving behind the sugar and egg-white-protein structure. Egg whites are pretty amazing at creating a foam anyway, owing to all these stretchy proteins they have. However, if you keep beating egg whites on their own, they will go too far – first becoming grainy and then collapsing on themselves.

Tips for making meringues:

  • Adding sugar to the eggs right at the start will make it slower to foam in the first place, so wait until you have a foam.

egg whites - soft foam

  • However, unlike egg whites on their own, it’s really hard to overbeat meringue, so if in doubt, add it early on, when the foam is still quite soft (a lot of recipes ask you to wait until you have stiff peaks before adding the sugar, but this isn’t necessary, especially if you’re using an electric whisk or a stand mixer). After the sugar is all added, you can also leave it whisking for a good few minutes to make sure you have a really stiff foam.
  • The more sugar you add the more stable the foam – you can use anything from 1:1 sugar to egg white (by weight) to 2:1, with the upper end being more common. For a 2:1 ratio, weigh your egg whites out, and then add twice the weight of sugar.
  • The sugar needs to dissolve, so use caster (superfine) sugar or icing sugar, and add it gradually. Warm or room temperature egg whites will make it easier to dissolve. Yotam Ottolenghi has a nice trick for his salted almond meringues – heating the sugar in the oven, then adding it gradually.
  • A little bit of acid helps egg whites to foam – you can wipe the bowl with a lemon, add a little cream of tartar or a few drops of vinegar.

And one more thing? Because egg whites are pretty much just protein and water, there isn’t much in them to go off. This means that you can keep egg whites quite safely for several weeks in the fridge. Or they freeze well (but never defrost in the microwave – they cook too quickly!).

For a crisp meringue

Here, we are after a meringue with all of the moisture removed so all that is left is the brittle egg white and sugar structure. To do this, use a ratio of 2 parts sugar (by weight) to 1 part egg white. As a large egg white is about 28g, that means about 110g (4oz) sugar for two large egg whites (or 100g for medium whites).

You also then need a very low temperature and a long time to make sure that all the water evaporates without browning the sugar. Something around 100°C/212°F is about right. When you have finished baking, leave the meringues in the turned off oven to cool, and remove any last moisture.

salted almond meringues to be baked

For a chewy meringue

If a meringue is chewy in the centre, it just means that it managed to hang on to some of the moisture in the foam. You still want a hard shell, so use 2 parts sugar again, or something close to it. You can add things to the mixture to help it hang on to this moisture – a little bit of cornflour being used most often. Chopped or ground nuts, as in french macarons or dacquoise, will also do this, partly by adding a bit of fat.

The other thing that will help make a chewy meringue is to bake them a little hotter and for a shorter time, meaning the centre doesn’t have the chance to dry out. Be careful of baking too hot though – this will cause the meringues to swell, and may overbrown the outside. A temperature of about 130°C/265°F is good.

For a pie meringue

Meringue-topped pies can be difficult. It can be particularly tricky to make sure it sits nicely on top of the topping, and to avoid moisture from the filling moving into the meringue, and making it ‘weep’. But in principle, it’s like the chewy meringue, but more extreme – it needs even more moisture in it, needs to stay stable, and you want the outside to cook very quickly and brown, before the inside dries at all. So add cornflour to stabilise it, and bake in a much hotter oven – around 170°C/340°F – to get a nice crisp top. Felicity Cloake’s Perfect Lemon Meringue Pie is a good guide.

Meringue recipes

I’ve made a couple of really good meringue recipes recently. Via pinterest, and this blog post by Jillian Leiboff, Yotam Ottolenghi’s salted almond meringues are really lovely – crisp outsides, chewy in the middle, and scented with both toasted almonds and almond extract.

This one, however, is an old favourite – adapted from a recipe in Flo Braker’s ‘Sweet Miniatures’. These are gluten-free, dairy-free chocolate cookies – little drops of meringue flecked with chopped chocolate.

Chocolate Meringue Stars

adapted from Flo Braker’s ‘Sweet Miniatures’

Chocolate meringue bubbles

– 100g caster sugar
– 2 large egg whites (55g)
– 45g dark chocolate

Line a baking sheet with parchment. Heat the oven to 110°C/100°C fan/225°F.

Grate or finely chop the chocolate, or grind it in a food processor until fairly fine.

Whisk the egg whites with an electric hand whisk or the whisk attachment of a stand mixer. Whisk slowly to start, as the protein unravels and the egg whites loosen up. Then increase the speed and whisk until a soft foam forms. Add the sugar a few spoonfuls at a time, whisking thoroughly between each, and then keep whisking for about three minutes until you have a very stiff and shiny foam.

stiff, shiny meringue

Remove the whisk and fold in the chopped chocolate until it is fairly evenly distributed.

folding in the chocolate

Use your finger to put a little meringue on the four corners of the parchment, and turn over to stick the parchment to the baking sheet (this stops it moving around when you pipe onto it).

Scrape the mixture into a piping bag with either a plain or star-tipped nozzle. If you don’t want to pipe them, simply use teaspoons to drop pieces of meringue about the size of a golf ball onto the baking sheet.

Bake for 1 hour. The finely chopped chocolate, combined with a short bake time means the centres should be chewy and chocolatey.

chocolate meringue stars

Further reading:

You might also be interested in these posts:

Egg whites, meringues and macarons

Meringue

Updated: now with links updated

You can do so many things with even a small amount of egg white. As they are the best ingredient for capturing air, you can expand even a single egg white into a bowlful of foam. There’s nothing much to egg whites – they are just water plus some proteins. The part that makes them so useful is the properties of the protein. After it has uncoiled a little, it forms a network that traps air bubbles really well.

Keeping egg whites

Very few people outside the catering and restaurant industry seem to know how stable egg whites are. If you separate eggs and use the yolks, you can put the whites into a clean container, cover with cling film and store in the fridge for weeks, even months. You can also freeze them without any problem. Just be sure to defrost them carefully – you can easily cook them by accident if you microwave frozen egg whites!

Working with egg whites

Macarons - 2
There are a lot of legends surrounding egg whites. You do need to keep any fat away from them if you want to whip them up. That means that glass and metal bowls are best – plastic ones aren’t a good idea. Things that help: a little bit of acid works well – a couple of drops of lemon juice, or a pinch of cream of tartar. If you don’t do these things, the egg whites will still increase in volume, but won’t reach quite the same heights of stiff peaks.

Many recipes with whisked egg whites require stiff peaks. If you whisk too far, however, the egg whites will break up into little lumps as you fold them into something else. Both the acid and copper, if you use a copper bowl, will create a stable foam that takes longer to reach this pebbly stage.

When working egg whites into a thick batter, like a cake batter, you can use a portion of the egg whites to loosen the batter first. Just take a large spoonful of the egg whites and stir into the batter without worrying about the air. The liquid in the egg whites will loosen the batter enough to make it easier to fold in the rest and preserve the

Meringues

Adding sugar to egg whites stabilises the foam. Once sugar has been added to a meringue mixture, you can beat it for a long time, and it will just get stiffer. If you’re piping the meringue, or adding other ingredients (such as ground almonds for macarons de Paris), you want the mixture to be as stiff as possible so it will hold up when the other ingredients are mixed in. Meringues can be spooned or piped onto parchment paper for baking.

Meringues are intensely sweet, so it is nice to add a bitter or toasted flavour to contrast with it. Toasted nuts and caramel create complicated, toasted flavours that can make the perception of sweetness less acute, by making it less simple.
Coffee and brown sugar meringues temper the sweetness of white sugar. Adding a thick bland filling based on true buttercream, or perhaps on barely sweetened whipped cream, will also contrast with the sweet meringue.
I like an Alice Medrich recipe that combines dark chocolate, ground in a food processor, with stiff meringue. These are piped in small peaks and baked to give a crisp meringue cookie, with bursts of chocolate flavour.

Macarons

Pistachio macarons
Ms Humble has the best guide to macaron making – in a series of completely comprehensive posts, she goes through every possible hint and tip you could know about. (She also has awesome science cookies posts).
In my own experience, it can be hard to get the ideal shape and texture, but almost every macaron is worth eating, even those that don’t look too beautiful.

Pistachio macarons

You need to make a really thick meringue mixture, so it will hold after folding in the almonds, and while you’re piping. However, too much air will mean a more grainy surface and you won’t get such a smooth skin forming on the surface. You need to dry them a little before they are baked to get that smooth skin. Ms Humble has lots of ideas about the much harder task of getting something that’s crisp on the ouside, soft on the inside, and neither hollow nor sticking to the sheet.

(Below are a pistachio macaron from Alain Ducasse at the Dorchester on the left, and my attempt on the right).

More interiors

Coconut macaroons are much easier – you make a stiff mixture with them, cooking the mixture a little in the saucepan before spooning onto a baking sheet. Here, the sticking power of the protein is much more important than its foaming properties. David Lebovitz has a nice recipe for coconut macaroons.

Gingerbread men (or stars, or trees…)

IMG_1162

Every year I try and make a few homemade things for Christmas to send to friends and take to family. All right, not a few, a lot. There was the year I decided to make two sorts of truffles, dipped in tempered chocolate, and also candy about 5 oranges, slice the peel really thin and dip each piece individually in tempered chocolate. Very messy. I have done brownies, David Lebovitz’s Chocolate cherry fruitcake, and last year, Raspberry truffles. This year, I went for mainly biscuits (with a few caramel brownies thrown in for good measure), and the king of Christmas biscuits is the gingerbread man.

Gingerbread is something that seems quintessentially festive. It has the deep spices that I love about Christmas cooking and decorated with white icing, it reflects ideas of snow and decoration, without being showy. You can make gingerbread biscuits with holes in to hang on the tree – and they will keep remarkably well that way – but I prefer to heap them into a tin, and snack on them. They will always outlast my appetite for them.

This year I made some biscuits to send to friends, and some to keep. I took the leftover scraps of dough with me to my mum’s, as I hadn’t had time to roll them out and bake them. They came up a little chewier and puffier than the rest of the batch, but delicious all the same: my 99 year old grandmother had two (and she doesn’t normally have sweets). Something about the almost austere plainness of these biscuits appeals across the ages. My two year old nephew pronounced them very good, and my 5 year old niece had three in a row just yesterday.

The recipe for these comes from an old issue of the veteran US cooking magazine, Gourmet, now sadly deceased. A few years ago, they did a round-up of cookie recipes from their history, choosing one recipe to represent each year the magazine was in print. This gingerbread recipe was reproduced from a 1959 issue of Gourmet. Although the recipe has now disappeared from the website, you can see the gingerbread men in this video about the project, at 1:42. All the cookie recipes they selected are now in the Gourmet Cookie Book.
IMG_1157

The first time I made these, I used currant eyes, and sliced almond mouths to make the faces. These were beautiful, but so time consuming to place every piece. I have decided I much prefer to ice with a little royal icing after they are baked instead. I can add faces and buttons to the gingerbread men, as well as dots and snowflakes to star-shaped cookies, and snow-laden branches to the christmas trees. Or they are very good just plain, as they are or dipped into a cup of tea to soften the edges a little. Like the best gingernuts you’ve ever come across.

The other benefit of not fiddling with currants before baking is that you can put the dough into the oven still cold, which makes the shapes better defined when baked, and less puffy. When first made, the dough will be quite soft. I have added even more flour than the original recipe states, to make it a little easier to handle, and to make sure that the cut-out shapes stay well defined. However, if the dough gets warm as you roll it out, the shapes will become floppy and will be hard to transfer to a baking sheet without distorting them. For this reason, I think the best answer is to make the dough ahead and chill it overnight, or for several hours at least, and then take out one piece at a time to roll out and cut. This should mean you can deal with the whole piece, and everything should remain cool enough, even in a warm kitchen. I tend to keep the scraps from each piece as I go, and then re-roll them all together at the end. The re-rolled shapes might be a little chewier and a little puffier than the earlier ones, but will still taste very good.

Recipe: Gingerbread men (or stars, or trees)

  • 350g plain flour
  • 1.5 teaspoons baking powder
  • 1/4 teaspoons bicarbonate of soda/baking soda
  • 1 tablespoon cinnamon
  • 1 teaspoon ground cloves
  • 1 teaspoon ground ginger
  • 1/2 teaspoon fine salt
  • 1/4 teaspoon ground allspice
  • 150g light brown soft sugar (I use muscovado)
  • 50g dark brown soft sugar
  • 195g black treacle
  • 30g golden syrup
  • 110g unsalted butter, softened
  • 1 large egg, beaten

Sift the flour together with all of the spices and the salt (or use a whisk to mix them all together in a bowl.

In a separate bowl (I use a mixer bowl), combine the rest of the ingredients. The butter must be soft enough to evenly mix with the rest of the ingredients – in fact, it doesn’t matter if it’s a bit melted. When combined, stir in the flour and spices. When the dough is smooth, wrap tightly in cling film and chill overnight or for several hours until firm.

Heat the oven to 375°F/190°C/170°C fan.

Flour a work surface, and roll out to about 4mm thickness. Cut out shapes with a floured cutter. Transfer the shapes carefully to a non-stick baking sheet, or a baking tray lined with baking parchment. Bake at  for 12 minutes or until very slightly browner at the edges.

Allow to cool completely, then decorate with royal icing (or icing sugar mixed with a little lemon juice).

Beginning to bake #6: Cookies

Cookies 1 and 2

Biscuits or cookies – there are hundreds of variations. Providing a basic recipe for biscuits is hard – there are thousands of different biscuit or cookie recipes out there, and every country has it’s own favourite variations: bourbon biscuits, gingernuts, speculoos, chocolate chip cookies, macarons de Paris, biscotti, shortbread, digestives – the list is *long*.

But let’s start with some generalisations: most are a combination of flour, butter and sugar. Many also have egg to bind the dough together and to help it become crispy. Some will include some leavening – baking powder or bicarbonate of soda – to help it puff in the oven.

The shortbread-type cookies contain just flour, butter and sugar. They are mixed in the same way as pastry, but with softened instead of cold butter. This makes it hard to roll out, but gives you that characteristic shortbread crunch and really crumbly texture.

American cookies usually have a lot more sugar and some extra liquid or egg. They are usually designed to be scooped into balls and then spread out in the oven, and they usually have plenty of additions – chocolate chunks, nuts, dried fruit, oats.

Looking at different cookie recipes, there is a huge variation in them (and, because I’m a complete geek, I assembled a spreadsheet to check this. I know. But it keeps me in gainful employment). Look at different people’s shortcrust pastry recipes and you’ll probably find they are almost identical. No two biscuit recipes seem to be the same. That gives you a clue – if there is a very wide range in existing recipes, that tells you that you can probably play around and adjust recipes quite safely, and still come out with something that works/is edible.

To prove that, I tested two different but basic cookie recipes for this post. Use whichever you like the sound of. When you make such plain cookies, though, remember that the taste of the butter will be very prominent, so use something good, and definitely don’t use margarine or low-fat spread.

Make sure the butter is soft before you start. If you usually keep butter in the fridge, as I do, there are a couple of things you can do. One is to get the butter out of the fridge and put it on the counter several hours before you plan to bake. Hmm. No, I don’t usually remember to do that either. Instead, I most often slice the butter I’ve weighed for the recipe into thick slices on a plate and put it into the microwave. I use 1 min bursts on the lowest setting (90W) until I can press a finger in without too much trouble. You don’t particularly want to melt it, but if part of it does, just let it stand for a bit, and then mix it all together again. For cookies, it’s not a big deal, though it will get more important next time when we move on to cupcakes…

Cookie recipe 1 – shortbread type

Baked sliced cookies 1

This is a very plain dough, and almost the only difference with recipe 2 is the much reduced amount of sugar. On its own, it’s a bit boring, but it would work well as a thumbprint cookie (where you press a depression in the centre of the cookie and fill it with jam). The contrast with something very sweet would work with this plain dough. Because it’s quite fragile, I rolled this dough into a log, chilled it, and then sliced it into discs before baking. You can also use this method to make a sweet tart case – take the discs and press them together in a tart tin to form a complete crust.

  • 200g butter, room temp
  • 100g caster sugar
  • 300g plain flour
  • 1 tsp vanilla extract
  • 1 tsp baking powder
  • 1 large egg, beaten

Put the softened butter into a bowl and add the sugar. Beat together – it will make a paste.

Add the vanilla. Put a sieve over the bowl, and add the flour and baking powder. Sift into the bowl and mix together. It will be crumbly.


Add egg and knead gently until it comes together as a dough.

Cookie dough 1
Wrap into a cylinder in baking parchment and twist the ends. Chill for about 30 minutes.

Cookie dough roll

Slice into discs about 5mm thick, and place the slices onto a baking sheet lined with baking parchment. If you want, press in chopped chocolate or coarse sugar as a topping.

Sliced dough with toppings 1

Put into the oven and bake for about 14 minutes at 150C (fan)/170C. When they’re done, they will still be very pale, but should just start to colour slightly brown at the edges.

Cookie recipe 2 – cookie type

Chocolate chip cookies 2

This is more recognisably a cookie. It won’t be chewy, but crisp instead. If you want chewy you can do a few things: use brown sugar instead of caster sugar; replace plain flour with bread flour, and beat the dough to develop the gluten a bit (you’ll need a mixer or a strong arm).

  • 200g butter
  • 300 plain flour
  • 1 tsp baking powder
  • 300g caster sugar
  • 1 tsp vanilla extract
  • 1 large egg, beaten

Cream the butter and sugar together, to make a stiff paste.

Butter and sugar 2

Add the vanilla and egg, and mix together. Place a sieve over the bowl, and add the flour with the baking powder. Sift into the bowl to make sure the two are combined. Mix together – it will form a stiff dough.

Cookie dough 2

Mix in any chunks, flavourings or other additions. For this recipe I used 70g of chopped dark chocolate.
Chocolate chip cookie dough 2

At this point you can chill the dough for 10 or 15 minutes (especially if it’s very soft) or up to a couple of days. Use a scoop or a spoon to pull off about a tablespoon at a time of dough, form it into a ball and place it on a baking sheet lined with baking parchment.

Scooped cookie dough 2

Bake for 15-20 minutes at 150C(fan)/170C, depending on how crisp you want them. As for the other cookies, you are looking for at least a little colour at the edges. These won’t colour like most cookies because they don’t contain brown sugar, so they will remain quite pale.

Variations:

Mini chocolate walnut cookies

There’s something in the air about miniature desserts. Dan Lepard profiled mini-cakes in Sainsbury’s magazine last month. Yotam Ottolenghi wrote a piece for the Guardian‘s weekend food column on miniature financiers, mini cheesecakes, mini cookies. Could the mini-dessert become (gasp) the New Cupcake? (or the new whoopie pie, by now). But foolish food trends aside, there is something quite compelling about demolishing a little cookie or a baby cake, in its entirety.

Mini chocolate walnut cookie on Flickr

Although this might look large, this is an espresso cup and saucer.

It was this that attracted me to Heidi’s Itsy Bitsy chocolate chip cookies when they appeared on her blog. I returned to the recipe recently when I wanted to make some cookies, and only then remembered that I had adapted it to be almost a one-bowl recipe, if you have a food processor. If you don’t have one, you can head over to 101 Cookbooks, and Heidi has great instructions for making this by hand. But I love the simplicity of this method, combined with the cute-factor of the tiny cookies, and the amazing toasted flavour that comes from the walnuts and the crisp edges. These are not chewy chocolate chip cookies – they are crisp little discs, with a nubbly quality from the nuts and chocolate rubble – perhaps invoking a souped-up hobnob? They are flavourful, but not cloying; crisp but not too crumbly or greasy – ideal cookie jar-cookies in other words.

Mini chocolate walnut cookies:

(adapted from 101 Cookbooks’ Itsy Bitsy Chocolate Chip Cookies)

Preheat the oven to 180°C /160°C fan / 350°F.

  • 140g dark chocolate (I used Green & Blacks cooking chocolate, 72%, but something sweeter would also work)
  • 70g walnuts

–> Break the chocolate into pieces, add the walnuts and process to rubble in a food processor.

  • 140g wholewheat self-raising flour
  • 1/4 tsp bicarbonate of soda
  • 1/2 tsp salt

–> Add to processor with the nuts and process again to mix everything together, and grind the chocolate and nuts a little finer.

–> Empty the processor contents into a separate bowl (you’ll add them back later).  Add to this bowl:

  • 110g rolled oats

–> Add to the empty processor:

  • 110g butter, softened
  • 120g dark brown muscovado sugar
  • 120g caster sugar

–> Process together until fairly smooth and creamy. Add

  • 1 large egg
  • 1.5 tsp vanilla

–> and process again until smooth, scraping down the sides to make sure it is combined fairly evenly.

–> Return the chocolate, nuts and flour to the processor.

–> Process fairly briefly to mix everything together – you don’t want to overmix, or the gluten will start to develop and the cookies will get tough. Scrape down with a spatula to make sure there are no more floury patches.

Either refrigerate (for up to two days) or use immediately. Scoop off teaspoons of mixture, roll into a small ball, less than an inch across, flatten a little with a fork and bake at 180C/160C fan for 10-12 minutes, until slightly cracked around the edge and crisp. They will crisp up further as they cool.

[Refrigerating chocolate chip cookie dough is a NY Times recipe trick, attributed to Maury Rubin of City Bakery, and it does seem to develop a bit of extra flavour, but these are fine without it as well.]

Bad-tempered Cookies

It’s quarter to midnight and I’ve just finished mopping tomato ketchup off the floor. Cookies are a nightmare. No really. I’ve had it up to here.

I was a fool. I read Adam’s enthusiastic, nay, evangelical posts about Martha Stewart’s cookie recipe and I had to give it a go. More fool me. Firstly, the recipe needed to be translated from the dreaded American cups. American cups as a baking measurement are just infuriating – for some reason the good old US of A refuses to use scales while baking, just as they cling to pounds and inches. Cups are never the same weight twice, especially when you’re talking about something like flour. Then there’s the ingredients. American All-Purpose Flour is actually somewhere between Plain Flour and Strong White Flour, and American granulated sugar is not as coarse as British granulated but not as fine as caster sugar.

So I took Adam’s recipe, and measured it carefully, substituting approximate British equivalents and … just look what happened:

Isn’t that the ugliest batch of cookies you’ve ever seen? The first set were gigantic and undercooked in the middle, the second and third batches better, but still ugly, the third set I burnt (those ones in the lower right-hand corner aren’t actually double chocolate – they just got baked for half an hour!).

Maybe it wasn’t the cookies after all – maybe they were just a karmic sign, because just after I pulled out the last baking tray, this happened:

You see, all week I’ve been avoiding a couple of kitchen chores: to scrub the kitchen floor and to wash down the skirting boards and door frames in preparation for painting them this weekend. The Ketchup Disaster ensured that I had to wipe down the skirting boards, and walls, and mop the floor. So maybe the cookies were just a sign after all: don’t waste your time on frivolous baking projects, get on the floor and clean, damn you!

So it’s Jeffrey Steingarten’s cookie recipe next – let’s hope I find a better time to try it, karmically-speaking.

Technorati Tags: ,

Better cookies

There have been occasions for cookies recently – visits with friends, the need for something sweet on a cold night, so last week I determined that I would make some Oatmeal Raisin Cookies, which always seems to suit autumn well. My first thought was for a huge batch of Oatmeal Raisin cookies from my copy of The All-American Cookie Book – they have gone down very well before, being tasty and crispy, with just the right amount of chew from the raisins. However, then I read David Lebovitz’s post on Nick Malgieri‘s Chewy Oatmeal Raisin Cookies – low fat, but still good, made with some apple sauce instead of butter. As it happened, I had a couple of Bramley apples sitting in the fridge, so it seemed fated that I should try this recipe instead of my normal one. And I have to say it turned out very well – the cookies are chewy, but softer and moister than my usual ones, and without the usual shortening and butter combo, you can feel extra-virtuous about eating them!

I converted the recipe as posted by David into metric, and also added some spices that I usually add to the other recipe – and they worked very well.

140g plain flour
1 tsp baking powder
1/2 tsp bicarbonate of soda
1/4 tsp ground ginger
1/4 tsp ground cinnamon
1/2 tsp salt
30g butter, softened
100g caster sugar
90g light brown muscovado sugar
1 large egg
70g unsweetened apple sauce
1 tsp vanilla extract
135g rolled oats
85g raisins

Preheat the oven to 190C (375F, 165C fan) and line a couple of baking sheets with baking parchment.

Mix the flour, baking powder, bicarb, spices and salt together so that the leavening is evenly distributed. Set aside.
Cream the butter with the caster sugar (it will be much stiffer than usual) for 4 or 5 minutes. Mix in the brown sugar, followed by the beaten egg, apple sauce, and vanilla. I used my electric mixer for all this, but it’s all perfectly possible with a wooden spoon. Stir in the flour, oats and raisins until just combined – do not beat hard. Spoon tablespoons of the mixture (a bit smaller than a golfball) onto the baking sheets, and press with a fork to flatten a little. (I forgot this on the second sheet, but it didn’t seem to make very much difference).

Bake for 10-12 minutes, until they look dull on the surface, but are moist and soft, and are just golden at the edges.