Friday food links – 24 Oct 2014

Christmas cake fruit is ready for brandy #lifewithbaby #naptime

Starting to look forward to winter now (and even countenancing the C-word – I made my Christmas cake last weekend).

Finally, my little girl is six months old today. Happy half-birthday, my gorgeous girl. It’s been so much fun getting to know you – I can’t wait for all the adventures we’ll have in the next six months.

E is six months old.

Friday food links – 17 Oct 2014

Copper beech leaves are falling

I managed to get some autumnal baking in this week with grape schiacciata, plum and almond cakes, and oatmeal, raisin and coconut cookies. Hoping to get time today to finish off Mary Berry’s Bara Brith.

Friday food links – 10 Oct 2014

What a stunning morning #nofilter

New food magazines keep popping up at the moment. If you’re lucky enough to live in the US, Jennifer Perillo is publishing her own quarterly magazine on Simple Scratch Cooking. If you’re in the UK, you can always buy her cookbook instead.

And in the UK, Toast, who organise foodie events, have a Kickstarter running to print their first magazine.

I love Shutterbean’s photos of meal prep (there’s also a post about how she prepares for the week ahead)

Justin Gellatly’s St John doughnuts were a major reason for me to hike across London to Maltby Street Market on the odd weekend. Then he went and opened his own bakery and cooking school, Bread Ahead, in Borough Market. They make the same impressive doughnuts in even more outrageous flavours. Meanwhile, I went and had a baby, and haven’t been back to either Borough Market or Maltby Street since. So this film about Justin and his ‘custard grenade’ doughnuts is *not helping*.

And while I pine for Bread Ahead doughnuts, it looks like Joy the Baker’s cinnamon sugar popovers might do the trick. (See also: Bea’s duffins).

Friday food links – Saturday 4 Oct 2014

IMG_5863

Sorry, late with this one – the week rather got away from me. Autumn is definitely here now – a wet and blustery day today. Time to break out the cast iron pot.

Friday food links – 26 Sept 2014

IMG_5820

Friday food links – 19 Sep 2014

Dukkah

Summer is still just hanging on, even as the conkers tumble down (causing me to lower the pushchair hood, just in case). I’m starting to get better at breaking recipes into stages, so that I can get things done between naps/feeds/shouts.

Friday food links

First conker

Glad that the glorious weather continued for a few days after we got back from holiday. However, I seem to have already switched to autumn mode for cooking: we’ve had toad-in-the-hole, mushroom risotto and Rosie Ramsden’s beef shin chilli for dinner this week.

Behind the sweets – part 2 – chocolate and tempering

Dipped truffles 2

This is part two looking at the techniques used in the BBC series ‘Sweets Made Simple‘. Part 1 looked at sugar work and caramel.

Kitty Hope encourages you to temper chocolate for any of the recipes that involve making a chocolate shell or cup to contain a filling. She also makes it look quick and simple – which it is if everything goes right. But why bother tempering chocolate, rather than just melting it?

As they say on the programme, tempered chocolate is smooth & shiny and has a ‘snap’ when you break or bite it. It will also shrink away from moulds, making it easy to unmould, and resists melting on your fingers, but melts all at once on your tongue. All chocolate bars that you buy should be tempered when you get them.

To see the difference, break up part of a bar of chocolate (dark shows the difference most clearly, because it only contains cocoa fat (cocoa butter) and no milk fat). Something like a bar of Lindt 70% is usually well tempered and you can really hear the snap with the thin squares. Melt a couple of squares, stir it around and leave them to set again on a piece of baking parchment – something you can peel them off easily.
When they are solid again, you will likely be able to see swirls and speckles of white on the surface, and if you break it, it will seem more crumbly than the stuff straight from the packet. Added to this, if you taste it, it will melt less smoothly, perhaps tasting a bit grainy.

untempered chocolate

Why the difference?
Cocoa fat/cocoa butter turns put to be quite complicated stuff that can form six different types of crystals. Tempered chocolate contains just one or two types that stack neatly together and melt all at the same temperature. When you melt and resolidify chocolate without tempering, you get a mix of all the types, melting at different temperatures, and stacking together in a jumbled way.

Tempering melts all the crystals out, then, by controlling the temperature, encourages just the good crystals to form.

So with tempering, you’re trying to encourage even crystals to form; with sugar work, you’re usually doing everything to prevent those nice even white sugar crystals forming in your syrup.

How to temper chocolate

I won’t provide a list of steps for tempering chocolate, as others have done this much better:

Kitty Hope from the series has this article on how and why to temper chocolate.

Alice Medrich, Californian chocolate queen, goes into some detail about the method and pitfalls of tempering.

Using tempered chocolate

Some of the things you can use tempered chocolate for:

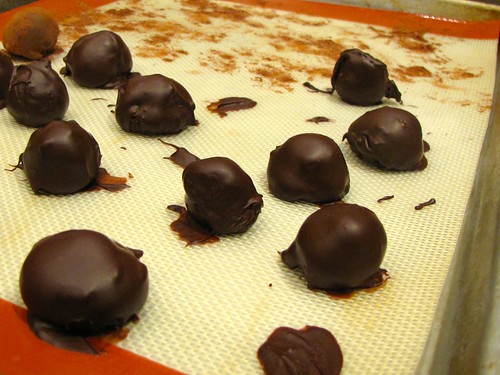
  • Coating chocolate truffles
  • Making chocolate shells or cups to fill with ganache or cream
  • Dipping candied orange peel to make orangettes
  • Coating biscuits or florentines
  • Dipping fruit such as cherries

Friday food links

Untitled

A brief post due to being on holiday in sunny Devon this week. Today’s mission: cream tea!

Banana granola

Banana granola

I have always been keen on breakfast. I can’t leave the house without it, and if I am forced, by travel or illness, to miss out, I know I will feel worse for the rest of the day. My pre-baby regime was a bowl of cereal and muesli at home, usually followed by a muffin, a smoothie or a pot of yoghurt and fruit at the office.
Post-baby, breakfast has taken on a talismanic importance. The first meal after a long night, I load up my bowl with as much cereal, muesli and fruit as it will hold, and then hope that baby will sleep long enough for me to finish it!

I tend to eat granola as a sprinkling on top of this bowl, rather than having it on its own. This is somewhat healthier, as well – if you’re going to eat granola, you need to come to terms with the fact that it’s basically another form of biscuit.
This recipe is better than most, with a fairly scant amount of fat and sugar. The bananas provide the additional sweetness and stickiness that is needed for the oats to stick together a little. I tend to use brown rice syrup because I keep it around for another granola recipe (Nigella’s Fairfield granola), and because I find it leads to a crunchier result than either honey or golden syrup.

Banana granola recipe

I got this recipe from Green Kitchen Stories. It perfectly fit the brief of a simple-to-make granola, with the added benefit of using up a couple if ripe bananas. What I wasn’t expecting was the fruitiness of the mix – not precisely smelling of bananas, but a harder-to-place fruit fragrance. Combined with the coconut oil, this is a wonderful scented granola, with a texture balanced between crisp and chewy. It’s the perfect thing to have for an energizing breakfast after a sleep- interrupted night with a newborn.

Recipe lightly adapted from Green Kitchen Stories

Banana Granola

  • 375 g rolled oats
  • 150 g flaked almonds (or chopped whole almonds, or a mixture)
  • 150 g pumpkin seeds (or a mixture of other seeds – sunflower, sesame, flax)
  • 1 pinch sea salt
  • 2 tbsp coconut oil
  • 2 tbsp vegetable oil
  • 2 tbsp runny honey or maple syrup
  • 2 tbsp brown rice syrup (or replace with honey/maple syrup)
  • 2 large, very ripe bananas, peeled and mashed

Warm the coconut oil, vegtable oil and syrups or honey until all is combined. (I use a table spoon to measure the vegetable oil first, then the syrup, so it slides out).
Break the bananas into the mix in pieces and mash until smooth.
Mix the liquid with the oats and nuts.
Spread on an oiled baking tray and toast for around 30-40 minutes at 160C/140C fan, or until some of the oats and almonds have become golden brown.